”M5AtomLite”と”M5Core2”の間で、 bluetooth通信(BluetoothSerialクラス)

1.動作概要
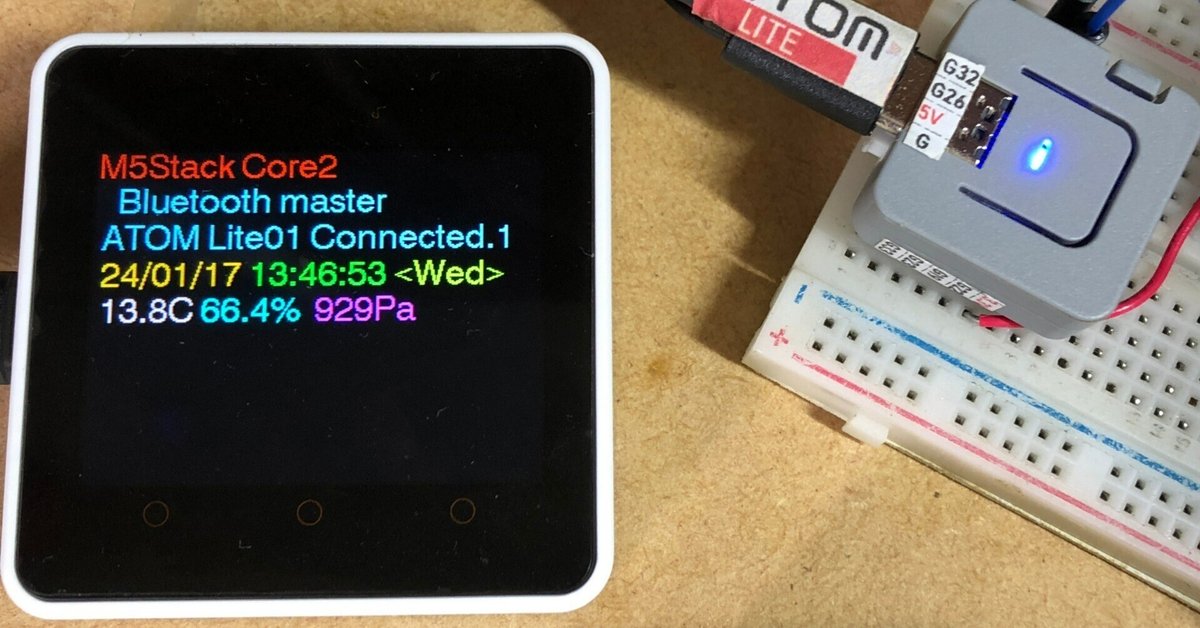
2台のM5マイコン同士 を、peer to peerで、ブルートゥース通信を行いました。BluetoothSerialクラスを使用します。通信が何らかの理由で切断されても、自動再接続できるようにしました。ですが、実際に運用してみないと、
どうなるかわかりません。とりあえず、室内では、動作しています。
<マスター、スレーブの決定>
Core2: bluetooth マスター
AtomLite: bluetooth スレーブ
2.ATOM側スレーブデバイス
AtomLiteスレーブデバイスは、BluetoothSerialクラスインスタンスを作ったあとは、日時とENV3の温湿度データを送信しているだけです。
パソコンのbluetoothアダプタと通信するようなコードです。
実際のコード
RTCとENV3の処理
初期化関数などは、自作のものなので、わかりにくいですが、とにかく、
bluetoothSerialインスタンスで、送信しているだけです。
/**
 * M5 ATOM Lite bluetooth com
 * Core2がマスター待ちの状態。
*/
#include <M5Atom.h>
#include <BluetoothSerial.h>
#include "myENV3.h"
#include "myDS3231.h"

BluetoothSerial SerialBT;
uint16_t cnt;
CRGB color;
std::string str;

void setup()
{
  //ATOM初期化 (Serial, I2C Wire0, RGBLED)
  M5.begin(true,false,true);
  //ENV3初期化
  Wire.begin(26,32,400000U);
  env3 = new ENV3(&Wire);
  //DS3231初期化-------------------------------------------------------
  Wire1.begin(25,21,400000U);
  rtc.init(&Wire1, &Serial);
  //bluetooth開始
  SerialBT.begin("ATOM01");
  //SerialBT.println("ATOM Lite bluetooth");
  //Serial.println("ATOM Lite Start");
}

static String timestring;
void loop()
{

  if(cnt==33)
  {
    //RTC時間表示------------------------------------------------
    DateTime now = rtc.now();
    rtc.WriteDateTimeToString(&now);
    timestring = rtc.dateString +"D"+ rtc.timeString +"T" +rtc.weekString+"X";
    //Serial.print(timestring);
  }


  if(cnt==33)
  {
    cnt=0;
    if(color == CRGB::Green)
    {
      color = CRGB::Blue;
    }else
    {
      color = CRGB::Green;
    }
    M5.dis.drawpix(0,color);
    if(env3->sht30.get()==0)
    {
      env3->tmp = env3->sht30.cTemp;
      env3->humi = env3->sht30.humidity;
      env3->pressure = env3->qmp6988.calcPressure()/100;
      //SerialBT.printf("%2.1fC %2.1f%% %4.0fpa\r\n",env3->tmp,env3->humi,env3->pressure);
      SerialBT.printf("%S%2.1fC %2.1f%% %4.0fPa\r\n",
                        timestring.c_str(),env3->tmp,env3->humi,env3->pressure);
    }else
    {
      env3->tmp=0;
      env3->humi=0;
      SerialBT.printf("nonDdata\r\n");
    }
  }

  cnt++;
  delay(10);
}
ATOM Lite 自身のMacアドレスの表示させるコード。
uint8_t bt_mac[6];
  //bluetoothクライアントアドレスの表示
  esp_read_mac(bt_mac, ESP_MAC_BT);
  Serial.printf("%02X:%02X:%02X:%02X:%02X:%02X\n",
                 bt_mac[0], bt_mac[1], bt_mac[2], bt_mac[3], bt_mac[4], bt_mac[5]);
3.Core2側マスターデバイス
一方、Core2マスターデバイスは、BluetoothSerialクラスインスタンスを開始するときに、マスターで起動するように指定します。
#include <M5Unified.h>
BluetoothSerial SerialBT;
<略>
setup()
{
   SerialBT.begin("Core2", true);//第2引数をtrueにすると、マスターモードで起動。
<略>
BluetoothSerialクラス beginメソッドの内容。ファイル:BluetoothSerial.cpp
/**
 * @Param isMaster set to true if you want to connect to an other device
 */
bool BluetoothSerial::begin(String localName, bool isMaster)
{
    _isMaster = isMaster;
    if (localName.length()){
        local_name = localName;
    }
    return _init_bt(local_name.c_str());
}
まず、SerialBT.begin("Core2", true);を実行して、マスターモードを起動させました。
<Core2側 コネクションの確立>
さらに、Core2側は、connectメソッドを使用して、スレーブデバイスと接続を試みます。オーバーライドがいくつかあります。
bool connect(String remoteName)
bool connect(uint8_t remoteAddress[], int channel=0, esp_spp_sec_t sec_mask=(ESP_SPP_SEC_ENCRYPT|ESP_SPP_SEC_AUTHENTICATE), esp_spp_role_t role=ESP_SPP_ROLE_MASTER);
bool connect(const BTAddress &remoteAddress, int channel=0, esp_spp_sec_t sec_mask=(ESP_SPP_SEC_ENCRYPT|ESP_SPP_SEC_AUTHENTICATE), esp_spp_role_t role=ESP_SPP_ROLE_MASTER) {
			return connect(*remoteAddress.getNative(), channel, sec_mask); };
bool connect();
実際の使用したコード
connected = SerialBT.connect(address);//in10秒ぐらいでタイムアウトconnectメソッドがtrueを返信したら、接続完了です。
#include <M5Unified.h>

<略>
//bluetooth deviceAddress
uint8_t atomlite1_address[6] = {0x--,0x--,0x--,0x--,0x--,0x--};

<略>

void bluetoothSerialBegin(uint8_t *address)
{
  bool ret=false;
  //isMaster set to true if you want to connect to an other device
  SerialBT.begin("Core2",true);//Master mode
  Serial.println("begin connect");
  M5.Display.setCursor(0,53);
  if(btConnectCounter!=0)
  {//リトライ接続時の表示
    M5.Display.setTextColor(CYAN);
    M5.Display.print(" Now Search the device.");
  }
  M5.Display.setCursor(0,53);

  //bluetoothデバイスサーチと接続
  //advertisingパケット受信。
  //ATOMLite側のアドバタイズは停止していない。
  int times=0;
  do
  {
    connected = SerialBT.connect(address);//10秒でタイムアウト
    Serial.printf("%d connected=%d ",times,connected);
    times++;
    if(times==30)
    {
      Serial.println("error:connect timeout");
      M5.Display.println("connect timeOut");
      break;
    }
  }while(!connected);
  Serial.println("");
  delay(30);
  if (connected)
  {//接続成功
    btConnectCounter++;
    Serial.printf("Connected Succesfully!\n\r");
    M5.Display.fillRect(0,53,320,28,BLACK);
    M5.Display.setTextColor(SKYBLUE);
    M5.Display.printf(" ATOM Lite01 Connected.%d\r\n",btConnectCounter);


  } else
  {//接続失敗
      while (!SerialBT.connected(10000)) {
          Serial.println("Failed to connect.");
          M5.Display.drawString(" Failed to connect.",0,50);
      }
  }
}
<Core2側 loop関数内で接続チェック>
loop関数内でAtomLite側との接続を随時チェックします。接続が切れていたら、再接続します。あと、ATOMから送られてくる日時データのフォーマットは、”24/01/16D 18:30:12T TueX\n”
で送ってきます。これを受信、D,T,Xを見つけて、日付、時間、曜日の文字列を取り出しています。
int cnt;//表示間隔調整用カウンタ
void loop()
{
  if(SerialBT.available()>10)
    {
        String str = SerialBT.readStringUntil('\n');
        uint length = str.length();
        Serial.print("echo=> ");
        Serial.print(str);
        Serial.printf("length=%d\r",length);
        M5.Display.setTextColor(WHITE);
        M5.Display.setCursor(0,80);
        M5.Display.fillRect(0,80,320,50,BLACK);
        //日時文字列とりだし。
        int l = findIndex(str, 'D');
        String dateStr = str.substring(0,l);
        int m = findIndex(str, 'T');
        String timeStr = str.substring(l+1,m);
        int n = findIndex(str,'X');
        String weekStr = str.substring(m+1,n);
        //ENV3センサー文字列とりだし。
        String envStr  = str.substring(n+1,length-1);
        l = findIndex(envStr,'C');
        String tempStr = envStr.substring(0,l+1);
        m = findIndex(envStr,'%');
        String humiStr = envStr.substring(l+2,m+1);
        n = findIndex(envStr,'P');
        String presStr = envStr.substring(m+2,n+2);
        //ディスプレイ表示
        M5.Display.setTextColor(ORANGE);
        M5.Display.print(" "+dateStr+" ");
        M5.Display.setTextColor(GREEN);
        M5.Display.print(timeStr+" ");
        M5.Display.setTextColor(GREENYELLOW);
        M5.Display.println("<"+weekStr+">");
        M5.Display.setTextColor(PINK);
        M5.Display.print(" "+tempStr+" ");
        M5.Display.setTextColor(CYAN);
        M5.Display.print(humiStr+" ");
        M5.Display.setTextColor(MAGENTA);
        M5.Display.print(presStr);
    }
//接続チェック
    while(!SerialBT.connected())
    {//接続してないのがわかったら、
        M5.Display.setCursor(0,80);
        M5.Display.fillRect(0,80,320,50,BLACK);
        M5.Display.setTextColor(RED);
        M5.Display.println("error:can't communicate.");
        // Bluetooth通信を終了する条件が満たされた場合
        //if(SerialBT.disconnect())// Bluetooth切断
        SerialBT.end();
        // 一定時間待機(必要に応じて)
        Serial.println("Bluetooth communication end");
        M5.Display.println("Bluetooth end.");
        delay(10000);
        //再接続
        M5.Display.fillRect(0,53,320,100,BLACK);
        bluetoothSerialBegin(atomlite1_address);
    }
    delay(5);
}
今のところこれで、再接続できています。
<Bleutooth用語>
INQ Inquiry
BluetoothのINQ(Inquiry)は、Bluetoothデバイスの探索や検出プロセスを指します。Bluetoothデバイスは他のデバイスと通信する前に、その周囲に存在する他のBluetoothデバイスを検出する必要があります。この検出プロセスがINQです。
GAP(Generic Access Profile)
は、Bluetooth通信において、デバイスの発見や接続などの基本的なアクセス機能を定義するプロファイルです。GAPは、Bluetoothデバイスが互いにどのように通信し、検出され、接続されるかを統一するための標準を提供します。
<補足 ESP32 IDF>
connectメソッドの内容を探っていくと..
/**
 * @brief       This function is called to init SPP module.
 *              When the operation is completed, the callback function will be called with ESP_SPP_INIT_EVT.
 *              This function should be called after esp_bluedroid_enable() completes successfully.
 *
 * @param[in]   mode: Choose the mode of SPP, ESP_SPP_MODE_CB or ESP_SPP_MODE_VFS.
 *
 * @return
 *              - ESP_OK: success
 *              - other: failed
 */
esp_err_t esp_spp_init(esp_spp_mode_t mode);
/**
* @brief This function is called to performs service discovery for the services provided by the given peer device.
* When the operation is completed, the callback function will be called with ESP_SPP_DISCOVERY_COMP_EVT.
* This funciton must be called after esp_spp_init() successful and before esp_spp_deinit().
*
* @param[in] bd_addr: Remote device bluetooth device address.
*
* @return
* - ESP_OK: success
* - other: failed
*/
esp_err_t esp_spp_start_discovery(esp_bd_addr_t bd_addr);この記事が気に入ったらサポートをしてみませんか?