Diffusersの複数機能も簡単に扱えるDiffusersPipelineManagerを公開 (コードの解説と使い方)

この記事について
DiffusersはStable-Diffusionを始め、音声や、3Dにも対応する、拡散モデルのためのライブラリ群です。この記事ではStable-Diffusionによる画像生成をプログラミングで操作するためにDiffusersの機能を利用し、多岐にわたるDiffusersの持つ機能を纏めてアプリ開発で便利に利用できるような機能とするためにPythonによるクラス化を行いました。Diffusersの概要には、「 Our library is designed with a focus on usability over performance, simple over easy, and customizability over abstractions.(参考和訳:Diffusers は、画像、音声、さらには分子の 3D 構造を生成するための、最先端の事前トレーニング済み拡散モデルの頼りになるライブラリです。シンプルな推論ソリューションを探している場合でも、独自の拡散モデルをトレーニングしたい場合でも、🤗 Diffusers は両方をサポートするモジュール式ツールボックスです。私たちのライブラリは、パフォーマンスよりも使いやすさ、簡単よりもシンプル、抽象化よりもカスタマイズ性に重点を置いて設計されています。)」とあり、クラス化は太字部分を犠牲にしてしまいそうでが、特別な抽象化をしているわけではない、ソースコードを公開しているので誰でも機能の追加や改良によりカスタマイズが容易に出来ること、などDiffusersの持つ特徴は継承出来ていると思います。本稿ではStable-Diffusionの主な生成手段であるt2i、i2i、inpaint機能を共通のpipelineを利用して少ないVRAMでも実行できるように工夫しています。VRAMに余裕があればControlNET用のpipelineを定義した上で、上記pipelineと併用することも可能です。利用できるモデルはSDXL専用としてコードの簡略化を行いました。ただしSDXLモデルの扱いやLCMによる高速化は複雑ですし、SD-1.5 で使えた機能が全て使えるわけではないこと、使えるControlNETが制限されることなど改良の余地はたくさん有ります。この記事ではt2i/i2i/inpaintとDiffusersにある公式ControlNETのcanny/openpose/depth/openpose-cannyの実装、及びに使い方について説明いたします。
制限事項
モデルのバージョン SDXLのみに限定
モデルのロード 事前ダウンロードしたsafetensor形式をロード
パスとファイル名で指定
LoRAのロード ダウンロード済LCM-LoRA及び学習済みsafetensor
パスとファイル名で指定
GPU VRAM12G以上、RTX3000番代以降を推奨
機能検証 多様な機能とパラメータを全て検証していない
生成画像 生成品質については向上の努力をしたわけではない
DiffusersPipelineManagerで出来ること
生成手法
t2i / i2i / inpaint / canny / openpose / depth / openpose-canny
pipelineの初期化
ー生成したいpipeline指定機能
ーモデルロード
ーVAE設定
ーLMCスケジューラとLMC-LORA機能による高速化
ーStyle-LoRA(学習済キャラLoRA、公開されているLoRAなど)のバインド
無制限のバインド(リスト化したLoRA/アダプタ名/ウエイト使用)
ーUNETによる高速化
ーLCMの無効化
画像の生成
ーpipelineの指定
ープロンプトエンべデッディングと重み付け
Compelni : トランスフォーマータイプのテキストエンべデッディングと テキストプロンプトの重み付けおよびブレンディング
ーネガティブプロンプト
ープロンプト毎の生成枚数指定
ープロンプトの効き具合の調整
ーseedの指定(マニュアル、自動ランダム)
ー画像の大きさ(高さx幅)
ーGuess モード(注)
ーFreeUによる生成品質の向上
ー出力画像形式(pil/ndarrey)
ーCrop conditioning(注)座標をずらした生成
ーその他、各pipelineに特有なパラメータの指定
提供するクラス
class DiffusersPipelineManager クラスの定義。
以下のクラスが使用できる
(1)pipeline_init() pipeline作成
(2)prompt_embedding() Compelによるプロンプトのembedding
(3)load_image_img() 画像のロード
(4)generate() t2i/i2i/inpaint画像の生成
(5)generate_controlnet() ControlnetNETパイプ用画像生成
(6)generate_t2a_adapter() T2I-Adapterが使うpipeの画像生成
生成画像例
DiffusersPipelineManagerの使い方
画像生成するまでの流れ
(1)pipelineを初期化する
生成に必要なpipelineを準備します。生成方法ごとにpipelineが異なる
ので、利用する生成方法に必要なpipelineを予め生成します。
(2)画像生成に必要なデータの準備
プロンプトの準備やレファレンスイメージ、マスクイメージの読み込み
SEEDの設定、prompt_embeddingの準備
(3)画像の生成
作成したpipelineに準備したデータを渡して生成します。
(4)生成された画像リストから画像を取り出す。
画像はリスト形式で並んでいます。必要な画像を取り出して利用します
(1)pipelineを初期化する
t2i / i2i / inpaint / canny / openpose / depth / openpose-canny各生成方法毎にpipelineを準備します。以下は設定例です。全てを設定するには大きなVRAMが必要です。t2i / i2i / inpaintを共通pipeにてContoroleNETのpipelineを2種類生成すると16G以上必要になります。推奨は、
t2i、i2i_pipe、inpaint_pipeを生成(共通pippeline)し、1種類のContorolNET用pipeline作成までです。
 #パイプ作成  LCM有効の時
pipe_t2i=Df.pipeline_init("t2i",model=model)
pipe_i2i=Df.pipeline_init("i2i",model=model)
pipe_i2i=Df.pipeline_init("i2i_pipe",pipeline=pipe_t2i) #t2i  pipelineの使い回しによる定義
pipe_inpaint=Df.pipeline_init("inpaint_pipe",pipeline=pipe_t2i) #t2i  pipelineの使い回しによる定義
pipe_canny=Df.pipeline_init("canny",model=model)  #Canny  ContorolNET用pipeの新規定義
pipe_openpose=Df.pipeline_init("openpose",model=model)  #openpose  ContorolNET用pipeの新規定義
pipe_canny_openpose=Df.pipeline_init("canny_openpose",model=model) #ContorolNET用pipeの新規定義 ,Canny+openpose
pipe_t2i_adapter=Df.pipeline_init("t2i_adapter_canny",model=model, lora_en=False)#2i_adapter用 #LCMを有効にしないSDXLモデル用のパイプ定義
pipe_t2i=pipeline_init("t2i",model=model , vae_en=False , lcm_lora_en=False , lora_en=False,  set_unet=False)
設定オプション
mode:str="t2i",
ー指定できるpipe名 t2i/i2i/canny/i2i_pipe/inpaint_pipe/canny/openpose
/canny_openpose/depth/t2i_adapter_canny pipeline=None, ーpipeloneの再利用の時に参照する生成済みpipeline名指定
ーデフォルト:無し
model:str=None
ーロードするSDXLモデル名 デフォルト:無し
vae_en:bool=True
ーVAE有効無効設定 デフォルト:有効
vae_path:str=None
ーVAE有効時のVAEへのパス デフォルト:無し
lcm_lora_en:bool=True
ーLCM-LoRA有効無効設定
無効にするとLCM-LoRAとLCMスケジュ-ラがロードされない
デフォルト 有効
lcm_lora_path=None
ーLCM-LoRA有効のLCM-LoRAへのパス デフォルト:無し
lora_en:bool=True
ーStyle-LoRAの有効無効設定 デフォルト 有効
lola_models:list=None
ーStyle-LoRAの有効時のStyle-LoRAへのパスリスト
複数のStyle-LoRAをロード出来る デフォルト:無し set_unet:bool=True
ーUNETの有効無効設定 デフォルト 有効
デフォルト値設定
DiffusersPipelineManagerクラスで定義している重要パラメータです。pipeline作成時に指定するとオーバーライドされます。指定時の参考にしてください。 なお、ControlNETで使用する重みなどはコード中にハードコードされています。適時書き換えてください。
VAE
self.org_vae = "madebyollin/sdxl-vae-fp16-fix"
ここはダウンロードしていなくてもHuggingFaceのIDでokです。
model
self.org_model="./models/animagine-xl-2.0/animagine-xl-2.0.safetensors"
LoRA
以下のようにLoRAを[LoRAパス、アダプタ名、ウエイト]のように順番にリストに記述します。そしてself.org_lora_model_list中に並べます。
self.org_lora_model_list=[
["./models/animagine-xl-2.0/megu_sports_sdxl_v02.safetensors","style",0.8],
["./models/animagine-xl-2.0/anime-detailer-xl.safetensors","detaile",1.0], ["./models/animagine-xl-2.0/style-enhancer-xl.safetensors","enhancer",0.5]]
Compal プロンプトエンべデッディング用プロンプトの準備
以下はわかりやすくした参考例です。実施に利用して生成していません。
動かしているself.prompt_embeはコードを参照下さい。
self.prompt_embe=["masterpiece, best quality, 1girl, solo, flower, long hair, outdoors, letterboxed, school uniform, day" , "at shcool park"]
LCM-LoRA
self.lcm_lora="./models/SSD-1B-anime/lcm-ssd1b-anime.safetensors"
(2)生成の準備
生成方法毎に異なるので、各サンプルコードを見ていただくと確実です。
プロンプト
prompt =”テキスト”
プロンプトをCompalを使用してエンべデッディングする場合
prompt_embe=[”テキスト1” , "テキスト2"]
conditioning, pooled = Df.prompt_embedding(pipe_i2i,prompt_embe)
生成pipeline中ではプロンプトの代わりにconditioning, pooledを指定
ネガティブ・プロンプト
negative_prompt = 'low quality, bad quality, sketches'
画像の読み込み(レファレンス、オリジナル、マスクなど)
load_image_imgを利用して読み込むことが出来ます。
ファイルパス又はurl指定ができます)
image =Df.load_image_img("MIKU.png")
SEED
以下の例ではTorchが必要です。改善の余地は有ります。
generator = torch.manual_seed(19872631 )
generator = torch.random_seed(19872631 )
Canny画像
original_image = Df.load_image_img("haikei.png")
image = np.array(original_image)
image = cv2.Canny(image, 100, 200)
のように記述するか、以下を利用します。
canny_image =Df.get_canny(image).resize((1024, 1216))
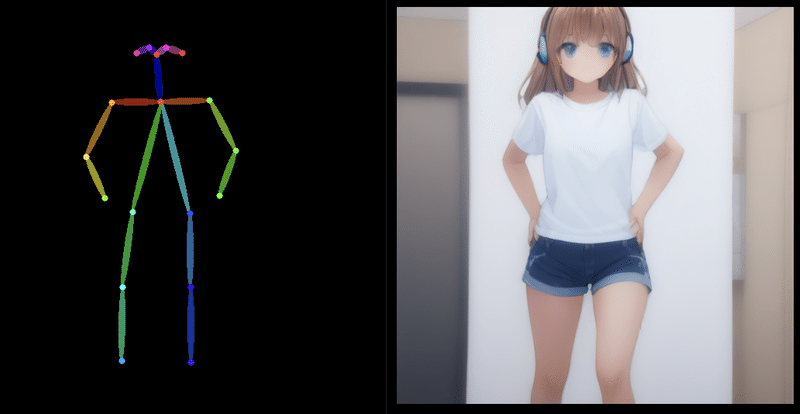
OPENPOSE画像
以下のようにDf.get_openposeを使用します。
openpose_image = Df.get_openpose(original_image)
Depthイメージの準備
Df.get_depth_mapを使います。
depth_image = Df.get_depth_map(image)
(3)画像生成
生成時に設定出来るオプション
pipe 利用するpipeを指定。必ず指定しなければならない。 image=None,
入力イメージを指定する。パスではなくイメージオブジェクト
(PILが標準、CV2も使えるはず(ためしていない)
mask_image=None,
インペイントなどのマスクイメージを指定。パスではなくイメージオブ ジェクト(PILが標準、CV2も使えるはず(ためしていない)
embe:bool=True,
プロンプトエンべデッディング有効・無効。
有効時はCONPLEによるエンべディングを行う。
プロンプトのウエイト指定も可能
ウエイト指定の例 prompt = "a red cat++ playing with a ball----"
+はprompt Enhace /-は Reduce
prompt:str=None,
プロンプト 文章も使えます。ただし英語のみ
conditioning=None,
pooled=None,
conditioningとpooledはプロンプトエンべデッディングで
CONPLEから得られる変数を記述
negative_prompt=None,
ネガティブプロンプト
num_inference_steps:int=4,
生成時のSTEP、大きと画像が綺麗になる。lmcは4が標準、適時上げる
strength:float=0.1,
プロンプトの効きを調整する0〜1.0
guidance_scale:float=1.0,
ガイダンススケール 1.0で無効、大きいと生成時間が伸びる。
上げればプロンプトが反映される。画像がきれいになるわけででない
generator=None,
SEEDを指定する。
例 generator = torch.manual_seed(0 )でマニュアルでSEED指定
height:int = None,
画像の高さを指定する
width:int = None,
画像の幅を指定する
num_images_per_prompt:int = 1,
プロンプトあたりの生成画像数を指定して複数生成させることが出来る
guess_mode:bool=None,
ガウシアン効果の有効無効指定
freeu:bool=False,
freeu効果の有効無効指定。有効にすると生成画像が鮮やかな色になる。
output_type:str="pil",
画像出力形式を指定する。ndarreyが指定可能("nd")
crops_coords_top_left=(0, 0),
生成する主画像の位置を指定する
controlnet_conditioning_scale=1.0,
コントロールネットの効き具合を指定する
T2I-Adaper特有のパラメータ
adapter_conditioning_scale:float=None,
adapter_conditioning_factor:int=None,
アダプタの効き具合の設定をする
(3)-1a t2iを使う
定義したパイプラインを用いてgenerateクラスを呼びます。
エンべデッディング有りの例。すでにpipelineはpipe_t2iとして定義ずみなので、ここでは流用しています。
    prompt_embe=["masterpiece, best quality, 1girl, solo, flower, long hair, outdoors, letterboxed, school uniform, day, sky, looking up, short sleeves, parted lips, shirt, cloud" "black hair, sunlight, white shirt, serafuku, upper body, from side, pink flower, blurry, brown hair, blue sky, depth of field",
          "at shcool park,"]
    conditioning, pooled = Df.prompt_embedding(pipe_t2i,prompt_embe)
    image_count=2
    generator = torch.manual_seed(0 )
    x_image_list= Df.generate( pipe_t2i,
                             conditioning=conditioning ,
                             pooled=pooled ,
                             generator =generator,
                             height = 512, width = 512,
                             num_images_per_prompt=image_count,
                             freeu=True ,
                             )
(3)-1b t2iを使う embe=False
エンべデッディング無しの例。
(3)-2 i2iを使う
i2iはt2iのpipelineを流用する方法と、独自にi2i専用pipelineを定義する方法が有ります。サンプルには両方のコードを記述しましたが、ここではt2iのpipelineを流用する方法で生成を試します。
pipe_i2i=Df.pipeline_init("i2i_pipe",pipeline=pipe_t2i)#pipelineの使い回し
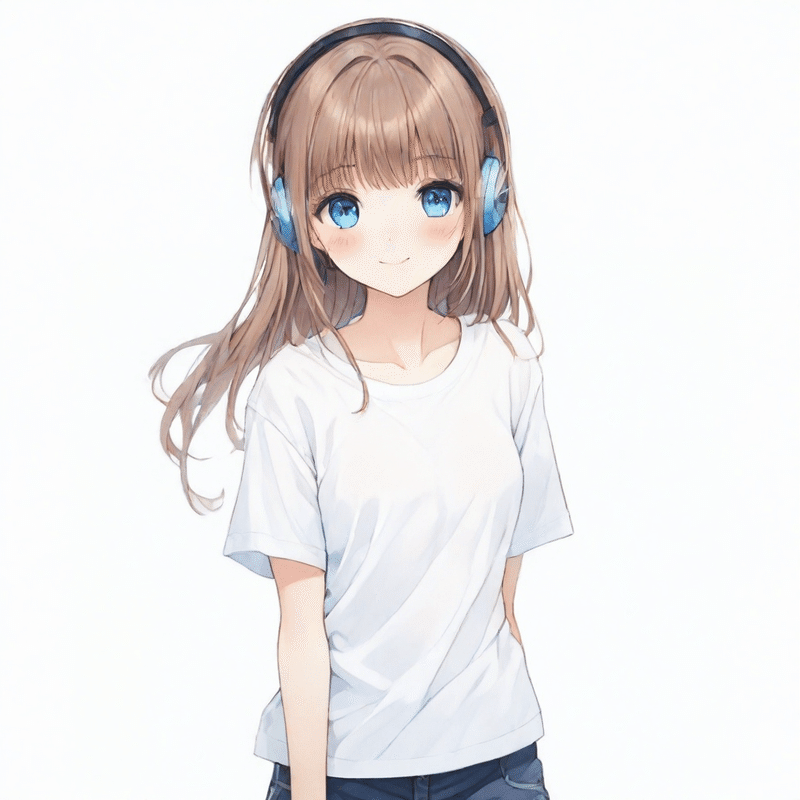
prompt = "masterpiece, best quality, 1girl, solo, long hair, white shirt, serafuku, brown hair,looking at viewer,blush,smile, bangs,blue eyes, simple background,t-shirt,white background,closed mouth,standing,white t-shirt,shorts, short shorts,headphones,black shorts,light brown hair,blue shorts ,running"
##pipe_i2i=load_textual_inversion(pipe_i2i)
conditioning, pooled = Df.prompt_embedding(pipe_i2i,prompt_embe)
image =Df.load_image_img("MIKU.png")
generator = torch.manual_seed(0 )
conditioning, pooled = Df.prompt_embedding(pipe_i2i,prompt_embe)
x_image_list = Df.generate( pipe_i2i,
image=image,
prompt=prompt ,
conditioning=conditioning ,
pooled=pooled ,
negative_prompt="worst quality",
generator=generator,
freeu=True,
num_inference_steps=6,
strength=0.5,
guidance_scale=1.0
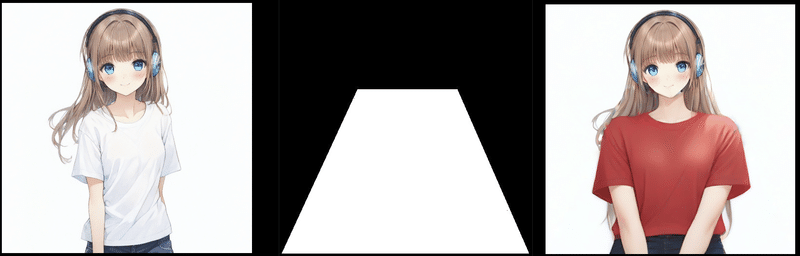
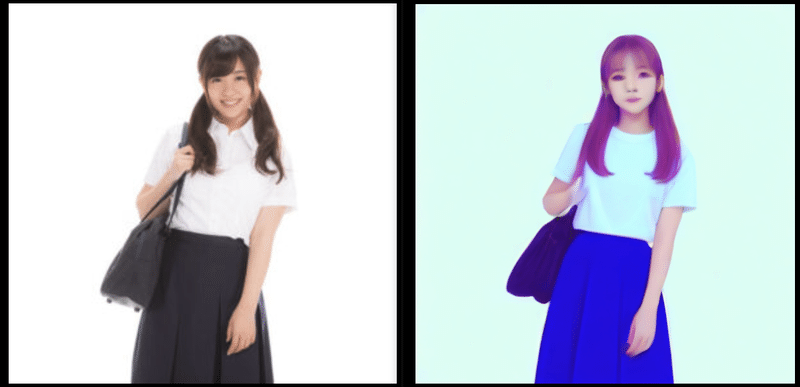
)(3)-3 inpaintを使う
inpaintのpiplineはt2iやi2iが流用できます。DiffusersPipelineManagerでは流用コードしか実装していません。以下生成画像です。プロンプトは
prompt = "masterpiece, best quality, 1girl, solo, long hair, red t-shirt,simple background,white background"
でred t-shirtが効いています。
    pipe_inpaint=Df.pipeline_init("inpaint_pipe",pipeline=pipe_t2i)#pipelineの使い回し
    image=Df.load_image_img("image_lcm_lora_3.png")
    mask_image =Df.load_image_img("mask_body.jpg")
    prompt = "masterpiece, best quality, 1girl, solo, long hair, red t-shirt,simple background,white background"
    generator = torch.manual_seed(19872631 )
    x_image_list = Df.generate( pipe_inpaint ,embe=False, prompt=prompt ,
                             image=image, mask_image=mask_image,
                             generator=generator,
                             height = 512,width = 512,
                             num_inference_steps=30,
                             strength=0.95,
                             guidance_scale=1.0)
    x_image_list[0].show()
(3)-4 Cannyを使う
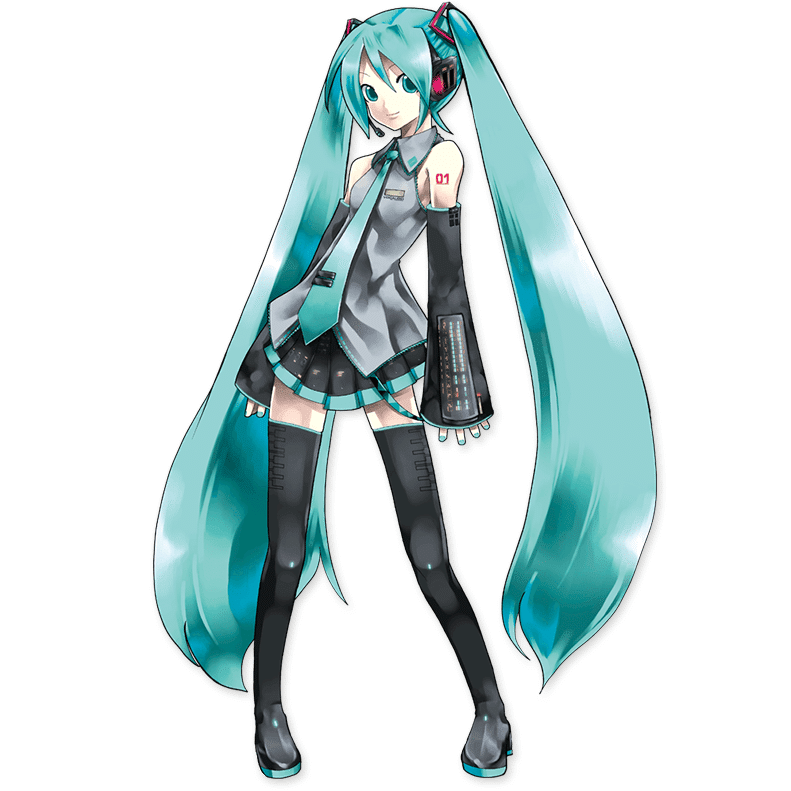
ControlNETなので専用のpipelineを作成し、画像生成もgenerate_controlnetを使って生成します。テストではnum_inference_steps=12と低めなのでややぼやけた画像ですが、レファンレンス画像を引き継いでいることがわかります。i2iと違いCannyイメージに基づいて再生成されているので変化も大きいです。
    model="./models/animagine-xl-2.0/animagine-xl-2.0.safetensors"
    original_image = Df.load_image_img("MIKU.png")
    canny_image = Df.get_canny(original_image=original_image)
    #Canny  ContorolNET用pipeの新規定義
    pipe_canny=Df.pipeline_init("canny",model=model)
    prompt = "masterpiece, best quality, 1girl, solo, long hair,  white shirt, serafuku,  brown hair,looking at viewer,blush,smile, bangs,blue eyes, simple background,t-shirt,white background,closed mouth,standing,white t-shirt,shorts, short shorts,headphones,black shorts,light brown hair,blue shorts ,running"
    negative_prompt = 'low quality, bad quality, sketches'
    x_image_list = Df.generate_controlnet( pipe_canny,
                             prompt = prompt ,
                             negative_prompt = negative_prompt,
                             image = canny_image,
                             num_inference_steps=12 ,
                             guidance_scale=1.0,
                             #height  = 512, width = 512,
                             guess_mode=True,
                             controlnet_conditioning_scale=0.5,)
(3)-5 OPENPOSEを使う
OpenposeもControlNETなので専用のpipelineを作成します。更にopenposeで棒人間を生成し、画像生成に進みます。生成された画像は頭が切れていますが、姿勢は概ね合っています。パラメータの調整が不十分だと思います。
    model="./models/animagine-xl-2.0/animagine-xl-2.0.safetensors"
    #original_image  = Df.load_image_img("MIKU.png")
    original_image = load_image(
        "https://huggingface.co/datasets/huggingface/documentation-images/resolve/main/diffusers/person.png" )
    openpose_image = Df.get_openpose(original_image)
    openpose_image .show()
    prompt = "masterpiece, best quality, 1girl, solo, long hair,  white shirt, serafuku,  brown hair,looking at viewer,blush,smile, bangs,blue eyes, simple background,t-shirt,white background,closed mouth,standing,white t-shirt,shorts, short shorts,headphones,black shorts,light brown hair,blue shorts ,running"
    negative_prompt = 'low quality, bad quality, sketches'
    #Openpose  ContorolNET用pipeの新規定義
    pipe_openpose=Df.pipeline_init("openpose",model=model)
    x_image_list = Df.generate_controlnet( pipe_openpose,
                             prompt = prompt ,
                             negative_prompt = negative_prompt,
                             image = openpose_image,
                             num_inference_steps=8,
                             guidance_scale=1.0,
                             height = 512, width = 512,
                             guess_mode=True,
                             controlnet_conditioning_scale=0.8,)
(3)-6 T2I-Adaperを使う
T2I-Adaperを使うときは専用のpipelineと専用のgeneraterが必要です。
generate_t2a_adapterで生成します。以下は生成サンプルです。元絵はモノクロの影絵です。左側はCannyで輪郭を取り出し、Cannyに対してT2I-Adaperを用いて画像生成しています。
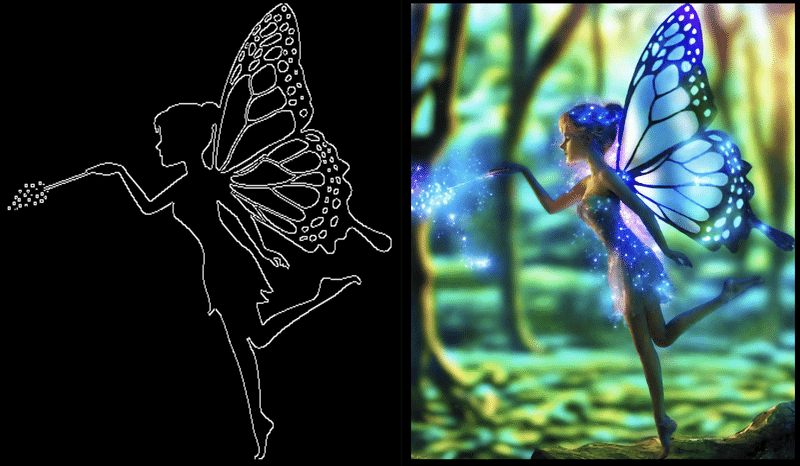
    print("++++++++++   T2I-Adapter" )
    image = Df.load_image_img(
         "https://huggingface.co/Adapter/t2iadapter/resolve/main/figs_SDXLV1.0/org_canny.jpg"
    ).resize((384, 384))
    canny_image =Df.get_canny(image).resize((1024, 1216))
    #model ="./models/animagine-xl-2.0/animagine-xl-2.0.safetensors"
    model="stabilityai/stable-diffusion-xl-base-1.0"
    pipe_t2i_adapter=Df.pipeline_init("t2i_adapter_canny",model=model, lora_en=False)
    prompt = "Mystical fairy in real, magic, 4k picture, high quality"
    negative_prompt = "extra digit, fewer digits, cropped, worst quality, low quality, glitch, deformed, mutated, ugly, disfigured"
    generator = torch.manual_seed(0)
    x_image_list = Df.generate_t2a_adapter(pipe_t2i_adapter,
                             prompt=prompt,
                             negative_prompt=negative_prompt,
                             image = canny_image,
                             generator=generator,
                             num_inference_steps = 34,
                             guidance_scale=1.0,
                             adapter_conditioning_scale=0.8,
                             adapter_conditioning_factor=1,
                              )
(3)-7 depthを使う
depthもControlNETなので専用のpipelineを作成します。generaterがControlNET用が使えます。どの程度の効果が出ているのか何とも判断出来ませんが、それなりには生成されているようです。ここではリアルにも強いモデルに変えています。
model="stabilityai/stable-diffusion-xl-base-1.0"
prompt = "Mystical fairy in real, magic, 4k picture, high quality" negative_prompt = "extra digit, fewer digits, cropped, worst quality, low quality, glitch, deformed, mutated, ugly, disfigured"
    print("++++++++++  Control NET Depth" )
    #model ="./models/animagine-xl-2.0/animagine-xl-2.0.safetensors"
    model="./models/sd_xl_1.0/sd_xl_base_1.0.safetensors"
    image=Df.load_image_img("nissinIMGL0853.jpg")
    depth_image = Df.get_depth_map(image)
    prompt = "masterpiece, best quality, 1girl, solo, long hair, red t-shirt,simple background,white background"
    negative_prompt = 'low quality, bad quality, sketches'
    #Openpose  ContorolNET用pipeの新規定義
    pipe_depth = Df.pipeline_init("depth",model=model)
    x_image_list = Df.generate_controlnet( pipe_depth,
                             prompt = prompt ,
                             negative_prompt = negative_prompt,
                             image = depth_image,
                             num_inference_steps=30,
                             guidance_scale=1.0,
                             height = 512, width = 512,
                             controlnet_conditioning_scale=0.5,)
DiffusersPipelineManagerのコード
クラス初期化とデフォルト設定
呼び出すプログラムを簡素化するためにデフォルトを多く設定しています。DiffusersPipelineManagerクラスが初期化されるとデフォルトが設定されます。以下の部分です。設定内容については使い方の章を参照してください。
     def __init__(self):
        #----- デフォルト用定義
        #VAE
        self.org_vae = "madebyollin/sdxl-vae-fp16-fix"
        #model
        self.org_model="./models/animagine-xl-2.0/animagine-xl-2.0.safetensors"
        #self .org_model="./models/sd_xl_1.0/sd_xl_base_1.0.safetensors",
        #self .org_model="./models/blue_pencil-XL-LCM/bluePencilXLLCM_v200.safetensors"

        #LoRA
        self.org_lora_model_list=[
            ["./models/animagine-xl-2.0/megu_sports_sdxl_v02.safetensors","style",0.8],
            ["./models/animagine-xl-2.0/anime-detailer-xl.safetensors","detaile",1.0],
            ["./models/animagine-xl-2.0/style-enhancer-xl.safetensors","enhancer",0.5]]

        #embe  TEST プロンプトの準備
        self.prompt_embe=["masterpiece, best quality, 1girl, solo, flower, long hair, outdoors, letterboxed, school uniform, day, sky, looking up, short sleeves, parted lips, shirt, cloud,black hair, sunlight, white shirt, serafuku, upper body, from side, pink flower, blurry, brown hair, blue sky, depth of field",
          "at shcool park"]

        #lcm_lora ="latent-consistency/lcm-lora-sdxl"
        self.lcm_lora="./models/SSD-1B-anime/lcm-ssd1b-anime.safetensors"
パイプラインの生成 pipeline_init()
生成方式毎に個別にpipelineを生成すると煩雑になるので、pipeline_initに生成したいpipelineの種類を渡せば目的のpipelineが得られるようになっています。長いですがクラス冒頭の以下の部分です。前半は引数処理を行っています。この処理の最後ではモデルロード済のpipelineが出来ています。なお、ti2iとinpaintはt2iのpipeを流用できるので、各々のpipelineはt2iのpipelineを読み込んで返しています。
     def  pipeline_init(self,
                mode:str="t2i",              #指定できるpipe名  t2i/i2i/canny/i2i_pipe/inpaint_pipe/canny/openpose/canny_openpose/depth/t2i_adapter_canny
                pipeline=None,               #pipeloneの再利用の時に参照する生成済みpipeline名指定  デフォルト:無し
                model:str=None,              #ロードするSDXLモデル名  デフォルト:無し
                vae_en:bool=True,            #VAE有効無効設定   デフォルト:有効
                vae_path:str=None,           #VAE有効時のVAEへのパス  デフォルト:無し
                lcm_lora_en:bool=True,       #LCM -LoRA有効無効設定 無効にするとLCM-LoRAとLCMスケジュ-ラがロードされない デフォルト 有効
                lcm_lora_path=None,          #LCM -LoRA有効のLCM-LoRAへのパス デフォルト:無し
                lora_en:bool=True,           #Style -LoRAの有効無効設定 デフォルト 有効
                lola_models:list=None,       #Style -LoRAの有効時のStyle-LoRAへのパスリスト 複数のStyle-LoRAをロード出来る デフォルト:無し
                set_unet:bool=True,):        #UNETの有効無効設定  デフォルト 有効

        # デフォルト引数が None の場合、クラス属性を使用
        if model is None:
            model = self.org_model
        if vae_path is None:
            vae_path = self.org_vae
        if lcm_lora_path is None:
            lcm_lora_path = self.lcm_lora
        if lola_models is None:
            lola_models = self.org_lora_model_list
        #UNETの準備
        if lcm_lora_en:
            unet = UNet2DConditionModel.from_pretrained(
                "latent-consistency/lcm-sdxl",
                torch_dtype=torch.float16,
                variant="fp16",)
        else:
             unet =None
        #VAEの準備
        if vae_en:
            vae = AutoencoderKL.from_pretrained(vae_path, torch_dtype=torch.float16, use_safetensors=True)
        else:
            print("VAE disabled")
            vae = None

        #pipelineの準備
        if mode=="t2i":
            pipe = StableDiffusionXLPipeline.from_single_file(
                model,
                variant="fp16",
                safety_checker=None,
                feature_extractor=None,
                unet=unet,
                torch_dtype=torch.float16,
                vae=vae,
                ).to("cuda")
        elif mode=="i2i":
            pipe = StableDiffusionXLImg2ImgPipeline.from_single_file(
                model,
                variant="fp16",
                use_safetensors=True,
                safety_checker=None,
                feature_extractor=None,
                unet=unet,
                torch_dtype=torch.float16,
                vae=vae,
                ).to("cuda")
        #"i2i_pipe","inpaint_pipe"は"t2i"の設定を引き継ぐので再設定はできない。設定を変える場合は"i2i"を指定すること。"inpaint"は銃日していない。
        elif mode=="i2i_pipe":
            pipe = AutoPipelineForImage2Image.from_pipe(pipeline).to("cuda")
            return pipe
        elif mode=="inpaint_pipe":
            pipe = AutoPipelineForInpainting.from_pipe(pipeline).to("cuda")
            return pipe
        #ControlNet名を指定してpipeを設定するとき 。 対象は="canny" , "openpose" , "depth"の3種類
        elif mode=="canny" or mode=="openpose"  or mode=="depth":
             if mode=="canny" :
                 controlnet = ControlNetModel.from_pretrained("diffusers/controlnet-canny-sdxl-1.0", torch_dtype=torch.float16, use_safetensors=True )
             elif mode=="openpose":
                 controlnet = ControlNetModel.from_pretrained("thibaud/controlnet-openpose-sdxl-1.0", torch_dtype=torch.float16)
             elif mode=="depth":
                  controlnet = ControlNetModel.from_pretrained("diffusers/controlnet-depth-sdxl-1.0", variant="fp16", use_safetensors=True, torch_dtype=torch.float16,).to("cuda")
             else:
                  print("ContorolNET error")
             #pipe  = StableDiffusionXLControlNetPipeline.from_pretrained(  #HuggingFaceからダウンロードする場合
             pipe = StableDiffusionXLControlNetPipeline.from_single_file(
                   model,
                   controlnet=controlnet,
                   vae=vae,
                   torch_dtype=torch.float16,
                   use_safetensors=True )
             pipe.enable_model_cpu_offload()
        #canny_openpose  指定 マルチControlNeのpipeを設定するとき。
        elif mode=="canny_openpose":
            controlnets = [
                 ControlNetModel.from_pretrained("diffusers/controlnet-canny-sdxl-1.0", torch_dtype=torch.float16, use_safetensors=True ),
                 ControlNetModel.from_pretrained( "thibaud/controlnet-openpose-sdxl-1.0", torch_dtype=torch.float16 ),
                  ]
            #pipe  = StableDiffusionXLControlNetPipeline.from_pretrained(   #HuggingFaceからダウンロードする場合
            pipe = StableDiffusionXLControlNetPipeline.from_single_file(
                   model,
                   controlnet=controlnets,
                   vae=vae,
                   torch_dtype=torch.float16,
                   use_safetensors=True)
            pipe.scheduler = UniPCMultistepScheduler.from_config(pipe.scheduler.config)
            pipe.enable_model_cpu_offload()
        #T2I -Adapterのpipeを作成する時
        elif mode=="t2i_adapter_canny":
             adapter = T2IAdapter.from_pretrained("TencentARC/t2i-adapter-canny-sdxl-1.0", torch_dtype=torch.float16, varient="fp16").to("cuda")
             unet = UNet2DConditionModel.from_pretrained("latent-consistency/lcm-sdxl", torch_dtype=torch.float16, variant="fp16",)
             pipe = StableDiffusionXLAdapterPipeline.from_pretrained(      #HuggingFaceからダウンロードする場合
                    model,
                    unet=unet,
                    adapter=adapter,
                     vae=vae,
                     torch_dtype=torch.float16,
                     variant="fp16",
                      ).to("cuda")
        else:
            print("error=100")   #pipe名指定のエラー
            return "100"
Pipelineに対する様々な追加処理
スケジューラ
次にLCMスケージューラーをセットします。高速化の大きなポイントです。
        # Set scheduler LCMスケージューラーのセット
        if lcm_lora_en:   # Reload the scheduler with custom config
            pipe.scheduler = LCMScheduler.from_config(pipe.scheduler.config)# Reload the scheduler with custom config
LCM-LoRAのロード
Style- LoRAとは独立して設定します。後でバインドするためにadapter_nameを設定して置きます。
        #LCM -LoRAのロード
        if lcm_lora_en:
            #pipe .load_lora_weights("latent-consistency/lcm-lora-sdxl", adapter_name="lcm") #HuggingFaceからダウンロードする場合
            pipe.load_lora_weights(lcm_lora_path, adapter_name="lcm")
            adapters_list=["lcm"]
Style- LoRAロード
キャラLoRAや画風、エンハンサなどいくつもあるので、複数のLoRAが利用できるように考慮しています。最後にLCM-LoRAとウエイトに基づくバインドを行います。
        #Style -LoRAのロード
        if lora_en :
            n_of_lora=len( lola_models)
            if lcm_lora_en:
                adapter_weights_list=[1.0]
            else:
                adapter_weights_list=[]
            #loRAのモデルとアダプタ名及びウエイトリスト作成
            for n in range(n_of_lora):
                lora_name=lola_models[n][0]
                adapter_name=lola_models[n][1]
                adapters_list.append(adapter_name)
                weight=lola_models[n][2]
                adapter_weights_list.append(weight)
                pipe.load_lora_weights(lora_name, adapter_name=adapter_name)
            # Combine LoRAs
            pipe.set_adapters(adapters_list, adapter_weights=adapter_weights_list)
            print("adapters_list",adapters_list,"adapter_weights",adapter_weights_list)
UNETの設定
パフォーマンスが若干上がります。このあと、これまでのpipelineを返します。(rogress_barもdisableにしています)
        if set_unet:
            pipe.unet = pipe.unet.to(memory_format=torch.channels_last)
        # Disable the progress bar
        pipe.set_progress_bar_config(disable=True)

        return pipe
Generationクラス
画像生成に利用するgenerationクラスは3種類有ります。
generate() はt2i/i2i/inpaitで使う基本的な生成クラスです。
generate_controlnet() はContoreolNETで使用します。
generate_t2a_adapter() はT2A-Adaperでの生成で使用します。
これらの差は引数の有る無し程度です。共通化できそうで出来なかったのですが、指定する方式毎に引数を渡さない設定ができれば共通化可能だと思います。
以下は引数の説明になります。
3種類の生成モード共通のパラメータ
pipe
利用するpipeを指定。必ず指定しなければならない。
image=None,
力イメージを指定する。パスではなくイメージオブジェクト(PILが
標準、CV2も使えるはず(ためしていない)
mask_image=None,
インペイントなどのマスクイメージを指定。パスではなくイメージ
オブジェクト(PILが標準、CV2も使えるはず(ためしていない)
embe:bool=True,
プロンプトエンべデッディング有効・無効。有効時はCONPLEによる
エンべディングを行う。プロンプトのウエイト指定も可能
ウエイト指定の例 prompt = "a red cat++ playing with a ball----" +は prompt Enhace /-は Reduce
prompt:str=None,
プロンプト 文章も使えます。ただし英語のみ
conditioning=None,
pooled=None,
conditioningとpooledはプロンプトエンべデッディングでCONPLEから
得られる変数を記述
negative_prompt=None,
ネガティブプロンプト
num_inference_steps:int=4,
生成時のSTEP、大きい方がきれいになる。lmcは4が標準だが適時上げる
strength:float=0.1,
プロンプトの効きを調整する0〜1.0
guidance_scale:float=1.0,
ガイダンススケール 1.0で無効、大きいと生成時間が伸びる。上げれば画 像がきれいになるわけででない
generator=None,
SEEDを指定する。例 generator = torch.manual_seed(0 )でマニュアルで SEED指定
height:int = None,
画像の高さを指定する
width:int = None,
画像の幅を指定する
num_images_per_prompt:int = 1,
プロンプトあたりの生成画像数を指定して複数生成させることが出来る
guess_mode:bool=None,
ガウシアン効果の有効無効指定
freeu:bool=False,
freeu効果の有効無効指定。有効にすると生成画像が鮮やかな色になる。
output_type:str="pil",
画像出力形式を指定する。ndarreyが指定可能("nd")
crops_coords_top_left=(0, 0),
生成する主画像の位置を指定する
controlnet_conditioning_scale=1.0,
コントロールネットの効き具合を指定する
T2I-Adaper特有のパラメータ
adapter_conditioning_scale:float=None,
adapter_conditioning_factor:int=None,
アダプタの効き具合の設定をする
t2i/i2i/inpaint共通 generate()クラス
    #-----image generation  t2i/i2i
     def generate(self,
        pipe,
        image=None,
        mask_image=None,
        embe:bool=True,
        prompt:str=None,
        conditioning=None,
        pooled=None,
        negative_prompt=None,
        num_inference_steps:int=4,
        strength:float=0.1,
        guidance_scale:float=1.0,
        generator=None,
        height:int = None,
        width:int = None,
        num_images_per_prompt:int = 1,
        guess_mode:bool=None,
        freeu:bool=False,
        output_type:str="pil",
        crops_coords_top_left=(0, 0),
        controlnet_conditioning_scale=1.0,
        ):
        if freeu:        # Freeu enable
            pipe.enable_freeu(s1=0.9, s2=0.2, b1=1.2, b2=1.4)
        if embe:
                image = pipe(
                    image=image,
                    mask_image=mask_image,
                    prompt_embeds=conditioning,
                    pooled_prompt_embeds=pooled,
                    negative_prompt=negative_prompt,
                    num_inference_steps=num_inference_steps,
                    strength=strength,
                    generator=generator,
                    height =height,
                    width = width,
                    num_images_per_prompt=num_images_per_prompt,
                    guess_mode=guess_mode,
                    guidance_scale=guidance_scale,
                    crops_coords_top_left=crops_coords_top_left,
                    controlnet_conditioning_scale=controlnet_conditioning_scale,
                    ).images
        else:
                image = pipe(
                    prompt=prompt,
                    image=image,
                    mask_image=mask_image,
                    negative_prompt=negative_prompt,
                    num_inference_steps=num_inference_steps,
                    strength=strength,
                    generator=generator,
                    height =height,
                    width = width,
                    num_images_per_prompt=num_images_per_prompt,
                    guess_mode=guess_mode,
                    guidance_scale=guidance_scale,
                    crops_coords_top_left=crops_coords_top_left,
                    controlnet_conditioning_scale=controlnet_conditioning_scale,
                    ).images
        return  image
テストプログラム
各生成を試すために作成しました。個別の小さなテストでも良かったのでですが、煩雑になるので、1つに纏めています。冒頭のテスト項目をTrueに設定することで目的のテストが実行されます。
生成方式を選択
複数選択できますが、ContorolNETは異なるpiperlineを作成するので複数選択するとVRAM容量を超えてしまいます。注意してください。
 #実行するテストをTrueに設定 。複数設定可能だが、canny以下のContorolNETは同時に複数動かさないほうが良い。複数のpipeがVRAMにロードされる
t2i=False
t2i_em=False
i2i=False
i2i_pipe=False
inpaint_pipe=False
canny=False
openpose=False
canny_openpose=False
t2i_adapter_canny=True
depth=False
DiffusersPipelineManagerクラスの初期化
Df=DiffusersPipelineManager()デフォルトpipeline
t2i/i2i/inpaint用のpipeをデフォルトでロードしています。これらは共用できるのでVRAM容量に影響しません。
model="./models/animagine-xl-2.0/animagine-xl-2.0.safetensors"
pipe_t2i=Df.pipeline_init("t2i",model=model)
pipe_i2i=Df.pipeline_init("i2i_pipe",pipeline=pipe_t2i)#pipelineの使い回し
pipe_inpaint=Df.pipeline_init("inpaint_pipe",pipeline=pipe_t2i)#pipelineの使い回し
LCMを有効にしないSDXLモデル用のパイプ定義
pipe_t2i=pipeline_init("t2i",model=model , vae_en=False , lcm_lora_en=False , lora_en=False, set_unet=False)i2iパイプラインの独自定義
t2iを引き継がないpipelineも作成出来ます。
pipe_i2i=pipeline_init("i2i",model=model)
t2i同様にLCMを有効にしないSDXLモデル用のパイプ定義も可能
ControlNETパイプラインの定義
以下のように使用したい生成方式毎にpipelineを準備します。どれか1つまたは2つ以下で使用することをおすすめします。テストプロギグラムでは各テストの冒頭で設定しています。
pipe_canny=Df.pipeline_init("canny",model=model) #Canny ContorolNET用pipeの新規定義 #pipe_openpose =Df.pipeline_init("openpose",model=model) #openpose ContorolNET用pipeの新規定義 #pipe_canny_openpose =Df.pipeline_init("canny_openpose",model=model)#ContorolNET用pipeの新規定義,Canny+openpose #pipe_t2i_adapter =Df.pipeline_init("t2i_adapter_canny",model=model, lora_en=False)#2i_adapter用画像の生成
定義したパイプラインを用いてgenerateクラスを呼ぶことで画像が生成されます。生成後は確認のために画像を表示しています。
t2iによる画像生成例
    #-----LCM "t2i" アニメテスト
    #--embeddingあり
    print("++++++++++   t2iアニメ")
    #modelとpipeはデフォルトを使う
    prompt_embe=["masterpiece, best quality, 1girl, solo, flower, long hair, outdoors, letterboxed, school uniform, day, sky, looking up, short sleeves, parted lips, shirt, cloud" "black hair, sunlight, white shirt, serafuku, upper body, from side, pink flower, blurry, brown hair, blue sky, depth of field",
          "at shcool park,"]
    conditioning, pooled = Df.prompt_embedding(pipe_t2i,prompt_embe)
    image_count=2
    #generator  = [torch.Generator().manual_seed(0) for _ in range(image_count)]
    generator = torch.manual_seed(0 )
    x_image_list= Df.generate( pipe_t2i,
                             conditioning=conditioning ,
                             pooled=pooled ,
                             generator =generator,
                             height = 512, width = 512,
                             num_images_per_prompt=image_count,
                             freeu=True ,
                             )
コード全体
DiffusersPipelineManagerクラス
from diffusers import StableDiffusionXLImg2ImgPipeline  ,  StableDiffusionXLPipeline  ,  AutoPipelineForImage2Image ,StableDiffusionDepth2ImgPipeline
from diffusers import DiffusionPipeline, LCMScheduler, UNet2DConditionModel , AutoencoderKL ,  AutoPipelineForInpainting,StableDiffusionXLAdapterPipeline
from diffusers import StableDiffusionXLControlNetPipeline, ControlNetModel, AutoencoderKL, UniPCMultistepScheduler, T2IAdapter, LCMScheduler
from diffusers.utils import load_image,make_image_grid
from compel import Compel,ReturnedEmbeddingsType
from controlnet_aux import OpenposeDetector #Depthで使用
from transformers import DPTFeatureExtractor, DPTForDepthEstimation

import torch
from datetime import datetime
import time
from tqdm import tqdm
import numpy as np
import cv2
from PIL import Image

class DiffusersPipelineManager:
     def __init__(self):
        #----- デフォルト用定義
        #VAE
        self.org_vae = "madebyollin/sdxl-vae-fp16-fix"
        #model
        self.org_model="./models/animagine-xl-2.0/animagine-xl-2.0.safetensors"
        #self .org_model="./models/sd_xl_1.0/sd_xl_base_1.0.safetensors",
        #self .org_model="./models/blue_pencil-XL-LCM/bluePencilXLLCM_v200.safetensors"

        #LoRA
        self.org_lora_model_list=[
            ["./models/animagine-xl-2.0/megu_sports_sdxl_v02.safetensors","style",0.8],
            ["./models/animagine-xl-2.0/anime-detailer-xl.safetensors","detaile",1.0],
            ["./models/animagine-xl-2.0/style-enhancer-xl.safetensors","enhancer",0.5]]

        #embe  TEST プロンプトの準備
        self.prompt_embe=["masterpiece, best quality, 1girl, solo, flower, long hair, outdoors, letterboxed, school uniform, day, sky, looking up, short sleeves, parted lips, shirt, cloud,black hair, sunlight, white shirt, serafuku, upper body, from side, pink flower, blurry, brown hair, blue sky, depth of field",
          "at shcool park"]

        #lcm_lora ="latent-consistency/lcm-lora-sdxl"
        self.lcm_lora="./models/SSD-1B-anime/lcm-ssd1b-anime.safetensors"

     def  pipeline_init(self,
                mode:str="t2i",                        #指定できるpipe名  t2i/i2i/canny/i2i_pipe/inpaint_pipe/canny/openpose/canny_openpose/depth/t2i_adapter_canny
                pipeline=None,                         #pipeloneの再利用の時に参照する生成済みpipeline名指定  デフォルト:無し
                model:str=None,                   #ロードするSDXLモデル名  デフォルト:無し
                vae_en:bool=True,                 #VAE有効無効設定   デフォルト:有効
                vae_path:str=None,                #VAE有効時のVAEへのパス  デフォルト:無し
                lcm_lora_en:bool=True,       #LCM -LoRA有効無効設定 無効にするとLCM-LoRAとLCMスケジュ-ラがロードされない デフォルト 有効
                lcm_lora_path=None,          #LCM -LoRA有効のLCM-LoRAへのパス デフォルト:無し
                lora_en:bool=True,                #Style -LoRAの有効無効設定 デフォルト 有効
                lola_models:list=None,       #Style -LoRAの有効時のStyle-LoRAへのパスリスト 複数のStyle-LoRAをロード出来る デフォルト:無し
                set_unet:bool=True,):        #UNETの有効無効設定  デフォルト 有効

        # デフォルト引数が None の場合、クラス属性を使用
        if model is None:
            model = self.org_model
        if vae_path is None:
            vae_path = self.org_vae
        if lcm_lora_path is None:
            lcm_lora_path = self.lcm_lora
        if lola_models is None:
            lola_models = self.org_lora_model_list
        #UNETの準備
        if lcm_lora_en:
            unet = UNet2DConditionModel.from_pretrained(
                "latent-consistency/lcm-sdxl",
                torch_dtype=torch.float16,
                variant="fp16",)
        else:
             unet =None
        #VAEの準備
        if vae_en:
            vae = AutoencoderKL.from_pretrained(vae_path, torch_dtype=torch.float16, use_safetensors=True)
        else:
            print("VAE disabled")
            vae = None

        #pipelineの準備
        if mode=="t2i":
            pipe = StableDiffusionXLPipeline.from_single_file(
                model,
                variant="fp16",
                safety_checker=None,
                feature_extractor=None,
                unet=unet,
                torch_dtype=torch.float16,
                vae=vae,
                ).to("cuda")
        elif mode=="i2i":
            pipe = StableDiffusionXLImg2ImgPipeline.from_single_file(
                model,
                variant="fp16",
                use_safetensors=True,
                safety_checker=None,
                feature_extractor=None,
                unet=unet,
                torch_dtype=torch.float16,
                vae=vae,
                ).to("cuda")
        #"i2i_pipe","inpaint_pipe"は"t2i"の設定を引き継ぐので再設定はできない。設定を変える場合は"i2i"を指定すること。"inpaint"は銃日していない。
        elif mode=="i2i_pipe":
            pipe = AutoPipelineForImage2Image.from_pipe(pipeline).to("cuda")
            return pipe
        elif mode=="inpaint_pipe":
            pipe = AutoPipelineForInpainting.from_pipe(pipeline).to("cuda")
            return pipe
        #ControlNet名を指定してpipeを設定するとき 。 対象は="canny" , "openpose" , "depth"の3種類
        elif mode=="canny" or mode=="openpose"  or mode=="depth":
             if mode=="canny" :
                 controlnet = ControlNetModel.from_pretrained("diffusers/controlnet-canny-sdxl-1.0", torch_dtype=torch.float16, use_safetensors=True )
             elif mode=="openpose":
                 controlnet = ControlNetModel.from_pretrained("thibaud/controlnet-openpose-sdxl-1.0", torch_dtype=torch.float16)
             elif mode=="depth":
                  controlnet = ControlNetModel.from_pretrained("diffusers/controlnet-depth-sdxl-1.0", variant="fp16", use_safetensors=True, torch_dtype=torch.float16,).to("cuda")
             else:
                  print("ContorolNET error")
             #pipe  = StableDiffusionXLControlNetPipeline.from_pretrained(  #HuggingFaceからダウンロードする場合
             pipe = StableDiffusionXLControlNetPipeline.from_single_file(
                   model,
                   controlnet=controlnet,
                   vae=vae,
                   torch_dtype=torch.float16,
                   use_safetensors=True )
             pipe.enable_model_cpu_offload()
        #canny_openpose  指定 マルチControlNeのpipeを設定するとき。
        elif mode=="canny_openpose":
            controlnets = [
                 ControlNetModel.from_pretrained("diffusers/controlnet-canny-sdxl-1.0", torch_dtype=torch.float16, use_safetensors=True ),
                 ControlNetModel.from_pretrained( "thibaud/controlnet-openpose-sdxl-1.0", torch_dtype=torch.float16 ),
                  ]
            #pipe  = StableDiffusionXLControlNetPipeline.from_pretrained(   #HuggingFaceからダウンロードする場合
            pipe = StableDiffusionXLControlNetPipeline.from_single_file(
                   model,
                   controlnet=controlnets,
                   vae=vae,
                   torch_dtype=torch.float16,
                   use_safetensors=True)
            pipe.scheduler = UniPCMultistepScheduler.from_config(pipe.scheduler.config)
            pipe.enable_model_cpu_offload()
        #T2I -Adapterのpipeを作成する時
        elif mode=="t2i_adapter_canny":
             adapter = T2IAdapter.from_pretrained("TencentARC/t2i-adapter-canny-sdxl-1.0", torch_dtype=torch.float16, varient="fp16").to("cuda")
             unet = UNet2DConditionModel.from_pretrained("latent-consistency/lcm-sdxl", torch_dtype=torch.float16, variant="fp16",)
             pipe = StableDiffusionXLAdapterPipeline.from_pretrained(      #HuggingFaceからダウンロードする場合
                    model,
                    unet=unet,
                    adapter=adapter,
                     vae=vae,
                     torch_dtype=torch.float16,
                     variant="fp16",
                      ).to("cuda")
        else:
            print("error=100")   #pipe名指定のエラー
            return "100"
        # Set scheduler LCMスケージューラーのセット
        if lcm_lora_en:   # Reload the scheduler with custom config
            pipe.scheduler = LCMScheduler.from_config(pipe.scheduler.config)# Reload the scheduler with custom config
        #LCM -LoRAのロード
        if lcm_lora_en:
            #pipe .load_lora_weights("latent-consistency/lcm-lora-sdxl", adapter_name="lcm") #HuggingFaceからダウンロードする場合
            pipe.load_lora_weights(lcm_lora_path, adapter_name="lcm")
            adapters_list=["lcm"]
        else:
            adapters_list=[]
        #Style -LoRAのロード
        if lora_en :
            n_of_lora=len( lola_models)
            if lcm_lora_en:
                adapter_weights_list=[1.0]
            else:
                adapter_weights_list=[]
            #loRAのモデルとアダプタ名及びウエイトリスト作成
            for n in range(n_of_lora):
                lora_name=lola_models[n][0]
                adapter_name=lola_models[n][1]
                adapters_list.append(adapter_name)
                weight=lola_models[n][2]
                adapter_weights_list.append(weight)
                pipe.load_lora_weights(lora_name, adapter_name=adapter_name)
            # Combine LoRAs
            pipe.set_adapters(adapters_list, adapter_weights=adapter_weights_list)
            print("adapters_list",adapters_list,"adapter_weights",adapter_weights_list)
        # Set the unet to channels last, which accelerates inference a little bit
        if set_unet:
            pipe.unet = pipe.unet.to(memory_format=torch.channels_last)
        # Disable the progress bar
        pipe.set_progress_bar_config(disable=True)

        return pipe

     #-----prompt_embeddings プロンプトをロードするクラス
     #prompt  = "a red cat++ playing with a ball----"   prompt  Enhace / Reduce
     def prompt_embedding(self, pipe, prompt):
        #compel_proc  = Compel(tokenizer=pipe.tokenizer, text_encoder=pipe.text_encoder)
        compel = Compel(
              tokenizer=[pipe.tokenizer, pipe.tokenizer_2] ,
              text_encoder=[pipe.text_encoder, pipe.text_encoder_2],
              returned_embeddings_type=ReturnedEmbeddingsType.PENULTIMATE_HIDDEN_STATES_NON_NORMALIZED,
              requires_pooled=[False, True]
                )
        conditioning, pooled = compel(prompt)
        return conditioning, pooled

    #-----load_image for i2i 指定イメージをロードするクラス
     def load_image_img(self,image_path):
        image =load_image(image_path)
        #image  = pipe.image_processor.preprocess(
        #        Image.open(image_path) .convert("RGB").resize((512,) * 2, Image.Resampling.LANCZOS))
        #image  = Image.open(image_path)#同じ
        return image

     #cannyイメージ作成クラス
     def get_canny(self , original_image , low_threshold = 100 , high_threshold = 200):
          image = np.array(original_image)
          image = cv2.Canny(image, low_threshold, high_threshold)
          image = image[:, :, None]
          image = np.concatenate([image, image, image], axis=2)
          canny_image = Image.fromarray(image)
          return canny_image

     #openposeイメージ作成クラス
     def get_openpose(self , image ):
          openpose = OpenposeDetector.from_pretrained("lllyasviel/ControlNet")
          openpose_image = openpose(image)
          return openpose_image

     #Depthイメージ作成クラス
     def get_depth_map(self, image):
          feature_extractor = DPTFeatureExtractor.from_pretrained("Intel/dpt-hybrid-midas")
          depth_estimator = DPTForDepthEstimation.from_pretrained("Intel/dpt-hybrid-midas").to("cuda")
          image = feature_extractor(images=image, return_tensors="pt").pixel_values.to("cuda")
          with torch.no_grad(), torch.autocast("cuda"):
               depth_map = depth_estimator(image).predicted_depth
          depth_map = torch.nn.functional.interpolate(depth_map.unsqueeze(1), size=(1024, 1024), mode="bicubic", align_corners=False, )
          depth_min = torch.amin(depth_map, dim=[1, 2, 3], keepdim=True)
          depth_max = torch.amax(depth_map, dim=[1, 2, 3], keepdim=True)
          depth_map = (depth_map - depth_min) / (depth_max - depth_min)
          image = torch.cat([depth_map] * 3, dim=1)
          image = image.permute(0, 2, 3, 1).cpu().numpy()[0]
          image = Image.fromarray((image * 255.0).clip(0, 255).astype(np.uint8))
          return image

    #画像の生成
    #generate  t2i/i2i/inpaint/cannyで使用
    #generate_controlnet   openpose/depth/Multi-ContorolNETで使用
    #generate_t2a_adapter   T2I- Adapterで使用

     """3種類の生成モード共通のパラメータ
        pipe
        利用するpipeを指定。必ず指定しなければならない。
        image=None,
   入力イメージを指定する。パスではなくイメージオブジェクト(PILが標準、CV2も使えるはず(ためしていない)
        mask_image=None,
   インペイントなどのマスクイメージを指定。パスではなくイメージオブジェクト(PILが標準、CV2も使えるはず(ためしていない)
        embe:bool=True,
         プロンプトエンべデッディング有効・無効。有効時はCONPLEによるエンべディングを行う。プロンプトのウエイト指定も可能
             ウエイト指定の例  prompt = "a red cat++ playing with a ball----"   +はprompt  Enhace /-は Reduce
        prompt:str=None,
             プロンプト 文章も使えます。ただし英語のみ
        conditioning=None,
        pooled=None,
             conditioningとpooledはプロンプトエンべデッディングでCONPLEから得られる変数を記述
        negative_prompt=None,
             ネガティブプロンプト
        num_inference_steps:int=4,
             生成時のSTEP、大きいほうがきれいになる。lmcは4が標準だが適時上げる
        strength:float=0.1,
             プロンプトの効きを調整する0〜1.0
        guidance_scale:float=1.0,
             ガイダンススケール 1.0で無効、大きいと生成時間が伸びる。上げれば画像がきれいになるわけででない
        generator=None,
             SEEDを指定する。例 generator = torch.manual_seed(0 )でマニュアルでSEED指定
        height:int = None,
             画像の高さを指定する
        width:int = None,
             画像の幅を指定する
        num_images_per_prompt:int = 1,
             プロンプトあたりの生成画像数を指定して複数生成させることが出来る
        guess_mode:bool=None,
             ガウシアン効果の有効無効指定
        freeu:bool=False,
             freeu効果の有効無効指定。有効にすると生成画像が鮮やかな色になる。
        output_type:str="pil",
             画像出力形式を指定する。ndarreyが指定可能("nd")
        crops_coords_top_left=(0, 0),
         生成する主画像の位置を指定する
        controlnet_conditioning_scale=1.0,
             コントロールネットの効き具合を指定する
     T2I-Adaper特有のパラメータ
        adapter_conditioning_scale:float=None,
        adapter_conditioning_factor:int=None,
         アダプタの効き具合の設定をする
     """

    #-----image generation  t2i/i2i
     def generate(self,
        pipe,
        image=None,
        mask_image=None,
        embe:bool=True,
        prompt:str=None,
        conditioning=None,
        pooled=None,
        negative_prompt=None,
        num_inference_steps:int=4,
        strength:float=0.1,
        guidance_scale:float=1.0,
        generator=None,
        height:int = None,
        width:int = None,
        num_images_per_prompt:int = 1,
        guess_mode:bool=None,
        freeu:bool=False,
        output_type:str="pil",
        crops_coords_top_left=(0, 0),
        controlnet_conditioning_scale=1.0,
        ):
        if freeu:        # Freeu enable
            pipe.enable_freeu(s1=0.9, s2=0.2, b1=1.2, b2=1.4)
        if embe:
                image = pipe(
                    image=image,
                    mask_image=mask_image,
                    prompt_embeds=conditioning,
                    pooled_prompt_embeds=pooled,
                    negative_prompt=negative_prompt,
                    num_inference_steps=num_inference_steps,
                    strength=strength,
                    generator=generator,
                    height =height,
                    width = width,
                    num_images_per_prompt=num_images_per_prompt,
                    guess_mode=guess_mode,
                    guidance_scale=guidance_scale,
                    crops_coords_top_left=crops_coords_top_left,
                    controlnet_conditioning_scale=controlnet_conditioning_scale,
                    ).images
        else:
                image = pipe(
                    prompt=prompt,
                    image=image,
                    mask_image=mask_image,
                    negative_prompt=negative_prompt,
                    num_inference_steps=num_inference_steps,
                    strength=strength,
                    generator=generator,
                    height =height,
                    width = width,
                    num_images_per_prompt=num_images_per_prompt,
                    guess_mode=guess_mode,
                    guidance_scale=guidance_scale,
                    crops_coords_top_left=crops_coords_top_left,
                    controlnet_conditioning_scale=controlnet_conditioning_scale,
                    ).images
        return  image
     #-----image generation  controlnet
     def generate_controlnet(self,
        pipe,
        image=None,
        prompt:str=None,
        negative_prompt=None,
        num_inference_steps:int=4,
        guidance_scale:float=1.0,
        generator=None,
        height:int = None,
        width:int = None,
        num_images_per_prompt:int = 1,
        guess_mode:bool=None,
        freeu:bool=False,
        output_type:str="pil",
        crops_coords_top_left=(0, 0),
        controlnet_conditioning_scale=1.0,
             ):
        if freeu:        # Freeu enable
            pipe.enable_freeu(s1=0.9, s2=0.2, b1=1.2, b2=1.4)
        image = pipe(
                    prompt=prompt,
                    image=image,
                    negative_prompt=negative_prompt,
                    num_inference_steps=num_inference_steps,
                    generator=generator,
                    height =height,
                    width = width,
                    num_images_per_prompt=num_images_per_prompt,
                    guess_mode=guess_mode,
                    guidance_scale=guidance_scale,
                    crops_coords_top_left=crops_coords_top_left,
                    controlnet_conditioning_scale=controlnet_conditioning_scale,
                    ).images
        return  image
     #-----image generation  t2a_adapter
     def generate_t2a_adapter(self,
        pipe,
        image=None,
        prompt:str=None,
        negative_prompt=None,
        num_inference_steps:int=4,
        guidance_scale:float=1.0,
        generator=None,
        height:int = None,
        width:int = None,
        num_images_per_prompt:int = 1,
        freeu:bool=False,
        output_type:str="pil",
        crops_coords_top_left=(0, 0),
        adapter_conditioning_scale:float=None,
        adapter_conditioning_factor:int=None,
             ):
        if freeu:        # Freeu enable
            pipe.enable_freeu(s1=0.9, s2=0.2, b1=1.2, b2=1.4)
        image = pipe(
                    prompt=prompt,
                    image=image,
                    negative_prompt=negative_prompt,
                    num_inference_steps=num_inference_steps,
                    generator=generator,
                    height =height,
                    width = width,
                    num_images_per_prompt=num_images_per_prompt,
                    guidance_scale=guidance_scale,
                    crops_coords_top_left=crops_coords_top_left,
                    adapter_conditioning_scale=adapter_conditioning_scale,
                    adapter_conditioning_factor=adapter_conditioning_factor,
                    ).images
        return  image
テストコード全体
import torch
from PIL import Image
from datetime import datetime
import time
import cv2
import numpy as np
from  n_lcm_lora_sdxl_i2i_t2i_class_v1 import DiffusersPipelineManager
    #実行するテストをTrueに設定 。複数設定可能だが、canny以下のContorolNETは同時に複数動かさないほうが良い。複数のpipeがVRAMにロードされる
t2i=False
t2i_em=False
i2i=False
i2i_pipe=False
inpaint_pipe=False
canny=False
openpose=False
canny_openpose=False
t2i_adapter_canny=True
depth=False
 #DiffusersPipelineManagerの定義と初期化
Df=DiffusersPipelineManager()

""" #モデル例
model=".//models/animagine-xl-2.0/animagine-xl-2.0.safetensors"
model="./models/sd_xl_1.0/sd_xl_base_1.0.safetensors"
model="./models/blue_pencil-XL-LCM/bluePencilXLLCM_v200.safetensors"

パイプ作成 LCM有効の時
pipe_t2i=Df.pipeline_init("t2i",model=model)
pipe_i2i=Df.pipeline_init("i2i",model=model)
pipe_i2i=Df.pipeline_init("i2i_pipe",pipeline=pipe_t2i)#t2i pipelineの使い回しによる定義
pipe_inpaint=Df.pipeline_init("inpaint_pipe",pipeline=pipe_t2i)#t2i pipelineの使い回しによる定義
pipe_canny=Df.pipeline_init("canny",model=model) #Canny  ContorolNET用pipeの新規定義
pipe_openpose=Df.pipeline_init("openpose",model=model) #openpose  ContorolNET用pipeの新規定義
pipe_canny_openpose=Df.pipeline_init("canny_openpose",model=model)#ContorolNET用pipeの新規定義,Canny+openpose
pipe_t2i_adapter=Df.pipeline_init("t2i_adapter_canny",model=model, lora_en=False)#2i_adapter用

 LCMを有効にしないSDXLモデル用のパイプ定義
pipe_t2i=pipeline_init("t2i",model=model , vae_en=False , lcm_lora_en=False , lora_en=False,  set_unet=False)

#-----LCMを有効にしないSDXLモデルによる生成とインペイントの使用例
#----https://huggingface.co/docs/diffusers/using-diffusers/sdxl#stable-diffusion-xlのテスト
    print("++++++++++  Non LCM")
    model="/home/animede/auto1111/models/sd_xl_1.0/sd_xl_base_1.0.safetensors"
    pipe_t2i=Df.pipeline_init("t2i",model=model , vae_en=False , lcm_lora_en=False , lora_en=False,  set_unet=False)
    pipe_inpaint=Df.pipeline_init("inpaint_pipe",pipeline=pipe_t2i)#pipelineの使い回し
    prompt = "Astronaut in a jungle, cold color palette, muted colors, detailed, 8k"
    image = Df.generate( pipe_t2i, prompt=prompt ,embe=False ,num_inference_steps=42 ,strength=1.0,guidance_scale=4.0 )[0]
    image.show()

    mask_url = "https://huggingface.co/datasets/huggingface/documentation-images/resolve/main/diffusers/sdxl-inpaint-mask.png"
    mask_image=Df.load_image_img(mask_url )
    prompt = "A deep sea diver floating"
    image_list = Df.generate( pipe_inpaint ,embe=False, prompt=prompt ,
                             image=image, mask_image=mask_image,
                             num_inference_steps=50 ,
                             strength=0.85,
                             guidance_scale=12.5 )
    image_list[0].show()
"""
 #デフォルトpipeのロード
model="./models/animagine-xl-2.0/animagine-xl-2.0.safetensors"
pipe_t2i=Df.pipeline_init("t2i",model=model)
pipe_i2i=Df.pipeline_init("i2i_pipe",pipeline=pipe_t2i)#pipelineの使い回し
pipe_inpaint=Df.pipeline_init("inpaint_pipe",pipeline=pipe_t2i)#pipelineの使い回し

if t2i:
    #-----LCM "t2i" アニメテスト
    #--embeddingあり
    print("++++++++++   t2iアニメ")
    #modelとpipeはデフォルトを使う
    prompt_embe=["masterpiece, best quality, 1girl, solo, flower, long hair, outdoors, letterboxed, school uniform, day, sky, looking up, short sleeves, parted lips, shirt, cloud" "black hair, sunlight, white shirt, serafuku, upper body, from side, pink flower, blurry, brown hair, blue sky, depth of field",
          "at shcool park,"]
    conditioning, pooled = Df.prompt_embedding(pipe_t2i,prompt_embe)
    image_count=2
    #generator  = [torch.Generator().manual_seed(0) for _ in range(image_count)]
    generator = torch.manual_seed(0 )
    x_image_list= Df.generate( pipe_t2i,
                             conditioning=conditioning ,
                             pooled=pooled ,
                             generator =generator,
                             height = 512, width = 512,
                             num_images_per_prompt=image_count,
                             freeu=True ,
                             )
    image_list=[]
    for i in range(int(len(x_image_list)/2)):
         x_image_list[i].show()
         image_list.append(x_image_list[i])

if t2i_em:
    #-----LCM "t2i" アニメテスト
    #modelとpipeはデフォルトを使う
    #--embeddingなし
    prompt = "masterpiece, best quality, 1girl, solo, long hair,  white shirt, serafuku,  brown hair,looking at viewer,blush,smile, bangs,blue eyes, simple background,t-shirt,white background,closed mouth,standing,white t-shirt,shorts, short shorts,headphones,black shorts,light brown hair,blue shorts ,running"
    image_count=2
    generator = torch.manual_seed(0 )
    x_image_list=Df.generate( pipe_t2i ,
              prompt=prompt ,
              embe=False,  generator=generator , freeu=True ,
              num_images_per_prompt=image_count,
              height=512,width=512)
    x_image_list[0].show()
    x_image_list[1].show()
    #generate ( pipe_t2i ,  prompt=prompt , embe=False  , generator=generator , freeu=True , height=1024,width=1024,  num_inference_steps=16 ,  guidance_scale=2.0 )[0].show()

if  i2i_pipe:
    #-----LCM "i2i" アニメテスト
    #-modelとpipeはt2i_pipeを使う
    print("++++++++++   i2i_pipe")
    #pipe_i2i =Df.pipeline_init("i2i_pipe",pipeline=pipe_t2i)#pipelineの使い回し
    prompt = "masterpiece, best quality, 1girl, solo, long hair,  white shirt, serafuku,  brown hair,looking at viewer,blush,smile, bangs,blue eyes, simple background,t-shirt,white background,closed mouth,standing,white t-shirt,shorts, short shorts,headphones,black shorts,light brown hair,blue shorts ,running"
    ##pipe_i2i=load_textual_inversion(pipe_i2i)
    conditioning, pooled = Df.prompt_embedding(pipe_i2i,prompt_embe)
    image =Df.load_image_img("MIKU.png")
    generator = torch.manual_seed(0 )
    conditioning, pooled = Df.prompt_embedding(pipe_i2i,prompt_embe)
    x_image_list = Df.generate( pipe_i2i,
                             image=image,
                             prompt=prompt ,
                             conditioning=conditioning ,
                             pooled=pooled ,
                             negative_prompt="worst quality",
                             generator=generator,
                             freeu=True,
                             num_inference_steps=6,
                             strength=0.5,
                             guidance_scale=1.0
                             )
    x_image_list[0].show()

if inpaint_pipe:
    #-----LCM "inpaint" アニメテスト
    #-modelとpipeはt2i_pipeを使う
    print("++++++++++  inpaint_pipe")
    #pipe_inpaint =Df.pipeline_init("inpaint_pipe",pipeline=pipe_t2i)#pipelineの使い回し
    image=Df.load_image_img("image_lcm_lora_3.png")
    mask_image =Df.load_image_img("mask_body.jpg")
    prompt = "masterpiece, best quality, 1girl, solo, long hair, red t-shirt,simple background,white background"
    generator = torch.manual_seed(19872631 )
    x_image_list = Df.generate( pipe_inpaint ,embe=False, prompt=prompt ,
                             image=image, mask_image=mask_image,
                             generator=generator,
                             height = 512,width = 512,
                             num_inference_steps=30,
                             strength=0.95,
                             guidance_scale=1.0)
    x_image_list[0].show()

if canny:
    #-----Control NET Canny テスト
    print("++++++++++  Control NET Canny" )
    model="./models/animagine-xl-2.0/animagine-xl-2.0.safetensors"
    original_image = Df.load_image_img("MIKU.png")
    canny_image = Df.get_canny(original_image=original_image)
    #Canny  ContorolNET用pipeの新規定義
    pipe_canny=Df.pipeline_init("canny",model=model)
    prompt = "masterpiece, best quality, 1girl, solo, long hair,  white shirt, serafuku,  brown hair,looking at viewer,blush,smile, bangs,blue eyes, simple background,t-shirt,white background,closed mouth,standing,white t-shirt,shorts, short shorts,headphones,black shorts,light brown hair,blue shorts ,running"
    negative_prompt = 'low quality, bad quality, sketches'
    x_image_list = Df.generate_controlnet( pipe_canny,
                             prompt = prompt ,
                             negative_prompt = negative_prompt,
                             image = canny_image,
                             num_inference_steps=12 ,
                             guidance_scale=1.0,
                             #height  = 512, width = 512,
                             guess_mode=True,
                             controlnet_conditioning_scale=0.5,)
    x_image_list[0].show()

if openpose:
    #-----Openpose t2i
    print("++++++++++  Control NET openpose" )
    model="./models/animagine-xl-2.0/animagine-xl-2.0.safetensors"
    #original_image  = Df.load_image_img("MIKU.png")
    original_image = load_image(
        "https://huggingface.co/datasets/huggingface/documentation-images/resolve/main/diffusers/person.png" )
    openpose_image = Df.get_openpose(original_image)
    openpose_image .show()
    prompt = "masterpiece, best quality, 1girl, solo, long hair,  white shirt, serafuku,  brown hair,looking at viewer,blush,smile, bangs,blue eyes, simple background,t-shirt,white background,closed mouth,standing,white t-shirt,shorts, short shorts,headphones,black shorts,light brown hair,blue shorts ,running"
    negative_prompt = 'low quality, bad quality, sketches'
    #Openpose  ContorolNET用pipeの新規定義
    pipe_openpose=Df.pipeline_init("openpose",model=model)
    x_image_list = Df.generate_controlnet( pipe_openpose,
                             prompt = prompt ,
                             negative_prompt = negative_prompt,
                             image = openpose_image,
                             num_inference_steps=8,
                             guidance_scale=1.0,
                             height = 512, width = 512,
                             guess_mode=True,
                             controlnet_conditioning_scale=0.8,)
    x_image_list[0].show()

if canny_openpose:
    #-----Openpose combaine Canny & Openpose
    print("++++++++++   Control NET canny & openpose" )
    model="./models/animagine-xl-2.0/animagine-xl-2.0.safetensors"
    original_image = Df.load_image_img("haikei.png")

    #Diffusesのサンプルを使う    **Cannyの中央をマスクするサンプル***
    #original_image  = image = Df.load_image_img("https://huggingface.co/datasets/huggingface/documentation-images/resolve/main/diffusers/landscape.png")
    image = np.array(original_image)
    low_threshold = 100
    high_threshold = 200
    image = cv2.Canny(image, low_threshold, high_threshold)
    # zero out middle columns of image where pose will be overlaid
    zero_start = image.shape[1] // 4
    zero_end = zero_start + image.shape[1] // 2
    image[:, zero_start:zero_end] = 0
    image = image[:, :, None]
    image = np.concatenate([image, image, image], axis=2)
    canny_image = Image.fromarray(image)
    canny_image.show()
    #original_image  = load_image("https://huggingface.co/datasets/huggingface/documentation-images/resolve/main/diffusers/person.png" )
    #------------------------------------------------------------------------------------
    original_image = Df.load_image_img("nissinIMGL0853.jpg")
    openpose_image = Df.get_openpose(original_image)
    openpose_image .show()
    prompt = "masterpiece, best quality, 1girl, solo, long hair,  white shirt, serafuku,  brown hair,looking at viewer,blush,smile, bangs,blue eyes, simple background,t-shirt,white background,closed mouth,standing,white t-shirt,shorts, short shorts,headphones,black shorts,light brown hair,blue shorts ,running"
    negative_prompt = 'low quality, bad quality, sketches'
    #Multi  ContorolNET用pipeの新規定義
    pipe_canny_openpose=Df.pipeline_init("canny_openpose",model=model)
    #Multi  ContorolNET用イメージの定義
    images = [openpose_image.resize((1024, 1024)), canny_image.resize((1024, 1024))]
    generator = torch.manual_seed(19872631 )
    x_image_list = Df.generate_controlnet( pipe_canny_openpose,
                             prompt = prompt ,
                             negative_prompt = negative_prompt,
                             generator=generator,
                             image = images ,
                             num_inference_steps=32,
                             guidance_scale=1.0,
                             height = 512, width = 512,
                             guess_mode=True,
                             num_images_per_prompt=1,
                             controlnet_conditioning_scale=[1.0, 0.9],)
    x_image_list[0].show()

if t2i_adapter_canny:
    #-----T2I-Adapter &  Canny
    print("++++++++++   T2I-Adapter" )
    image = Df.load_image_img(
         "https://huggingface.co/Adapter/t2iadapter/resolve/main/figs_SDXLV1.0/org_canny.jpg"
    ).resize((384, 384))
    canny_image =Df.get_canny(image).resize((1024, 1216))
    canny_image.show()
    #model ="./models/animagine-xl-2.0/animagine-xl-2.0.safetensors"
    model="stabilityai/stable-diffusion-xl-base-1.0"
    pipe_t2i_adapter=Df.pipeline_init("t2i_adapter_canny",model=model, lora_en=False)
    prompt = "Mystical fairy in real, magic, 4k picture, high quality"
    negative_prompt = "extra digit, fewer digits, cropped, worst quality, low quality, glitch, deformed, mutated, ugly, disfigured"
    generator = torch.manual_seed(0)
    x_image_list = Df.generate_t2a_adapter(pipe_t2i_adapter,
                             prompt=prompt,
                             negative_prompt=negative_prompt,
                             image = canny_image,
                             generator=generator,
                             num_inference_steps = 34,
                             guidance_scale=1.0,
                             adapter_conditioning_scale=0.8,
                             adapter_conditioning_factor=1,
                              )
    x_image_list[0].show()

if depth:
    #-----SDXL ControlNET Depth
    print("++++++++++  Control NET Depth" )
    #model ="./models/animagine-xl-2.0/animagine-xl-2.0.safetensors"
    model="./models/sd_xl_1.0/sd_xl_base_1.0.safetensors"
    image=Df.load_image_img("nissinIMGL0853.jpg")
    depth_image = Df.get_depth_map(image)
    prompt = "masterpiece, best quality, 1girl, solo, long hair, red t-shirt,simple background,white background"
    negative_prompt = 'low quality, bad quality, sketches'
    #Openpose  ContorolNET用pipeの新規定義
    pipe_depth = Df.pipeline_init("depth",model=model)
    x_image_list = Df.generate_controlnet( pipe_depth,
                             prompt = prompt ,
                             negative_prompt = negative_prompt,
                             image = depth_image,
                             num_inference_steps=30,
                             guidance_scale=1.0,
                             height = 512, width = 512,
                             controlnet_conditioning_scale=0.5,)
    x_image_list[0].show()
まとめ
1ヶ月半に渡るDiffusersのテストの纏めとしてDiffusersPipelineManagerクラスを作成し、テストプログラムから容易に画像生成を試すことができるようになりました。アプリケーションプログラムから呼び出して画像を生成することが簡単になります。クラス化出来ているのでFastAPIでラップすればAPI化も容易です。次回はAPI化と画像生成サーバの実装です。
テスト用画像、注記など
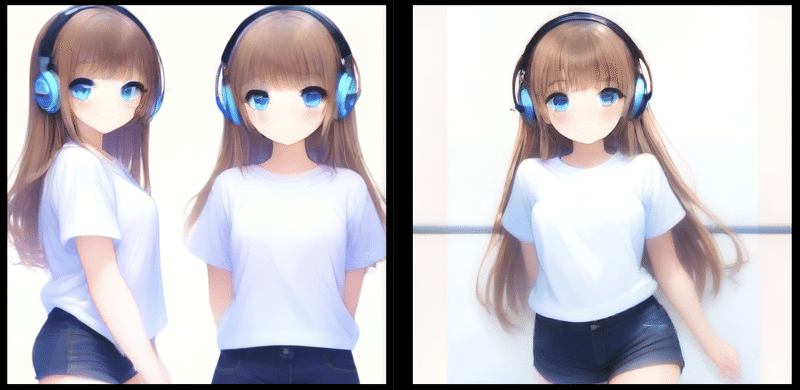
テストで用いいる画像
i2iとCannyで使用している入力画像
inpaintで使用している入力画像とマスク

注)Guess モードでは、ControlNet にプロンプトを提供する必要はまったくありません。これにより、ControlNet エンコーダは、入力コントロール マップの内容 (深度マップ、ポーズ推定、キャニー エッジなど) を最善の方法で「推測」するように強制されます。
注)FreeU で生成品質を向上させる。
UNet は逆拡散プロセス中のノイズ除去を担当し、そのアーキテクチャには 2 つの異なる特徴があります。
バックボーン機能は主にノイズ除去プロセスに貢献します。
スキップ機能は主に高周波機能をデコーダ モジュールに導入し、ネットワークがバックボーン機能のセマンティクスを見逃す可能性があります。 ただし、スキップ接続により、画像の細部が不自然になる場合があります。 FreeU は、UNet のスキップ接続とバックボーン機能マップからの寄与のバランスを再調整することで画質を向上させる技術です。 FreeU は推論中に適用され、追加のトレーニングは必要ありません。この技術は、テキストから画像、画像から画像、テキストからビデオなどのさまざまなタスクに使用できます。
注)Crop conditioning
SDXL は、学習時に (座標 (0, 0)) がが中心にある被写体と完全な顔に相 関するよう学習します (これは 🤗 ディフューザーのデフォルト値
です)。中心からずれた構図を生成したい場合は、Crop conditioningで
座標を指定出来ます。