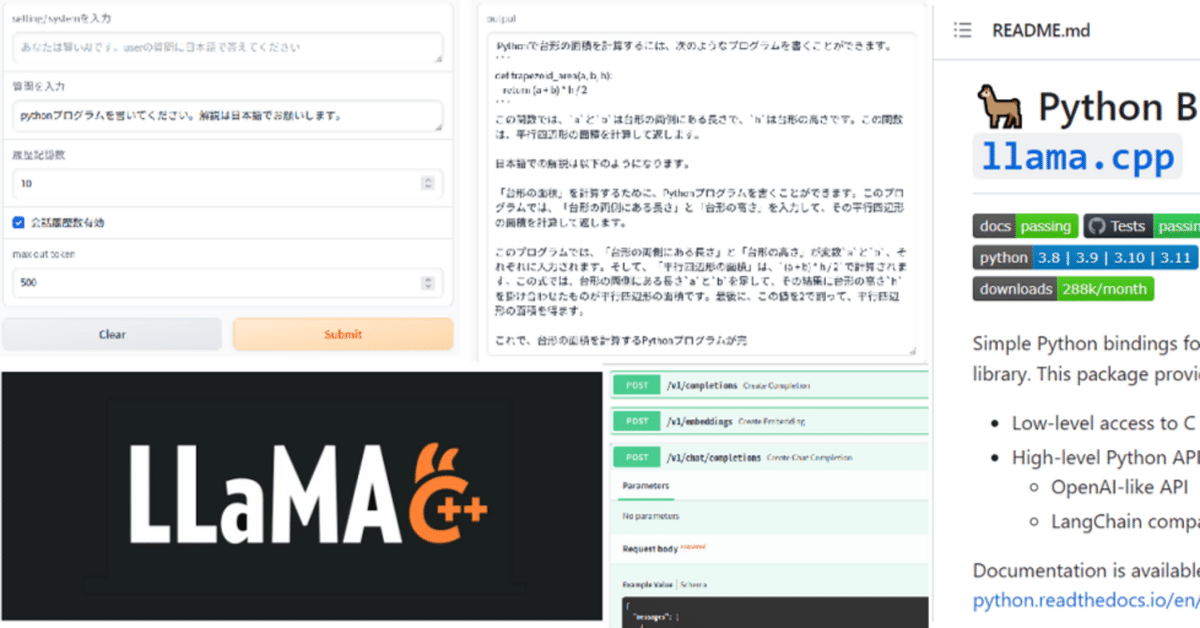
Llama-cpp-pythonでOpenAIのChatGPT互換APIサーバを立てる。

ローカルで色々なLLMを試してきましたが、実際にアプリに組み込むときには、評価用のコードでは色々と面倒です。また、LLM側とアプリ側が密になっているとデバッグ等で再起動が必要な時などにモデルのロードから始まるため、時間の無駄が生じます。確立されたLLMのAPIはOpenAIのAPIでしょう。いくつかのLLM動作環境ではOpenAI互換もあります。今回はLlama-cpp-pythoを使ってOpenAI互換APIサーバを稼働させ、さらに動作確認用としてgradioによるGUIアプリも準備しました。
動作環境
Ubuntu20.04
Corei9 10850K
MEM 32GByte
GPU Gforce4090
動作検証の結果から
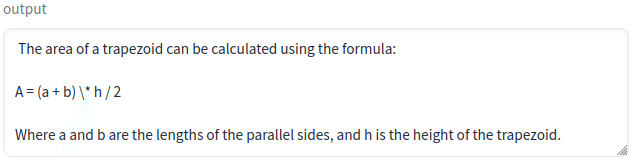
まず、この記事で準備したGUIで稼働させたサーバに接続して対話をした時の状態を見ていきます。(コード全体は最後に記載しています)
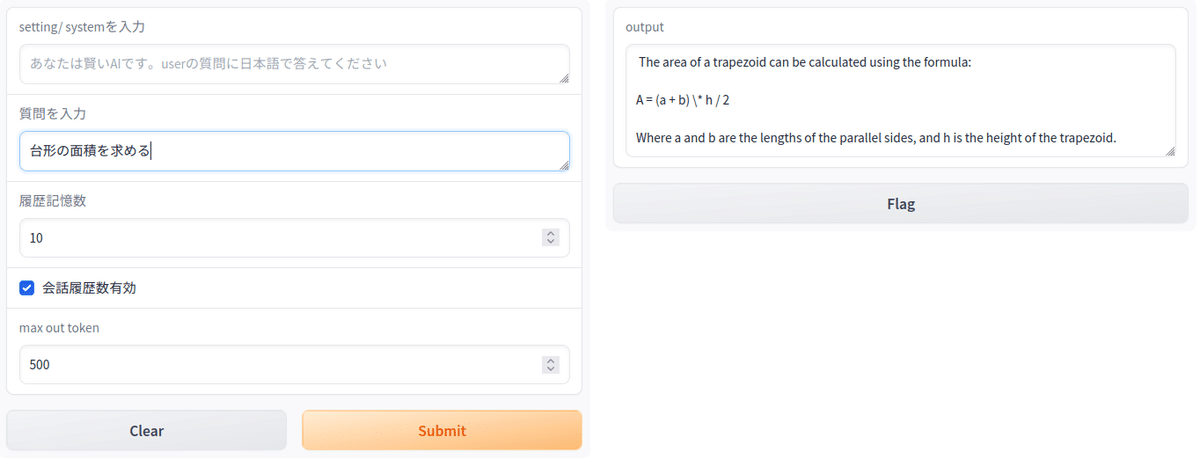
LLMは以下のように返事を返してきました。公式を教えてくれた訳ですね。
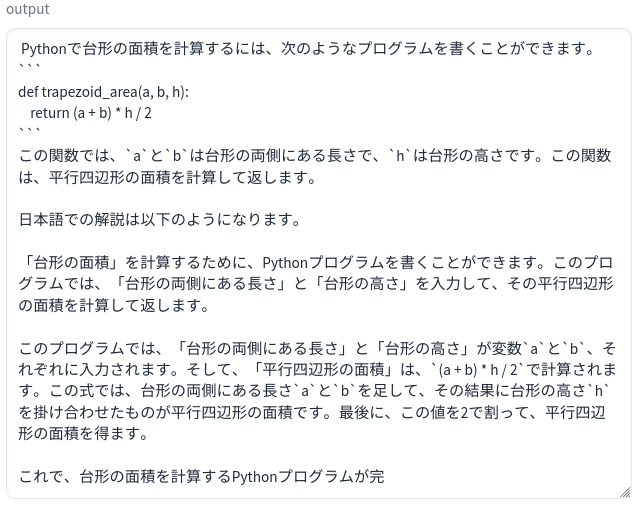
さらに、「pythonプログラムを書いてください。解説は日本語でお願いします」と入力します。ここでは台形に言及していません。
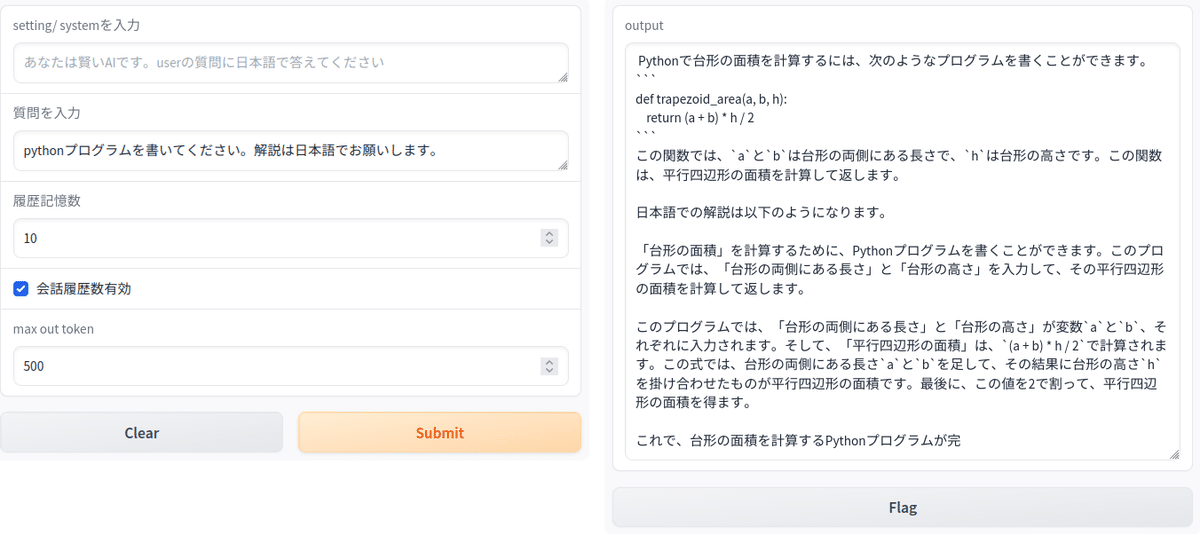
LLMからの返事です。計算用の関数を示して解説を日本語で出力しています。2回目の質問で「台形の面積」を入力に入れてませんが、一つ前の質問から判断して台形の面積のプログラムを生成しています。
OpenAIのAPIではsystemやuser、assistantとともに、会話履歴を送ることができます。今回のアプリでも会話履歴を設定できるので、あたかも会話をしてるような回答がでてきます。ただ、長くすると、新たな質問に移行しないので、履歴削除も必要です。今回のアプリでは履歴数を0にするか、「会話履歴数有効」チェックボックスのチェックを外すと履歴の記録は停止するので毎回異なる会話セッションになります。
このアプリではOpenAIのAPIをそのまま利用しています。サーバ側ではllama-cpp-pythonをサーバモードで起動しています。この例ではモデルをcodellama-34b-instruct.Q4_K_M.ggufで起動しているので、ローカルながら高い性能を期待できます。実際、上記の会話はChatGPTの会話の簡略版のような結果になっています。モデルはサーバ側で適時変更できるのでggufタイプのモデルがあるLLMですと動くはずです。最近は4060tiのような16G-VRAM搭載のGPUが安価に入手できますから、用途の異なる複数のLLMサーバを立てることも比較的容易ではないかと思います。本記事ではLLMサーバの立て方と上記アプリをソースコードをもとに解説していきます。
1,環境の構築
既にLlama.cppが動く環境であれば前半は不要です。読み飛ばしてください。あるいはCUDA環境があれば、llama.cppのビルドあたりからです。
CUDA tool-kit install
以下からダウンロードします。
Linux→x86_64→Ubuntu→20.04→runfile(local)
wget https://developer.download.nvidia.com/compute/cuda/12.2.2/local_installers/cuda_12.2.2_535.104.05_linux.run
sudo sh cuda_12.2.2_535.104.05_linux.run
PATHを設定
ホームの.bashrcをエディタで修正。最下部に以下を追加して再起動します。
export PATH="/usr/local/cuda-12.2/bin:$PATH"
export LD_LIBRARY_PATH="/usr/local/cuda-12.2/lib64:$LD_LIBRARY_PATH"
export CUDA_PATH="/usr/local/cuda-12.2/bin:$PATH"
2,Llama.cppを動かす
Python3.10以降の仮想環境を準備
環境の名称は何でも良いのですが、後にOpen-Interpreterも動かすのでInterpriter にしました。
conda create -n interpreter python=3.10
conda activate interpreter
Llama.cppをインストール
以下の公式に書いてあるとおりです。
git clone https://github.com/ggerganov/llama.cpp
cd llama.cpp
GPUはなくても動きますが、生成速度が遅いのでGPUアクセラレータ付きでビルドします。中程にcuBLASを使う場合の方法の記述があります。
cuBLAS
This provides BLAS acceleration using the CUDA cores of your Nvidia GPU. Make sure to have the CUDA toolkit installed. You can download it from your Linux distro's package manager or from here: CUDA Toolkit.
mkdir build
cd build
cmake .. -DLLAMA_CUBLAS=ON
cmake --build . --config Release
モデル
ggufモデルをダウンロードし、llama.cppディレクトリ内にmodelsディレクトリを作成して移しておきます。
以下はcodellama-13b-instruct.Q4_K_M.ggufの場合の例です。
テスト
./main -m ./models/codellama-13b-instruct.Q4_K_M.gguf -n 128 -ngl 20コンソールに多量のメセージが出ますが、最後の方に以下のような記述があればOKです。
llm_load_tensors: offloading 40 repeating layers to GPU
llm_load_tensors: offloading non-repeating layers to GPU
llm_load_tensors: offloading v cache to GPU
llm_load_tensors: offloading k cache to GPU
llm_load_tensors: offloaded 43/43 layers to GPU
さらに、system_info: n_threads =の中程に BLAS = 1になっています。
BLAS = 0の場合はGPUでは動いていません。
3,Llama-cpp-pythonのインストール
ビルド
Installation with Hardware Acceleration
To install with cuBLAS, set the LLAMA_CUBLAS=1 environment variable before installing:
に従います。
export LLAMA_CUBLAS=1
CMAKE_ARGS="-DLLAMA_CUBLAS=on" pip install llama-cpp-python
または再ビルド時
pip install llama-cpp-python --force-reinstall --upgrade --no-cache-dir -vv
PATHが通っていないとGPUなし版がビルドされるので、もしもCUDA-toolkit not foundのようなエラ-が出る場合は明示的にPATHを通してから上記ビルドをします。llama.cppがビルド出来てもllama-cpp-pythonではビルド出来ないケースがあります。
export CUDA_PATH=/usr/local/cuda-12.2/bin
export PATH=/usr/local/cuda/cuda-12.2/bin:$PATH
LD_LIBRARY_PATH=/usr/local/cuda-12.2/lib64
4,Web Serverの立ち上げ
今回のメインの作業です。llama-cpp-python[server]をインストールし、ビルドします。通常のllama-cpp-pythonと同じ作業です。
CMAKE_ARGS="-DLLAMA_CUBLAS=on" FORCE_CMAKE=1 pip install llama-cpp-python[server]モデルはllama.cppのビルド/試験時にllama.cpp内のmodelsディレクトリにダウンロードしているので、cd lama.cpp でディレクトリを移動しておきます。
以下はcodellama-34b-instruct.Q4_K_M.ggufをダウンロードした時のサーバ起動コマンドの例です。
python3 -m llama_cpp.server --model models/codellama-34b-instruct.Q4_K_M.gguf --n_gpu_layers 51system_info: n_threads =の中程でBLAS = 1になっていればGPUで動いています。BLAS = 0だとCPUで動きますが、遅いです。
http://localhost:8000 サーバが起動します。ドキュメントは
http://localhost:8000/docs で表示されます。
curlで動作確認
新たにターミナルを開きます。
curl http://localhost:8000/v1/chat/completions -H 'Content-Type: application/json' -d '{"model": "gpt-3.5-turbo","messages": [{"role": "user", "content": "こんにちは、元気?今日は何してた?日本語で回答してください。"}]}'レスポンスです。jeson形式で帰って来ます。
{"id":"chatcmpl-62c10fe7-37a4-430f-872a-6685948444bc","object":"chat.completion","created":1696147333,"model":"gpt-3.5-turbo","choices":[{"index":0,"message":{"role":"assistant","content":" Hello! I'm doing well, thank you for asking. How about you"},"finish_reason":"length"}],"usage":{"prompt_tokens":48,"completion_tokens":16,"total_tokens":64}}(base)
改行を入れて書き直すと以下のようになります。
{"id":"chatcmpl-62c10fe7-37a4-430f-872a-6685948444bc",
"object":"chat.completion",
"created":1696147333,
"model":"gpt-3.5-turbo",
"choices":[
{"index":0,"message":{
"role":"assistant",
"content":" Hello! I'm doing well, thank you for asking. How about you"
},
"finish_reason":"length"}
],
"usage":{"prompt_tokens":48,
"completion_tokens":16,
"total_tokens":64
}
}
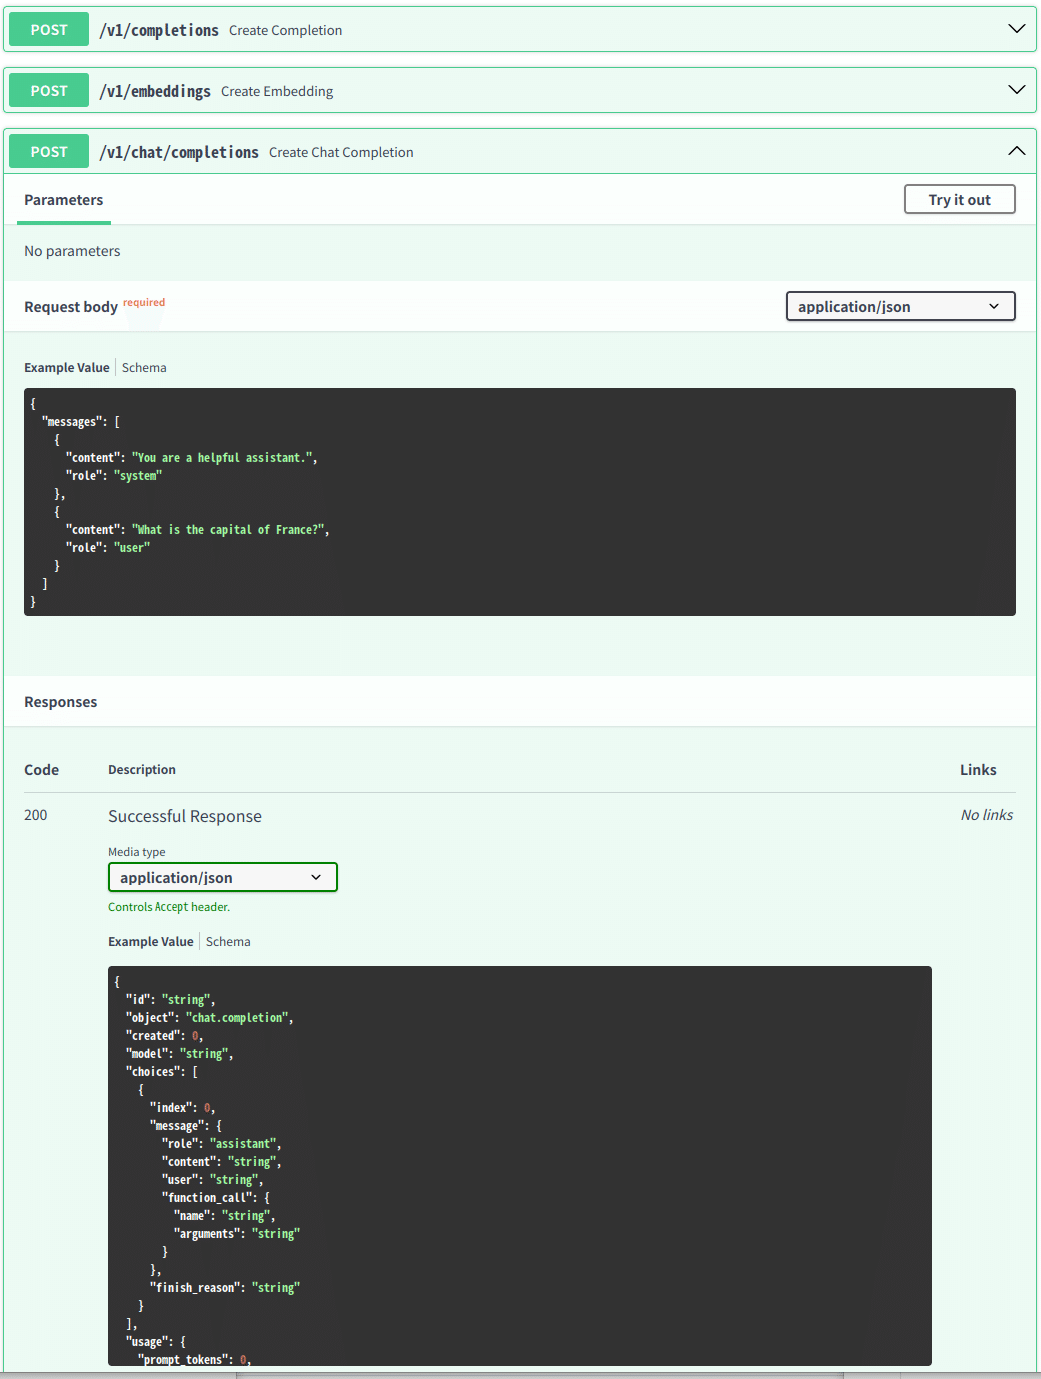
http://localhost:8000/docsでAPIと比較
HOSTアドレスを指定する
サーバーとして共有できるようにアドレスを公開します。
--host
--port
でホストアドレスとポート番号オプションが設定できます。
python3 -m llama_cpp.server --model models/codellama-34b-instruct.Q4_K_M.gguf --host 0.0.0.0 --n_gpu_layers 515,クライアント側のアプリ
gradioでGUIを作成しました。
openaiのpythonモジュールをインストールします。さらにgradioもインストールします。
pip install openai
pip install gradio
python openai_test.pyでアプリを起動します。コードがあるディレクトリで動かしますが、環境は特に制限はありません。上記の2つのモジュールがインストールされていれば動きます。
初期化
new_past_messages=[]
settings="あなたは賢いAIです。userの質問に日本語で答えてください" #System
settingsはsystemとして送られるプロンプトです。GUIの中で自由に変更ができます。
gradioとのインターフェース関数
def text_gen(system_txt, input_text, histry_num, histry_check, max_tokens):
       global new_past_messages
       settings=system_txt
       comment=input_text
       past_messages= new_past_messages
       out_comment,  past_messages = openAI_completion(comment,  settings,   past_messages,histry_num,histry_check,max_tokens)
       new_past_messages=past_messages
       print("new_past_messages",new_past_messages)
       return out_comment
text_gen(system_txt, input_text, histry_num, histry_check, max_tokens)で受け渡しをします。
system_txt settingsに渡されるテキスト
input_text userの入力になるテキスト
histry_num 履歴記録回数
histry_check 履歴の有効・無効
max_tokens 出力トークン数(多めの設定にすると返事が遅くなります)
OpenAI互換APIを呼び出す関数(前半)
 #OpenAI  api を呼び出す
def openAI_completion(new_message_text, settings_text, past_messages,histry_num,histry_check,max_tokens):
    openai.api_key=""
    openai.api_base="http://localhost:8000/v1"
    max_tokens_set=int(max_tokens)
    max_keep_msg=int(histry_num)
    if histry_check==False:
           print("histry_check=0")
           max_keep_msg=0
openai.api_base="http://localhost:8000/v1"でサーバアドレスとポートを指定しています。DOCSのAPI説明で各APIはv1から始まっているので、ポートの後ろにv1を追加して互換性を持たせています。あとは各種のパラメータセットを行っている部分です。openai.api_key=""ではkeyが無いので空白です。
APIボディー作成部分
このコードはAItuverめぐチャンネルで使用しているコードとほぼ同じです。
    if len(past_messages) == 0 and len(settings_text) != 0:
        # If this is the first message and settings are provided, add a system message with the settings
        system = {"role": "system", "content": settings_text}
        past_messages.append(system)
        # past messages list<=system

    new_message = {"role": "user", "content": new_message_text}
    past_messages.append(new_message)
    print(past_messages)
    #OpenAI  api
    result = openai.ChatCompletion.create(
        model="gpt-3.5-turbo",
        messages=past_messages,
        max_tokens=max_tokens_set
        )
    print("result =",result )
    print("finish_reason:",result.choices[0].finish_reason)
    response_message = {"role": "assistant", "content": result.choices[0].message.content}

    # past messagesを記憶数する処理、max_leep_msgで設定されたメッセージ数まで
    if max_keep_msg !=0:
        past_messages.append(response_message)
        if len(past_messages) > max_keep_msg:
            # Keep only the last 20 messages
            system_setting = past_messages[0]
            last_past_messages = past_messages[3:]
            past_messages = [system_setting] + last_past_messages
    else:
            past_messages =[]
    response_message_text = result.choices[0].message.content
    # response message text= response message(AI Message)
    return response_message_text, past_messages
前半でmessagesを準備しています。
中ほどの以下の部分がAPIです。
result = openai.ChatCompletion.create(
model="gpt-3.5-turbo",
messages=past_messages,
max_tokens=max_tokens_set )
後半は履歴アップデート部分です。
gradio GUI
特に変わったところは無いです。
# GradioのUIを定義します
interface = gr.Interface(
    fn=text_gen,
    inputs=[gr.Textbox(label="setting/ systemを入力", placeholder=settings),
            gr.Textbox(label="質問を入力", placeholder="ここにテキストを入力"),
            gr.Number(10, label="履歴記憶数"),
            gr.Checkbox(1, label="会話履歴数有効"),
            gr.Number(500, label="max out token")],
    outputs="text"  # 出力はテキストとして指定
    )
# Gradioアプリケーションを起動します
interface.launch()
まとめ
ローカルでOpenAIと互換サーバを立てることができました。今回は同一PC内でサーバとクライアントアプリを動かしましたが、サーバのアドレスを外部に公開すれば使い勝手はOpenAIのAPIをアクセスしているのと同じです。
code-llamaの34Bは大きなモデルだけあって質問に対する返事も違和感がありません。どれだけ利用しても無料というのはありがたいですし、他の日本語会話に特化したLLMでもサーバを立ち上げて使い分けをすればさらに便利です。評価コードだけではわからないLLMの実力もわかりやすくてとても面白い結果になりました。
おまけ
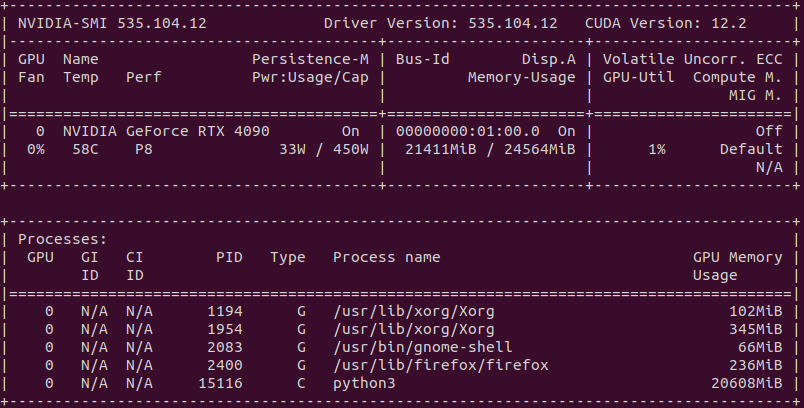
稼働中のGPUの状態 34Bもあるので、21Gbyteも利用しています。
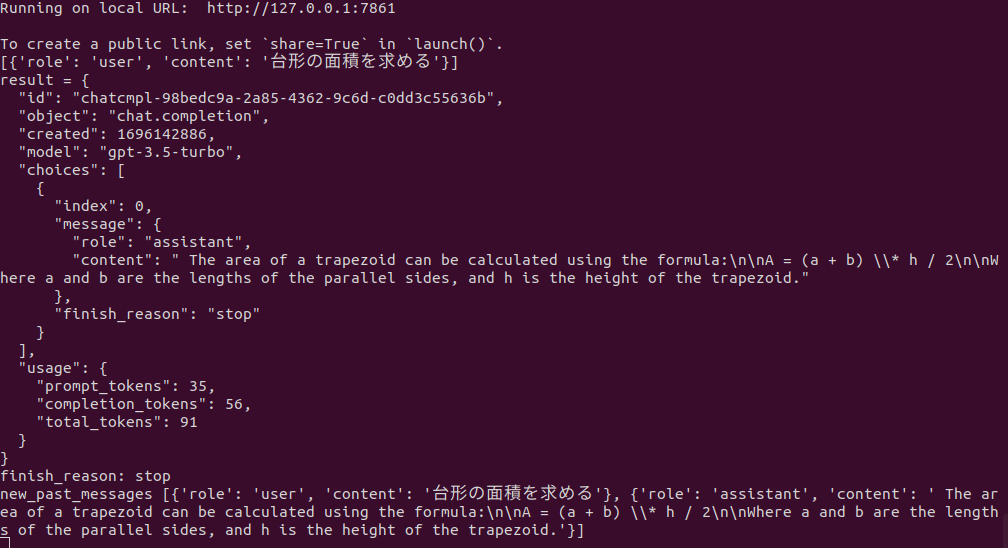
サーバ側メッセージ

クリアント側メッセージ
全コード openai_test.py
import openai
import gradio as gr

new_past_messages=[]
settings="あなたは賢いAIです。userの質問に日本語で答えてください" #System

def text_gen(system_txt, input_text, histry_num, histry_check, max_tokens):
       global new_past_messages
       settings=system_txt
       comment=input_text
       past_messages= new_past_messages
       out_comment,  past_messages = openAI_completion(comment,  settings,   past_messages,histry_num,histry_check,max_tokens)
       new_past_messages=past_messages
       print("new_past_messages",new_past_messages)
       return out_comment
  #OpenAI  api を呼び出す
def openAI_completion(new_message_text, settings_text, past_messages,histry_num,histry_check,max_tokens):
    openai.api_key=""
    openai.api_base="http://localhost:8000/v1"
    max_tokens_set=int(max_tokens)
    max_keep_msg=int(histry_num)
    if histry_check==False:
           print("histry_check=0")
           max_keep_msg=0

    if len(past_messages) == 0 and len(settings_text) != 0:
        # If this is the first message and settings are provided, add a system message with the settings
        system = {"role": "system", "content": settings_text}
        past_messages.append(system)
        # past messages list<=system

    new_message = {"role": "user", "content": new_message_text}
    past_messages.append(new_message)
    print(past_messages)
    #OpenAI  api
    result = openai.ChatCompletion.create(
        model="gpt-3.5-turbo",
        messages=past_messages,
        max_tokens=max_tokens_set
        )
    print("result =",result )
    print("finish_reason:",result.choices[0].finish_reason)
    response_message = {"role": "assistant", "content": result.choices[0].message.content}

    # past messagesを記憶数する処理、max_leep_msgで設定されたメッセージ数まで
    if max_keep_msg !=0:
        past_messages.append(response_message)
        if len(past_messages) > max_keep_msg:
            # Keep only the last 20 messages
            system_setting = past_messages[0]
            last_past_messages = past_messages[3:]
            past_messages = [system_setting] + last_past_messages
    else:
            past_messages =[]
    response_message_text = result.choices[0].message.content
    # response message text= response message(AI Message)
    return response_message_text, past_messages

# GradioのUIを定義します
interface = gr.Interface(
    fn=text_gen,
    inputs=[gr.Textbox(label="setting/ systemを入力", placeholder=settings),
            gr.Textbox(label="質問を入力", placeholder="ここにテキストを入力"),
            gr.Number(10, label="履歴記憶数"),
            gr.Checkbox(1, label="会話履歴数有効"),
            gr.Number(500, label="max out token")],
    outputs="text"  # 出力はテキストとして指定
    )
# Gradioアプリケーションを起動します
interface.launch()