LLMを使ってデスクトップマスコットに命を吹き込む

Takaさんの「フィーちゃんをデスクトップマスコットにするのに本気を出した話」をベースに作っています。
同じものを使っても面白くないのでライブラリを変えたり、文章の生成をChatGPTからLLMに、合成音声をCevio AIからVOICEVOXに変えてやってみました。
テキストの送信以外にマイクで会話できる機能を追加しました。
あと、Unityを使うのはこれが初めてなのでコードに何かあればコメントをください。
GPU使用率を見る感じ6GBでもギリギリ使えるようになってると思います。
実際の動作▼
Taka(@tktksnsn07)さんのnoteを参考にVOICEVOXとLLMを使ってデスクトップマスコットを作ってみた
— しろ (@siro020) September 29, 2023
テキスト入力に加えマイク入力を追加しました
サンプル動画は次にあります。
VOICEVOX声:四国めたん
Live2Dモデル:桃瀬ひより
Takaさんのnote▼https://t.co/j1HIrcghCM pic.twitter.com/zRtx2B2ure
マイク入力バージョン pic.twitter.com/57WXJB1Mm4
— しろ (@siro020) September 29, 2023
GPUが1GBぐらい使ってるのはChromeのせいです。
PythonとUnityの環境▼
・Python:3.10.11
・Unity:2022.3.8f1
Python(サーバ)
サーバで行うこと
テキストを音声データに変える
音声データを返す
収録した音声をテキストに変える
準備
Pythonの仮想環境(venv)を作成します。
作成するディレクトリに移動してコマンドを入力する
仮想環境の作成▼
$ py -m venv .venv
もしくは
$ python -m venv .venv.venvが仮想環境名になります。
環境起動▼
$ .venv\Scripts\activate参照▼
ライブラリのインストール
サーバ --- FastAPI、uvicorn
音声認識 --- faster_whisper
合成音声 VOICEVOX --- voicevox_core
LLMの推論 --- ctranslate2
その他 --- transformers、torch、accelerate、sentencepiec
pip インストールコマンド▼
$ pip install fastapi uvicorn ctranslate2 transformers faster-whisper accelerate sentencepiecePyTorchは環境にあったものをインストールしてください。
$ pip3 install torch torchvision torchaudio --index-url https://download.pytorch.org/whl/cu118
どちらか
$ pip3 install torch torchvision torchaudio --index-url https://download.pytorch.org/whl/cu117VOICEVOX COREのインストール
VOICEVOX COREには以下の3つが必要になります。
VOICEVOX COREのインストール
ONNX Runtimeのダウンロード
Open Jtalkのダウンロード
1) VOICEVOX COREのインストール
VOICEVOXのwheelパッケージのインストール
使うバージョンはCUDAの0.14.4
$ pip install https://github.com/VOICEVOX/voicevox_core/releases/download/0.14.4/voicevox_core-0.14.4+cuda-cp38-abi3-win_amd64.whl2) ONNX Runtimeのダウンロード
pcのビットに合わせてインストールしてください、私は64ビットなので
onnxruntime-win-x64-1.13.1.zipをダウンロードしました。
解凍した中からonnxruntime.dllとonnxruntime_providers_shared.dllを環境の直下に置きます。
3) Open Jtalkのダウンロード
以下のリンクからダウンロード、解凍してopen_jtalk_dic_utf_8-1.11を環境直下に置きます。
ディレクトリが以下のようになっているか確認してください。
ディレクトリ名
├─.venv
├─open_jtalk_dic_utf_8-1.11
├─app.py
├─onnxruntime_providers_shared.dll
└─onnxruntime.dll
参考▼
テキストを音声に変える
クライアントから送信されたテキストを推論し音声データに変更し音声ファイルパスを返す。
LINEのLLMを使います。
LLMはctranslate2を使いモデルをダウンロード&コンパイルし高速推論できるようにします。
$ ct2-transformers-converter --model "line-corporation/japanese-large-lm-3.6b-instruction-sft" --copy_files spiece.model tokenizer_config.json special_tokens_map.json --output_dir ".\llm\line" --quantization int8_float16 --force--model:モデルパス
--copy_files:Hugging Faceからコピーするファイル名
--output_dir: 出力ディレクトリ
--quantization:重み量子化タイプ
--force:出力ディレクトリが存在する場合、強制的に変換
モデルは環境直下にllm\lineディレクトリが作成されlineフォルダの中にファイルが保存されます。
・config.json
・model.bin
・special_tokens_map.json
・spiece.model
・tokenizer_config.json
・vocabulary.json
ディレクトリが以下のようになっているか確認してください。
ディレクトリ名
├─.venv
├─llm
│  └─line
│    └─モデルファイル
├─open_jtalk_dic_utf_8-1.11
├─api.py
├─onnxruntime_providers_shared.dll
└─onnxruntime.dll
参考▼
送られたテキストを推論させるコード▼
ファイル名:llm.py
import ctranslate2, torch
import transformers
import json
import os

def generate_batch(history):
    model_path = "llm\line"

    generator = ctranslate2.Generator(model_path, device="cuda" if torch.cuda.is_available() else "cpu")
    tokenizer = transformers.AutoTokenizer.from_pretrained(model_path, use_fast=False)

    tokens = tokenizer.convert_ids_to_tokens(tokenizer.encode(history, add_special_tokens=False))
    results = generator.generate_batch(
        [tokens],
        max_length=128,
        # max_length=256,
        sampling_topk=1,
        # sampling_topk=10,
        sampling_temperature=0.1,
        repetition_penalty=1.1,
        include_prompt_in_result=False,
        cache_static_prompt=True,
        return_scores=True,
    )
    text = tokenizer.decode(results[0].sequences_ids[0])
    return text

def reply_llm_msg(text, history = ''):
    # 会話の最大記録数
    max_history = 5

    history_data, history_path = setting(history)

    while len(history_data) > max_history:
        history_data.pop(0)

    print(len(history_data))
    message = []

    message.append(
        {
            "speaker": "ユーザー",
            "text": text
        },
    )

    prompt = [
        f"{uttr['speaker']}: {uttr['text']}"
        for uttr in history_data + message
    ]
    prompt = "\n".join(prompt)
    prompt += "\nシステム: "

    output = generate_batch(prompt) # ユーザー:などが含まれるものが返ってくる
    text = output.split("\n")
    print(text)

    prompt += f"{text[0]}\n"
    message.append(
        {
            "speaker": "システム",
            "text": text[0]
        },
    )

    # 履歴
    history_data.extend(message)

    with open(history_path, mode='wt', encoding="UTF-8") as f:
        json.dump(history_data, f, indent=2, ensure_ascii=False)

    return text[0]

def setting(history_path):
    try:
        with open(history_path, encoding="UTF-8") as f:
            data = json.load(f)
        return (data, history_path)

    except FileNotFoundError:
        dir_name = 'historys'
        history_name = 'history.json'
        save_dir(dir_name)

        history_path = f'{dir_name}/{history_name}'

        if not os.path.exists(history_path):

            with open(history_path, mode='w', encoding="UTF-8") as f:
                f.write('[]')

        with open(history_path, encoding="UTF-8") as f:
            data = json.load(f)

        return (data, history_path)

def save_dir(*args):

    for i in args:
        if not os.path.isdir(i):
            os.makedirs(i)
llm.pyのコードやLLMは自分なりにカスタマイズしてください。
推論したテキストを音声に変えるコード▼
ファイル名:voice.py
from pathlib import Path
import voicevox_core
from voicevox_core import AccelerationMode, AudioQuery, VoicevoxCore
from datetime import datetime
import os

def text2voice(text, speaker_id):
    open_jtalk_dict_dir = './open_jtalk_dic_utf_8-1.11'
    acceleration_mode = AccelerationMode.AUTO

    d = 'output\\voice'
    save_dir(d)

    # now = datetime.now().strftime('%Y%m%d%H%M%S')
    # out = Path(f'{d}\\{now}.wav')
    out = Path(f'{d}\\voice.wav')

    core = VoicevoxCore(
        acceleration_mode=acceleration_mode, open_jtalk_dict_dir=open_jtalk_dict_dir
    )
    core.load_model(speaker_id)
    audio_query = core.audio_query(text, speaker_id)
    wav = core.synthesis(audio_query, speaker_id)
    out.write_bytes(wav)

    return out

def save_dir(*args):

    for i in args:
        if not os.path.isdir(i):
            os.makedirs(i)
参考▼
収録した音声をテキストに変える
ctranslate2を使いwhisper-large-v2モデルをダウンロード&コンパイルし高速推論
$ ct2-transformers-converter --model openai/whisper-large-v2 --output_dir model/faster-whisper-large-v2 --copy_files tokenizer.json --quantization int8_float16モデルは環境直下にmodel/faster-whisper-large-v2ディレクトリが作成されfaster-whisper-large-v2フォルダの中にファイルが保存されます。
・config.json
・model.bin
・tokenizer.json
・vocabulary.json
音声ファイルを文字起こしするコード▼
ファイル名:voice_recognition.py
from faster_whisper import WhisperModel
import time

def voiceRecognition(audio):
    model_size = "model\\faster-whisper-large-v2"

    model = WhisperModel(model_size, device="cuda", compute_type="int8")

    segments, info = model.transcribe(audio, beam_size=5, language='ja')

    result = ' '.join([segment.text for segment in list(segments)])

    return result
参考▼
バックエンドの処理APIの作成
クライアントからのリクエストを受け付ける処理。
ファイル名:api.py
from fastapi import FastAPI, Request, status, Response
from fastapi.responses import FileResponse
from fastapi.exceptions import RequestValidationError
from fastapi.responses import JSONResponse
import subprocess
import os
from pydantic import BaseModel
from time import time
import voice, llm, voice_recognition

app = FastAPI()

@app.exception_handler(RequestValidationError)
async def handler(request:Request, exc:RequestValidationError):
    print(exc)
    return JSONResponse(content={}, status_code=status.HTTP_422_UNPROCESSABLE_ENTITY)

class RequestAudio(BaseModel):
    audio: str

# マイクでしゃべれるようにするものを追加する
@app.post("/voice")
def voiceRecognition(data: RequestAudio):
    start = time()

    result = voice_recognition.voiceRecognition(data.audio)
    end = time()
    processing_time = end - start

    data = {
        "text": result,
        "time": processing_time
    }
    print(data)

    return data

class RequestData(BaseModel):
    text: str
    # speak: int
    # history: str

@app.post("/text")
def llmtext2voice(request_data: RequestData):
    """テキストを合成音声に変える

    Args:
        text (str): ユーザの入力
        speak (int): voicevoxのボイスid

    Returns:
        _type_: ファイルパスを返す
    """
    start = time()

    text = request_data.text

    message = llm.reply_llm_msg(text)

    # 音声に変換
    wav = voice.text2voice(message, 2)
    name = os.path.basename(wav)
    end = time()
    processing_time = end - start

    data = {
        "filename": name,
        "reply": message,
        "time": processing_time
    }
    print(data)

    return data

class RequestData2(BaseModel):
    text: str

@app.get("/audio")
def read_item(file_name):

    with open(f'output\\voice\\{file_name}', 'rb') as f:
        wav_data = f.read()

    # Responseオブジェクトを作成する
    response = Response(content=wav_data, media_type="audio/wav")
    # レスポンスを返す
    return response


if __name__ == "__main__":
    name, ex = os.path.splitext(os.path.basename(__file__))
    subprocess.run(f"uvicorn {name}:app --reload")
起動するバッチファイルの作成▼
ファイル名:api.bat
@echo off

call .venv\Scripts\activate

call .venv\Scripts\python.exe api.py .venv\Scripts\python.exe
pause.venvは初めに作った仮想環境名です
最終的なファイル構造▼
ディレクトリ名
├─.venv
├─historys 自動で作成されます
│  └─history.json
├─llm
│  └─line
│    └─モデルファイル
├─model
│  └─faster-whisper-large-v2
│    └─モデルファイル
├─open_jtalk_dic_utf_8-1.11
├─output 自動で作成されます
│  └─voice
├─api.bat
├─api.py
├─llm.py
├─onnxruntime_providers_shared.dll
├─onnxruntime.dll
├─voice_recognition.py
└─voice.py
Unity(フロント)
準備
Unityのインストールは以下のサイトの説明通りにすればインストールできます。
Live2DをUnityで動かすために一度以下の記事を参考にしてみてください。
モデルのインポートのサンプルモデル集のリンク先がないので以下のサイトからモデルのダウンロードしてください。
音声をLive2Dモデルにしゃべってもらうには以下のサイトが参考になります。
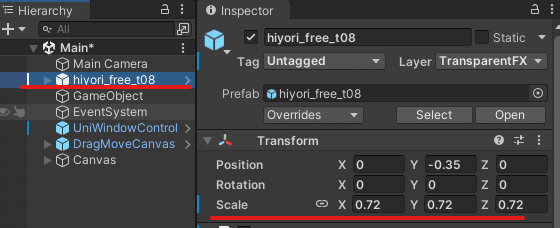
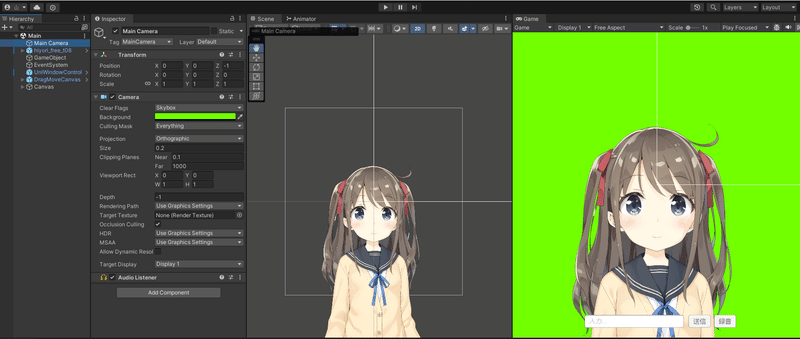
読み込んだLive2Dモデルが小さく表示されていたら
Main Cameraのサイズを変更するか
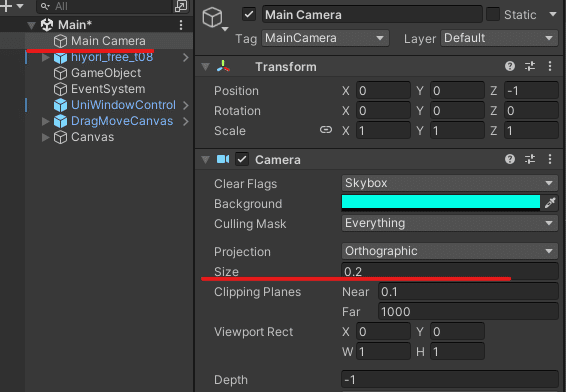
Live2DモデルのScaleを変更したりしてみてください。
参照▼
ここからは「【初心者向け】UnityとLive2Dで拡張しやすいVTuber配信システムを作る方法」の応用編に入る前と「リップシンク(口パク)の設定」
を終えてからの作成になります。
テキストをサーバに送り音声を再生
テキスト入力しボタンがクリックされたら送信する
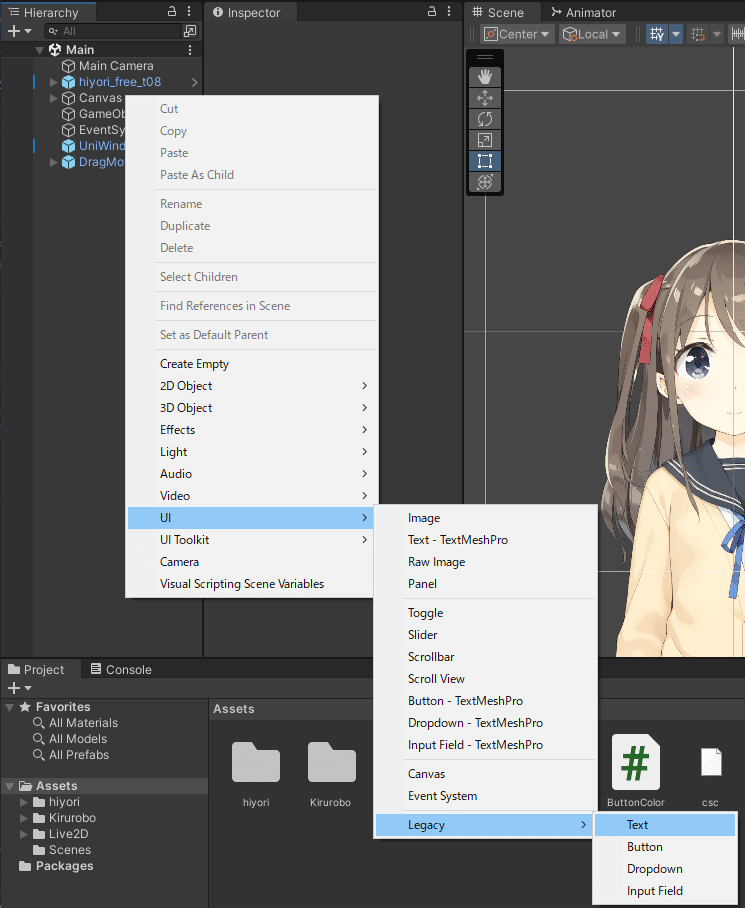
テキスト入力とボタンの作成方法
Hierarchyを右クリック
UIにカーソルを合わせる
Legacyにカーソルを合わせる
Textをクリック
作成するとCanvasが自動作られます。2回目以降はCanvasにカーソルを合わせ右クリックするとCanvas内に作成できます。
Buttonも同様のやり方で作成できます。
送信ボタンと録音ボタンの名前は区別がつくように違うのにしてください。
今回は送信ボタンはButton、録音ボタンをButtonMicで区別しています。
Rect TransformをいじるかScene画面を使って移動させて、いい感じにテキスト入力とボタンを配置します。
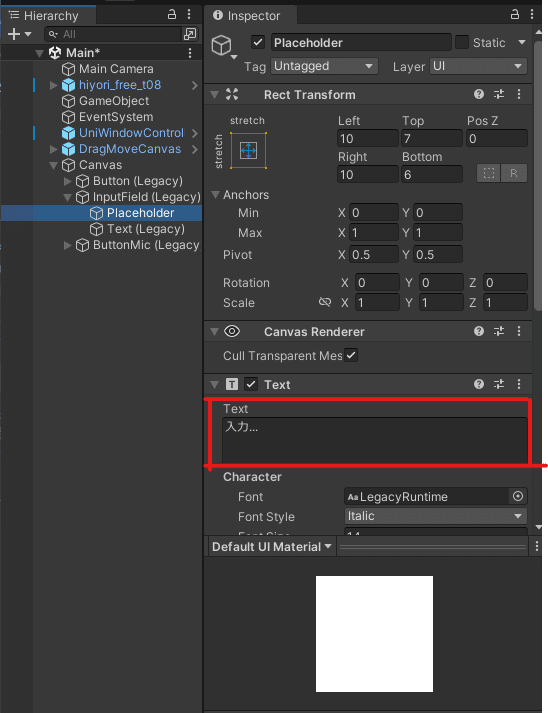
テキスト入力内の文字を変えたかったら
Canvasを開く
InputFieldを開く
Placeholderを選択
赤く囲っているところを変える
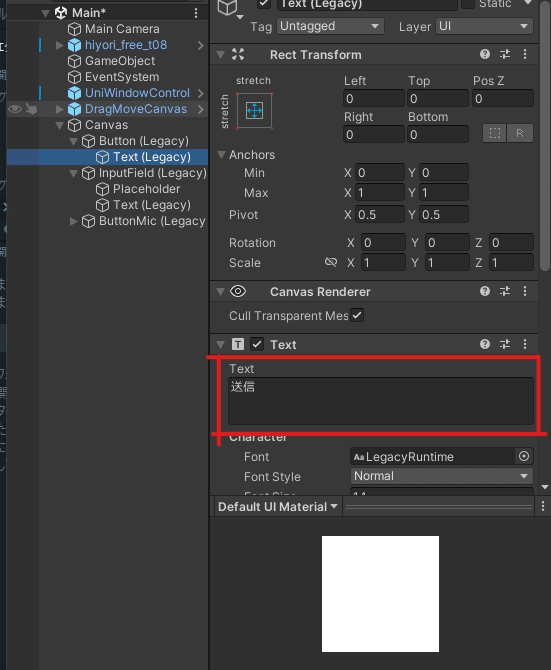
Buttonの場合
Canvasを開く
Buttonを開く
Textを選択
赤く囲っているところを変える
GameObjectにAudio Aourceを追加します。Add Componentをクリックし「Audio Source」を検索し、クリックで追加します。
スクリプトを作成します。
Assetを右クリック
Createにカーソルを合わせる
C# Scriptをクリック
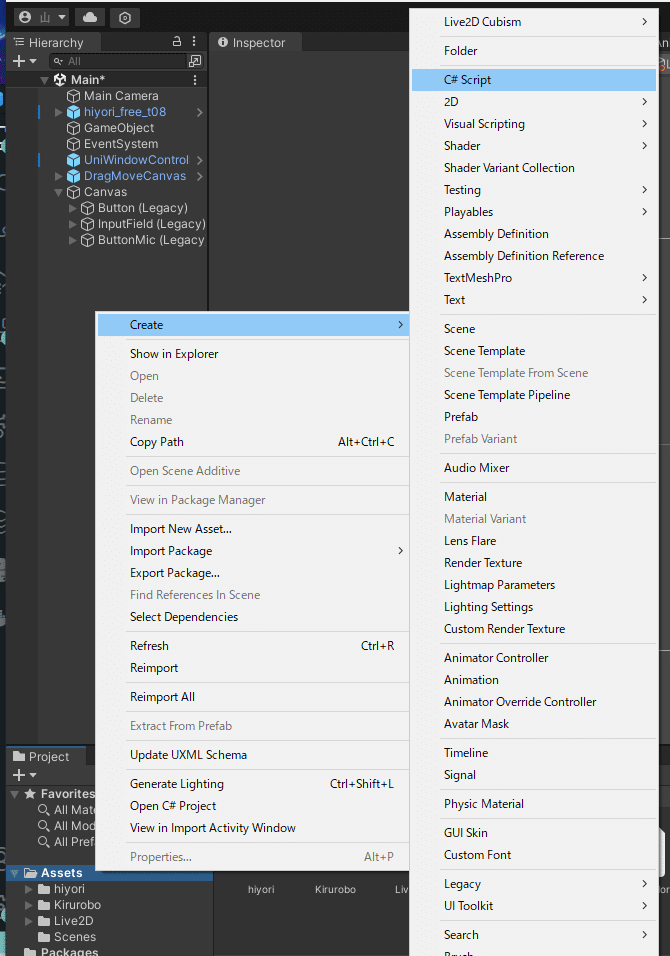
新しいスクリプトファイルがAssetsにできます。
ファイル名はTextVoiceControllerにしてください

TextVoiceControllerに以下のコードをコピペします。
ファイル名とクラス名は一緒にしてください。
using UnityEngine;
using UnityEngine.Networking;
using System.Collections;
using System.Collections.Generic;
using UnityEngine.UI;
public class TextVoiceController : MonoBehaviour
{
public InputField inputField; // テキスト入力
public Button button; // ボタンをInspectorで設定する
private bool isButtonPressed = false;
public GameObject audioGameObject; // オーディオソース
private string serverURL = "http://127.0.0.1:8000/"; // サーバーのURL
// JSONデータのクラス
[System.Serializable]
private class RequestTextData
{
public string text;
}
[System.Serializable]
public class ReplayRequest
{
public string filename;
}
void Start()
{
button.onClick.AddListener(SendingInput);
}
void SendingInput()
{
if (! string.IsNullOrEmpty(inputField.text)) {
string inputText = inputField.text;
Debug.Log(inputText);
StartCoroutine(Text2voice(inputText));
inputField.text = "";
} else {
Debug.Log("inputFieldがnullです。");
}
}
// Text2voice テキストを音声に変え再生
IEnumerator Text2voice(string inputText)
{
RequestTextData requestData = new RequestTextData
{
text = inputText,
};
string json = JsonUtility.ToJson(requestData);
// json形式で送信するためのあれこれ
byte[] postData = System.Text.Encoding.UTF8.GetBytes(json);
var request = new UnityWebRequest(serverURL + "text", "POST");
request.uploadHandler = (UploadHandler)new UploadHandlerRaw(postData);
request.downloadHandler = (DownloadHandler)new DownloadHandlerBuffer();
request.SetRequestHeader("Content-Type", "application/json");
yield return request.SendWebRequest();
if (request.result == UnityWebRequest.Result.Success)
{
Debug.Log("jsonが正常に送信されました。");
Debug.Log(request.downloadHandler.text);
string responseText = request.downloadHandler.text;
ReplayRequest data = JsonUtility.FromJson<ReplayRequest>(responseText);
// Debug.Log(data.filename);
string audioUrl = $"{serverURL}audio?file_name={data.filename}";
using (UnityWebRequest audioRequest = UnityWebRequestMultimedia.GetAudioClip(audioUrl, AudioType.WAV))
{
yield return audioRequest.SendWebRequest();
if (audioRequest.isNetworkError || audioRequest.isHttpError)
{
Debug.Log("失敗!");
}
else
{
Debug.Log("++++++++++++++++成功!+++++++++++++++++++");
AudioClip audioClip = DownloadHandlerAudioClip.GetContent(audioRequest);
AudioSource audioSource = audioGameObject.GetComponent<AudioSource>();
audioSource.clip = audioClip;
audioSource.Play();
}
}
}
else
{
Debug.LogError("データの送信中にエラーが発生しました: " + request.error);
}
}
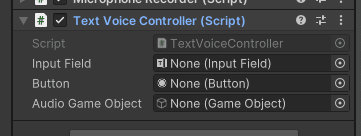
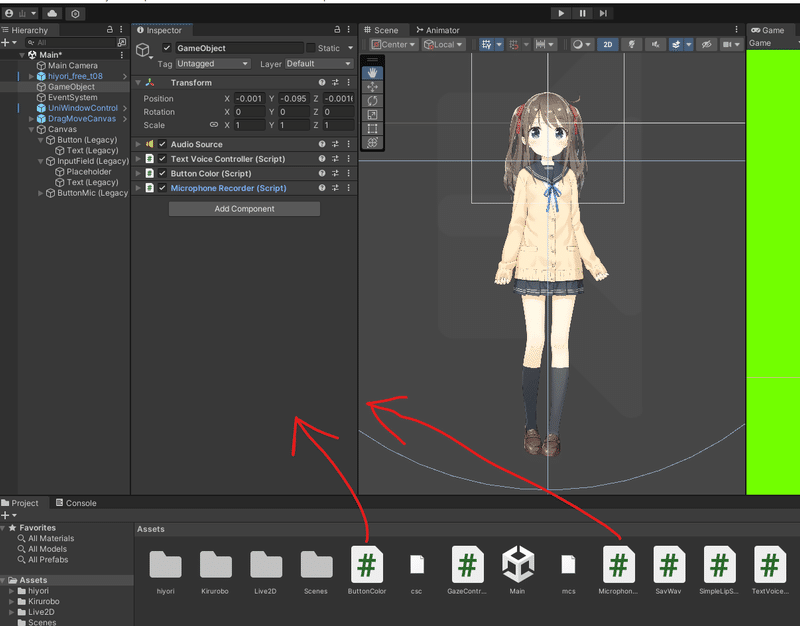
}GameObjectのInspectorにTextVoiceControllerファイルをドラック&ドロップします。

GameObjectのInspector内のTextVoiceControllerを開きの設定をしていきます。
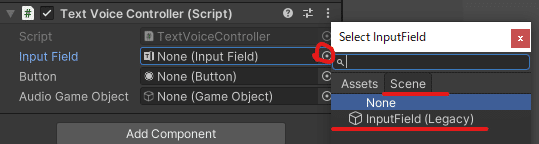
Input Fieldの設定
右のボタンをクリックするとメニューが開かれます。
Sceneをクリックします。
今回はテキスト入力はInputFieldしか作っていないので出ているものを選択。
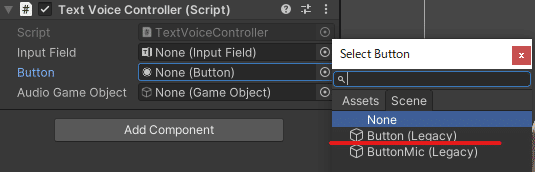
Bottonの設定
右のボタンをクリックするとメニューが開かれます。
Sceneをクリックします。
テキストの送信用のボタンを選択します。
Bottonを送信用にしているのでそれを選択します。
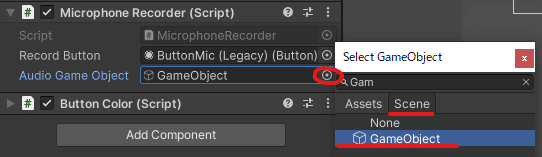
Audio Game Objectの設定
右のボタンをクリックするとメニューが開かれます。
Sceneをクリックします。
Audio Sourceが設定しているオブジェクトを選択します。
GameObjectにAudio Sourceを設定しているのでAudio Game ObjectにはGameObjectを設定します。
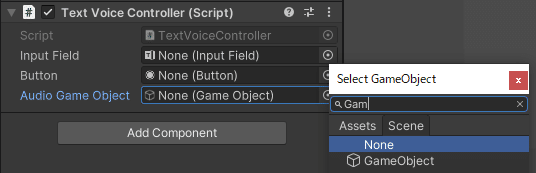
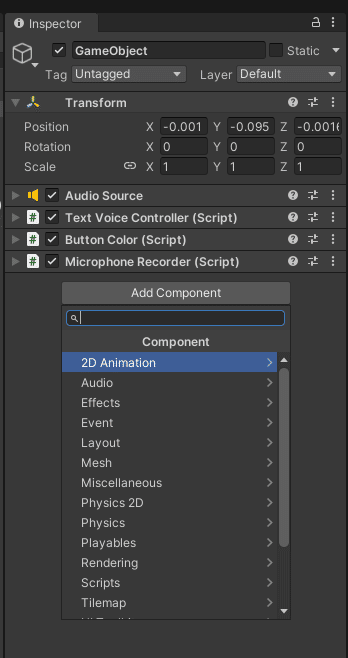
設定したら下の図のようになります。

テキストを送って返答をしゃべらすことができるようになりました。
次はテキストではなくマイクでしゃべる方法
音声データをサーバに送り音声を再生
TextVoiceControllerを作成したときのように3つのファイルを作成します。
1つ目はSavWavこれは、録音した音声を保存するためのスクリプト
2つ目はMicrophoneRecorderこれは、マイクのオンオフの切り替え、音声をサーバにリクエストするスクリプト
3つ目はButtonColorボタンの色と文字を変えるスクリプト
SavWavに以下のコードをコピペします。
ファイル名とクラス名は一緒にしてください。
using UnityEngine;
using System.Collections;
using System.IO;
using System;

public static class SavWav
{
    public static bool Save(string filename, AudioClip clip)
    {
        if (!filename.ToLower().EndsWith(".wav"))
        {
            filename += ".wav";
        }

        var filePath = Path.Combine(Application.persistentDataPath, filename);
        Debug.Log("Saving file to: " + filePath);

        // Create a WAV file header
        byte[] header = CreateWavHeader(clip);

        // Convert the AudioClip data to bytes
        float[] samples = new float[clip.samples];
        clip.GetData(samples, 0);

        byte[] byteArray = new byte[samples.Length * 2];
        int rescaleFactor = 32767;

        for (int i = 0; i < samples.Length; i++)
        {
            short value = (short)(samples[i] * rescaleFactor);
            BitConverter.GetBytes(value).CopyTo(byteArray, i * 2);
        }

        // Combine the header and audio data to create the WAV file
        FileStream fileStream = new FileStream(filePath, FileMode.Create);
        BinaryWriter binaryWriter = new BinaryWriter(fileStream);
        binaryWriter.Write(header);
        binaryWriter.Write(byteArray);
        fileStream.Close();

        return true;
    }

    private static byte[] CreateWavHeader(AudioClip clip)
    {
        int channels = clip.channels;
        int sampleRate = clip.frequency;
        int samples = clip.samples;

        byte[] header = new byte[44];

        header[0] = (byte)'R'; // RIFF
        header[1] = (byte)'I';
        header[2] = (byte)'F';
        header[3] = (byte)'F';
        header[4] = (byte)(samples * channels * 2 + 36); // file size - 36
        header[5] = (byte)((samples * channels * 2 + 36) >> 8);
        header[6] = (byte)((samples * channels * 2 + 36) >> 16);
        header[7] = (byte)((samples * channels * 2 + 36) >> 24);
        header[8] = (byte)'W'; // WAVE
        header[9] = (byte)'A';
        header[10] = (byte)'V';
        header[11] = (byte)'E';
        header[12] = (byte)'f'; // 'fmt '
        header[13] = (byte)'m';
        header[14] = (byte)'t';
        header[15] = (byte)' ';
        header[16] = 16; // 16 for PCM
        header[17] = 0;
        header[18] = 0;
        header[19] = 0;
        header[20] = 1; // 1 for PCM
        header[21] = 0;
        header[22] = (byte)channels;
        header[23] = 0;
        header[24] = (byte)(sampleRate & 255);
        header[25] = (byte)((sampleRate >> 8) & 255);
        header[26] = (byte)((sampleRate >> 16) & 255);
        header[27] = (byte)((sampleRate >> 24) & 255);
        header[28] = (byte)(sampleRate * channels * 2);
        header[29] = (byte)((sampleRate * channels * 2) >> 8);
        header[30] = (byte)((sampleRate * channels * 2) >> 16);
        header[31] = (byte)((sampleRate * channels * 2) >> 24);
        header[32] = (byte)(channels * 2);
        header[33] = 0;
        header[34] = 16; // 16 bits per sample
        header[35] = 0;
        header[36] = (byte)'d'; // data
        header[37] = (byte)'a';
        header[38] = (byte)'t';
        header[39] = (byte)'a';
        header[40] = (byte)(samples * channels * 2); // sample data size
        header[41] = (byte)((samples * channels * 2) >> 8);
        header[42] = (byte)((samples * channels * 2) >> 16);
        header[43] = (byte)((samples * channels * 2) >> 24);

        return header;
    }
}MicrophoneRecorderに以下のコードをコピペします。
ファイル名とクラス名は一緒にしてください。
using System.Collections;
using System.Collections.Generic;
using UnityEngine;
using UnityEngine.UI;
using System.IO;
using UnityEngine.Networking;

public class MicrophoneRecorder : MonoBehaviour
{
    public Button recordButton;
    private bool isRecording = false;
    private string recordedClipPath;
    private AudioClip recordedClip;
    public GameObject audioGameObject;
    private string serverURL = "http://127.0.0.1:8000/";

    void Start()
    {
        recordButton.onClick.AddListener(ToggleRecording);
    }

    void ToggleRecording()
    {
        if (!isRecording)
        {
            StartRecording();
        }
        else
        {
            StopRecording();
        }
    }

    void StartRecording()
    {
        isRecording = true;
        Debug.Log("Recording...");
        recordedClip = Microphone.Start(null, false, 10, 44100);
    }

    void StopRecording()
    {
        isRecording = false;
        Debug.Log("Recording Stopped");
        Microphone.End(null);
        SaveRecordedClip();
    }

    void SaveRecordedClip()
    {
        if (recordedClip == null)
        {
            Debug.LogError("No recorded audio to save.");
            return;
        }

        recordedClipPath = Path.Combine(Application.persistentDataPath, "recordedAudio.wav");
        SavWav.Save(recordedClipPath, recordedClip);

        StartCoroutine(SendAudioToAPI(recordedClipPath));
    }

    [System.Serializable]
    public class TranscriptionRequest
    {
        public string audio;
    }

    [System.Serializable]
    public class ReplayRequest
    {
        public string filename;
    }

    private class RequestTextData
    {
        public string text;
    }

    IEnumerator SendAudioToAPI(string audioFilePath)
    {
        TranscriptionRequest requestData = new TranscriptionRequest
        {
            audio = audioFilePath,
        };

        string json = JsonUtility.ToJson(requestData);
        byte[] postData = System.Text.Encoding.UTF8.GetBytes(json);

        var request = new UnityWebRequest(serverURL + "voice", "POST");
        request.uploadHandler = (UploadHandler)new UploadHandlerRaw(postData);
        request.downloadHandler = (DownloadHandler)new DownloadHandlerBuffer();
        request.SetRequestHeader("Content-Type", "application/json");
        yield return request.SendWebRequest();

        Debug.Log("Audio Sent to API");

        if (request.result == UnityWebRequest.Result.Success)
        {
            Debug.Log("jsonが正常に送信されました。");
            Debug.Log(request.downloadHandler.text);

            string responseText = request.downloadHandler.text;
            RequestTextData data = JsonUtility.FromJson<RequestTextData>(responseText);

            RequestTextData requestTextData = new RequestTextData
            {
                text = data.text,
            };

            string json2 = JsonUtility.ToJson(requestTextData);
            byte[] postData2 = System.Text.Encoding.UTF8.GetBytes(json2);

            var request2 = new UnityWebRequest(serverURL + "text", "POST");
            request2.uploadHandler = (UploadHandler)new UploadHandlerRaw(postData2);
            request2.downloadHandler = (DownloadHandler)new DownloadHandlerBuffer();
            request2.SetRequestHeader("Content-Type", "application/json");
            yield return request2.SendWebRequest();

            if (request2.result == UnityWebRequest.Result.Success)
            {
                Debug.Log("json2が正常に送信されました。");
                Debug.Log(request2.downloadHandler.text);

                string responseText2 = request2.downloadHandler.text;
                Debug.Log(responseText2);

                ReplayRequest data2 = JsonUtility.FromJson<ReplayRequest>(responseText2);
                Debug.Log(data2);

                string audioUrl = $"{serverURL}audio?file_name={data2.filename}";

                using (UnityWebRequest audioRequest = UnityWebRequestMultimedia.GetAudioClip(audioUrl, AudioType.WAV))
                {
                    yield return audioRequest.SendWebRequest();
                    if (audioRequest.isNetworkError || audioRequest.isHttpError)
                    {
                        Debug.Log("失敗!");
                    }
                    else
                    {
                        Debug.Log("++++++++++++++++成功!+++++++++++++++++++");
                        AudioClip audioClip = DownloadHandlerAudioClip.GetContent(audioRequest);
                        AudioSource audioSource = audioGameObject.GetComponent<AudioSource>();
                        audioSource.clip = audioClip;
                        audioSource.Play();
                    }
                }
            }
        }
        else
        {
            Debug.LogError("データの送信中にエラーが発生しました: " + request.error);
        }
    }
}ButtonColorに以下のコードをコピペします。
ファイル名とクラス名は一緒にしてください。
using System.Collections;
using System.Collections.Generic;
using UnityEngine;
using UnityEngine.UI;
public class ButtonColor : MonoBehaviour
{
    public Button button;
    private bool isRecording = false;
    void Start()
    {
        button.onClick.AddListener(ChangeButtonColor);
    }
    private void ChangeButtonColor()
    {
        Image buttonImage = button.GetComponent<Image>();
        if (!isRecording)
        {
            isRecording = true;
            buttonImage.color = Color.red;
            button.GetComponentInChildren<Text>().text = "録音中"; // ボタンのテキストを変更
            button.GetComponentInChildren<Text>().color = Color.white; // ボタンのテキストを変更
        }
        else
        {
            isRecording = false;
            buttonImage.color = Color.white;
            button.GetComponentInChildren<Text>().text = "録音"; // ボタンのテキストを元に戻す
            button.GetComponentInChildren<Text>().color = Color.black; // ボタンのテキストを変更
        }
    }
}
録音をしているのを視覚的にわかりやすくするために、録音中はボタンの色と文字を変更するようにします。
3つのファイルが作成出来たら、GameObjectの
InspectorにMicrophoneRecorderとButtonColorのファイルをドラック&ドロップします。
GameObjectのInspector内のMicrophoneRecorderの設定をしていきます。
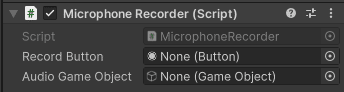
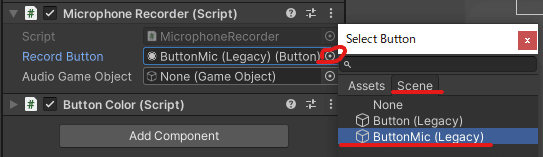
BottonMicの設定
右のボタンをクリックするとメニューが開かれます。
Sceneをクリックします。
BottonMicを録音用にしているのでそれを選択します。
Audio Game Objectの設定
右のボタンをクリックするとメニューが開かれます。
Sceneをクリックします。
Audio Sourceが設定しているオブジェクトを選択します。
GameObjectにAudio Sourceを設定しているのでAudio Game ObjectにはGameObjectを設定します。
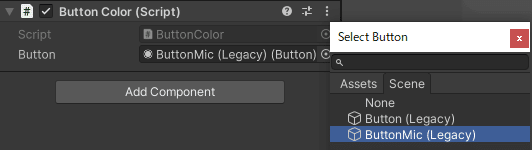
GameObjectのInspector内のButtonColorの設定をしていきます。
録音用ボタンを変化させたいのでBottonMicを選択
アプリの透過背景
マスコットの背景を透過する方法
上にReleases · kirurobo/UniWindowControllerをクリックし
UniWinC_v0.9.2.unitypackageをダウンロード

ダウンロードものをダブルクリックしパッケージをUnityにインポート
この時Unityは起動しておく
インポートできれば、AssetsにKiruroboがあればいいです。
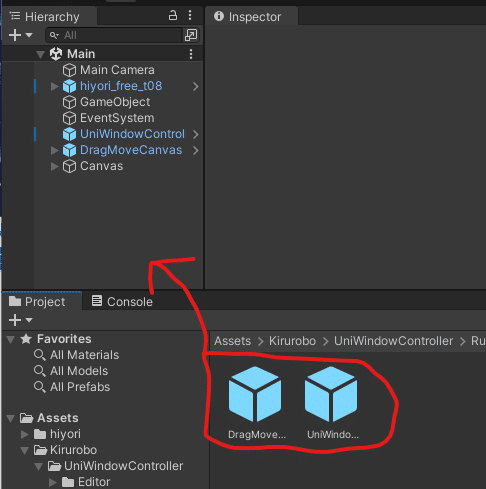
Kirurobo\UniWindowController\Runtime\Prefabsまで移動し
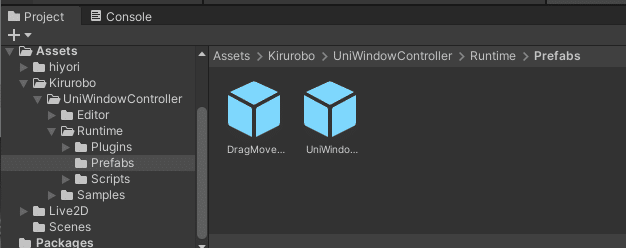
UniWindowControllerは透過させるプレハブ
DragMoveCanvasはアプリをマウスで動かすプレハブ
2つのプレハブをHierarchyにドラッグ&ドロップする。
UniWindowControllerの設定をします。
Is Transparent --- 背景の透過
Is Topmost --- 常に前に表示
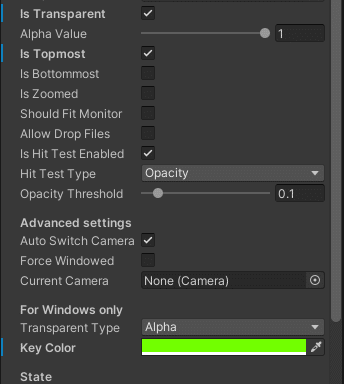
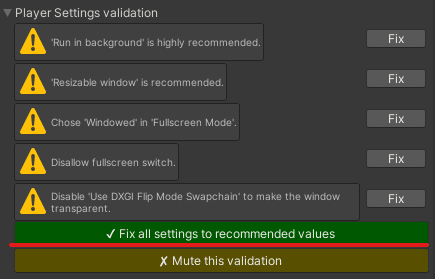
Player Settings validationの緑のボタンを押します。
これでアプリの作成は完了です。
最後にbuildして動かしましょう。
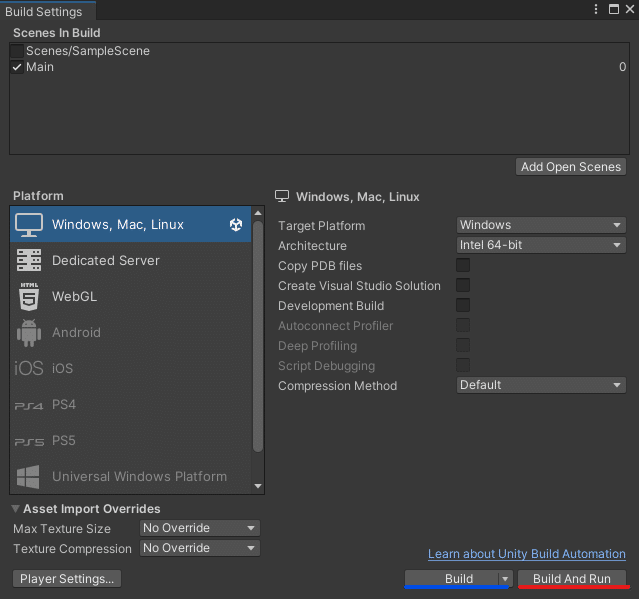
トップメニューからfile▶Build Settingsもしくは、Ctrl + Shift + Bでメニューを開きます。
Build And Runを押すと、保存するディレクトリを選択または、作成して選択保存しアプリが実行されます。
Buildは保存するだけ
これで完成です、お疲れさまでした。
最後に
Unityを使ったデスクトップマスコットの作り方をまとめて下さったTakaさんには感謝しています。
これをもとにアップデートしていけたらいいと思っています。
今後アップデートしてくとしたら以下のものを考えています。
口調の変更の設定
キャラがしゃべるまで何かしらのアニメーションを加える
テキストの表示設定
自作キャラのLive2d
記事通りに作ればエラーは起きないと思いますが、作っているときに私が引っかかったエラーの解決方法を一応載せておきます。
最後まで読んでいただきありがとうございます。
これまでのサンプルコードをまとめたものを置いておきます。
この記事が気に入ったらサポートをしてみませんか?