UIKit CatalogのOutline UIのコードを読み解く

UIKit Catalogという、かなり昔からある公式サンプルがある。
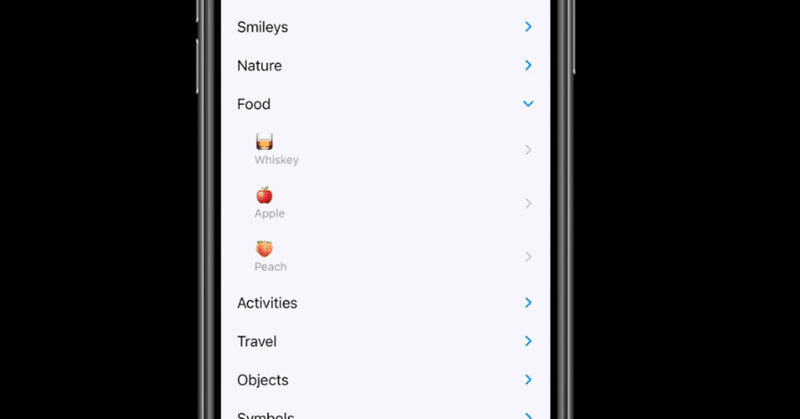
このサンプルは更新され続けていて、最新版ではAvailabilityはiOS 14+となっており、起動するとトップのビューは次のようないわゆるドリルダウンUI的な、タップでサブ要素を展開するUIになっている。
こういうUIは昔からOSS(や自前実装)では実現されていたが、iOS 14からは標準でサポートされた、というのはなんとなく伝え聞いていた。Appleは"Outline"と呼んでいるようだ。
コードを読んでみたところ、実態こそ昔からあるUICollectionViewなのだが、
- UICollectionViewDiffableDataSource (iOS 13〜)
- UICollectionViewCompositionalLayout (iOS 13〜)
- UICollectionView.CellRegistration(iOS 14〜)
- UICollectionViewListCell(iOS 14〜)
- UIListContentConfiguration(iOS 14〜)
- UICellAccessory(iOS 14〜)
- NSDiffableDataSourceSectionSnapshot (iOS 14〜)
という感じで新要素が入り混じっていて、レガシーiOSエンジニアな自分には少々複雑だった...
多くのことを学ぶという目的にはこれで良いのだろうけど、
・OutlineスタイルのUIを実装したい
・テーブルUIをUICollectionViewで実装したい
といった「やりたいことに対して何が最小限必要なのか」を知るにはわかりにくいサンプルだと感じた。
ちなみにそのコードを載せておく。
import UIKit

class OutlineViewController: UIViewController {

   enum Section {
       case main
   }

   class OutlineItem: Identifiable, Hashable {
       let title: String
       let subitems: [OutlineItem]
       let storyboardName: String?
       let imageName: String?

       init(title: String, imageName: String?, storyboardName: String? = nil, subitems: [OutlineItem] = []) {
           self.title = title
           self.subitems = subitems
           self.storyboardName = storyboardName
           self.imageName = imageName
       }

       func hash(into hasher: inout Hasher) {
           hasher.combine(id)
       }

       static func == (lhs: OutlineItem, rhs: OutlineItem) -> Bool {
           return lhs.id == rhs.id
       }

   }

   var dataSource: UICollectionViewDiffableDataSource<Section, OutlineItem>! = nil
   var outlineCollectionView: UICollectionView! = nil

   override func viewDidLoad() {
       super.viewDidLoad()

       configureCollectionView()
       configureDataSource()

       // Add a translucent background to the primary view controller for the Mac.
       splitViewController!.primaryBackgroundStyle = .sidebar
       view.backgroundColor = UIColor.clear

       // Listen for when a split view controller is expanded or collapsed.
       NotificationCenter.default.addObserver(
           self,
           selector: #selector(showDetailTargetDidChange(_:)),
           name: UIViewController.showDetailTargetDidChangeNotification,
           object: nil)

       if navigationController!.traitCollection.userInterfaceIdiom == .mac {
           navigationController!.navigationBar.isHidden = true
       }
   }

   // Posted when a split view controller is expanded or collapsed.
   @objc
   func showDetailTargetDidChange(_ notification: NSNotification) {
       // Reaload the data source, the disclosure indicators need to change (push vs. present on a cell).
       var snapshot = dataSource.snapshot()
       snapshot.reloadItems(menuItems)
       dataSource.apply(snapshot, animatingDifferences: false)
   }

   deinit {
       NotificationCenter.default.removeObserver(self, name: UIViewController.showDetailTargetDidChangeNotification, object: nil)
   }

   lazy var controlsOutlineItem: OutlineItem = {
       var controlsSubItems = [
           OutlineItem(title: NSLocalizedString("ButtonsTitle", comment: ""), imageName: nil,
                       storyboardName: "ButtonViewController"),

           OutlineItem(title: NSLocalizedString("PageControlTitle", comment: ""), imageName: nil, subitems: [
               OutlineItem(title: NSLocalizedString("DefaultPageControlTitle", comment: ""), imageName: nil,
                           storyboardName: "DefaultPageControlViewController"),
               OutlineItem(title: NSLocalizedString("CustomPageControlTitle", comment: ""), imageName: nil,
                           storyboardName: "CustomPageControlViewController")
           ]),

           OutlineItem(title: NSLocalizedString("SearchBarsTitle", comment: ""), imageName: nil, subitems: [
               OutlineItem(title: NSLocalizedString("DefaultSearchBarTitle", comment: ""), imageName: nil,
                           storyboardName: "DefaultSearchBarViewController"),
               OutlineItem(title: NSLocalizedString("CustomSearchBarTitle", comment: ""), imageName: nil,
                           storyboardName: "CustomSearchBarViewController")
           ]),

           OutlineItem(title: NSLocalizedString("SegmentedControlsTitle", comment: ""), imageName: nil,
                       storyboardName: "SegmentedControlViewController"),
           OutlineItem(title: NSLocalizedString("SlidersTitle", comment: ""), imageName: nil,
                       storyboardName: "SliderViewController"),
           OutlineItem(title: NSLocalizedString("SwitchesTitle", comment: ""), imageName: nil,
                       storyboardName: "SwitchViewController"),
           OutlineItem(title: NSLocalizedString("TextFieldsTitle", comment: ""), imageName: nil,
                       storyboardName: "TextFieldViewController")
       ]

       #if !targetEnvironment(macCatalyst)
       /** Because this sample has "Optimize Interface for Mac" turned on -
           UIStepper class is not supported when running Mac Catalyst apps in the Mac idiom.
       */
       let stepperItem =
           OutlineItem(title: NSLocalizedString("SteppersTitle", comment: ""), imageName: nil,
                       storyboardName: "StepperViewController")
       controlsSubItems.append(stepperItem)
       #endif

       return OutlineItem(title: "Controls", imageName: "slider.horizontal.3", subitems: controlsSubItems)
   }()

   lazy var pickersOutlineItem: OutlineItem = {
       var pickerSubItems = [
           OutlineItem(title: NSLocalizedString("DatePickerTitle", comment: ""), imageName: nil,
                       storyboardName: "DatePickerController"),
           OutlineItem(title: NSLocalizedString("ColorPickerTitle", comment: ""), imageName: nil,
                       storyboardName: "ColorPickerViewController"),
           OutlineItem(title: NSLocalizedString("FontPickerTitle", comment: ""), imageName: nil,
                       storyboardName: "FontPickerViewController"),
           OutlineItem(title: NSLocalizedString("ImagePickerTitle", comment: ""), imageName: nil,
                       storyboardName: "ImagePickerViewController")
       ]

       #if !targetEnvironment(macCatalyst)
       /** Because this sample has "Optimize Interface for Mac" turned on -
           UIPickerView class is not supported when running Mac Catalyst apps in the Mac idiom.
       */
       let pickerViewItem =
           OutlineItem(title: NSLocalizedString("PickerViewTitle", comment: ""), imageName: nil,
                       storyboardName: "PickerViewController")
       pickerSubItems.append(pickerViewItem)
       #endif

       return OutlineItem(title: "Pickers", imageName: "list.bullet", subitems: pickerSubItems)
   }()

   lazy var viewsOutlineItem: OutlineItem = {
       OutlineItem(title: "Views", imageName: "rectangle.stack.person.crop", subitems: [
           OutlineItem(title: NSLocalizedString("ActivityIndicatorsTitle", comment: ""), imageName: nil,
                       storyboardName: "ActivityIndicatorViewController"),
           OutlineItem(title: NSLocalizedString("AlertControllersTitle", comment: ""), imageName: nil,
                       storyboardName: "AlertControllerViewController"),
           OutlineItem(title: NSLocalizedString("ImageViewTitle", comment: ""), imageName: nil,
                       storyboardName: "ImageViewController"),
           OutlineItem(title: NSLocalizedString("ProgressViewsTitle", comment: ""), imageName: nil,
                       storyboardName: "ProgressViewController"),
           OutlineItem(title: NSLocalizedString("StackViewsTitle", comment: ""), imageName: nil,
                       storyboardName: "StackViewController"),

           OutlineItem(title: NSLocalizedString("ToolbarsTitle", comment: ""), imageName: nil, subitems: [
               OutlineItem(title: NSLocalizedString("DefaultToolBarTitle", comment: ""), imageName: nil,
                           storyboardName: "DefaultToolbarViewController"),
               OutlineItem(title: NSLocalizedString("TintedToolbarTitle", comment: ""), imageName: nil,
                           storyboardName: "TintedToolbarViewController"),
               OutlineItem(title: NSLocalizedString("CustomToolbarBarTitle", comment: ""), imageName: nil,
                           storyboardName: "CustomToolbarViewController")
           ]),

           OutlineItem(title: NSLocalizedString("WebViewTitle", comment: ""), imageName: nil,
                       storyboardName: "WebViewController")
       ])
   }()

   private lazy var menuItems: [OutlineItem] = {
       return [
           controlsOutlineItem,
           viewsOutlineItem,
           pickersOutlineItem
       ]
   }()

}

// MARK: - UICollectionViewDiffableDataSource

extension OutlineViewController {

   private func configureCollectionView() {
       let collectionView =
           UICollectionView(frame: view.bounds, collectionViewLayout: generateLayout())
       view.addSubview(collectionView)
       collectionView.autoresizingMask = [.flexibleHeight, .flexibleWidth]
       self.outlineCollectionView = collectionView
       collectionView.delegate = self
   }

   private func configureDataSource() {

       let containerCellRegistration = UICollectionView.CellRegistration<UICollectionViewListCell, OutlineItem> { (cell, indexPath, menuItem) in

           var contentConfiguration = cell.defaultContentConfiguration()
           contentConfiguration.text = menuItem.title

           if menuItem.imageName != nil {
               contentConfiguration.image = UIImage(systemName: menuItem.imageName!)
           }

           contentConfiguration.textProperties.font = .preferredFont(forTextStyle: .headline)
           cell.contentConfiguration = contentConfiguration

           let disclosureOptions = UICellAccessory.OutlineDisclosureOptions(style: .header)
           cell.accessories = [.outlineDisclosure(options:disclosureOptions)]

           let background = UIBackgroundConfiguration.clear()
           cell.backgroundConfiguration = background
       }

       let cellRegistration = UICollectionView.CellRegistration<UICollectionViewListCell, OutlineItem> { cell, indexPath, menuItem in
           var content = UIListContentConfiguration.cell()
           content.text = menuItem.title
           cell.contentConfiguration = content

           let background = UIBackgroundConfiguration.clear()
           cell.backgroundConfiguration = background

           cell.accessories = self.splitViewWantsToShowDetail() ? [] : [.disclosureIndicator()]
       }

       dataSource = UICollectionViewDiffableDataSource<Section, OutlineItem>(collectionView: outlineCollectionView) {
           (collectionView: UICollectionView, indexPath: IndexPath, item: OutlineItem) -> UICollectionViewCell? in
           // Return the cell.
           if item.subitems.isEmpty {
               return collectionView.dequeueConfiguredReusableCell(using: cellRegistration, for: indexPath, item: item)
           } else {
               return collectionView.dequeueConfiguredReusableCell(using: containerCellRegistration, for: indexPath, item: item)
           }
       }

       // Load our initial data.
       let snapshot = initialSnapshot()
       self.dataSource.apply(snapshot, to: .main, animatingDifferences: false)
   }

   private func generateLayout() -> UICollectionViewLayout {
       let listConfiguration = UICollectionLayoutListConfiguration(appearance: .sidebar)
       let layout = UICollectionViewCompositionalLayout.list(using: listConfiguration)
       return layout
   }

   private func initialSnapshot() -> NSDiffableDataSourceSectionSnapshot<OutlineItem> {
       var snapshot = NSDiffableDataSourceSectionSnapshot<OutlineItem>()

       func addItems(_ menuItems: [OutlineItem], to parent: OutlineItem?) {
           snapshot.append(menuItems, to: parent)
           for menuItem in menuItems where !menuItem.subitems.isEmpty {
               addItems(menuItem.subitems, to: menuItem)
           }
       }

       addItems(menuItems, to: nil)
       return snapshot
   }

}

// MARK: - UICollectionViewDelegate

extension OutlineViewController: UICollectionViewDelegate {

   private func splitViewWantsToShowDetail() -> Bool {
       return splitViewController?.traitCollection.horizontalSizeClass == .regular
   }

   private func pushOrPresentViewController(viewController: UIViewController) {
       if splitViewWantsToShowDetail() {
           let navVC = UINavigationController(rootViewController: viewController)
           splitViewController?.showDetailViewController(navVC, sender: navVC) // Replace the detail view controller.

           if navigationController!.traitCollection.userInterfaceIdiom == .mac {
               navVC.navigationBar.isHidden = true
           }
       } else {
           navigationController?.pushViewController(viewController, animated: true) // Just push instead of replace.
       }
   }

   private func pushOrPresentStoryboard(storyboardName: String) {
       let exampleStoryboard = UIStoryboard(name: storyboardName, bundle: nil)
       if let exampleViewController = exampleStoryboard.instantiateInitialViewController() {
           pushOrPresentViewController(viewController: exampleViewController)
       }
   }

   func collectionView(_ collectionView: UICollectionView, didSelectItemAt indexPath: IndexPath) {
       guard let menuItem = self.dataSource.itemIdentifier(for: indexPath) else { return }

       collectionView.deselectItem(at: indexPath, animated: true)

       if let storyboardName = menuItem.storyboardName {
           pushOrPresentStoryboard(storyboardName: storyboardName)
       }
   }

}
iPad向け、macOS向けの実装も入っていて、それらも複雑性を増している。
というわけで、いらない要素を取り除いていき、「何がOutlineスタイルのUI実装における必要最小限なのか」を読み解いてみた。
記事末尾に整理したサンプルコードを添付しています。不要な要素は取り除き、メインのOutlineViewControllerは約100行以下まで削減できました。
## 結論: Outline UIとしての実態はどこなのか?
いきなり結論だが、Outline UIをOutline UIたらしめている部分は、もともと300行近くあったコードのうち、以下の2行だった。

最後まで読んでいただきありがとうございます!もし参考になる部分があれば、スキを押していただけると励みになります。 Twitterもフォローしていただけたら嬉しいです。 https://twitter.com/shu223/