
How to Escape the VeryPoor of VRChat Avatars Using Only Unity

Hello, I'm Kohada, I hope you are enjoying VRChat. I enjoy participating in DJ events, and I am especially interested in overseas events.
At those overseas events, people are very conscious of not using avatars that would overload the participants' screen display, and if you read the information board at the entrance, you will almost always find that it says "No Very Poor avatars allowed" (and if you use one, you may be verbally pointed out).

On the other hand, avatars for VRChat available at BOOTH and other places are often assembled with full specs, assuming high quality display and modification, and the performance rank of the avatar is often Very Poor.
Avatar lightening is a recurring topic in the VRChat user community, and methods of dealing with it have been discussed in various places, generally in the following manner.
Reduce polygon count
Combine materials
Combine Skinned Mesh
Reduce the number of bones
Eliminate animations, lights, and particles
And the degree of difficulty varies greatly depending on "how much" of each of the above items is done. For example, bringing a model into Blender and reducing the number of vertices and mesh can reduce the polygon count nicely, but it requires specialized skills and experience.
There is no end to lightweighting, and you must first decide "where to aim".
In this article, I will write a how to with a primary focus on how easy it is to modify the "Poor" avatar for the participation requirements of DJ events.
If you are interested in going through the process in earnest, please read this article. If you are interested in going all the way, I recommend you read this article!
What is Avatar's performance rank?
VRChat has the avatar performance rank, which indicates how much a user's avatar affects the display performance of other users accessing the same location.
Performance rank icons

This icon is shown with other users' nameplates when the menu is open in VRChat. The official recommendation is "Aim for "Good". If you can't, keep it at "Medium"", they recommend. However, it may (or may not) entail a lot of work difficulties and compromises in terms of looking bad.
As mentioned above, this section considers what needs to be completed to escape Very Poor and become Poor.
According to the official documentation, the requirements for Poor avatars are as follows (only the main ones are excerpted)
Number of polygons ... 70,000 or less
Number of skin mesh renderers ... 16 or less
Number of mesh renderers ... 24 or less
Number of material slots ... 32 or less
Number of PhysBone components ... 32 or less *Same for DynamicBone
Number of bones ... Less than 400
Number of Animators components ... 32 or less
Number of Lights components ... 1 or less
Number of Particle Systems components ... 16 or less
(There are many more, but I've picked out just the ones that might be worth considering)
If any of these criteria are not met, you will not be able to achieve that performance rank, so it is a good idea to look at the avatar upload screen in the VRChat SDK and compare your avatar to the Poor's requirements and get an idea of where you are exceeding in particular.

I will now go on to describe what you should do for each of these items.
Notes.
There are various processes to be followed to reduce weight, but if you have already incorporated the bones of the dressing into the avatar's Armature, the "2. Combine Material and Mesh" by the tool Mesh Baker does not seem to work.
If you have already changed your clothes and don't want to fix them before changing them again, and you think "Polygon count is the only reason why it's VeryPoor!" you can only execute items 1, 3, 4, and 5 from here on.
1. Reduce polygon count to 70,000 or less
If you want to deal with this without using 3D modeling software such as Blender, I recommend that you consider the following
Avoid avatars that are initially much larger than 70,000 polygons
If you are altering your clothes, choose items to wear.
To make a dressing change, expand the Prefab of the object to be dressed from Asset in the Project column of Unity, select the mesh data contained in the Prefab, and check the information that appears at the bottom of the Inspector column.
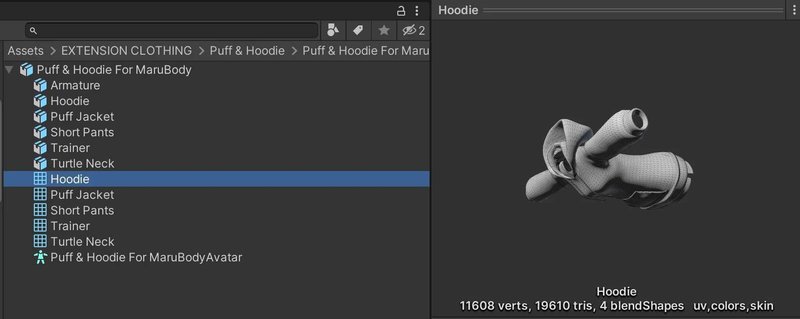
and other attachments must all total less than 70,000.
Verts refers to the number of vertices, and tris refers to the number of polygons here. This information is used to determine the mesh with the highest polygon count.
1-1. delete hidden objects
The first thing to do is to delete any hidden objects that are not in use. The objects contained in the avatar are counted in polygons, even if they are hidden.

For example, above is a Prefab object for a certain dress-up, but in the image on the left, "skirt_slit" and "skirt_Trum" are different designs of the same item, and only one of them is actually displayed. In this case, the one that is not used should be erased instead of hidden after "Unpack Prefab". The image on the right shows another prefab, but since "Hoodie" and "Trainer" are in the same part, one of them should be left and deleted. If there are any other accessories or body parts (such as unused chemomimi or tails) that are not normally displayed, delete them.
1-2. Erase polygons in invisible areas.
What can then be done is to remove polygons that are hidden and obscured by clothing or other objects. This is especially effective when there is little skin exposed. This tool is useful for erasing polygons. For more information on how to use this tool, please refer to this article.
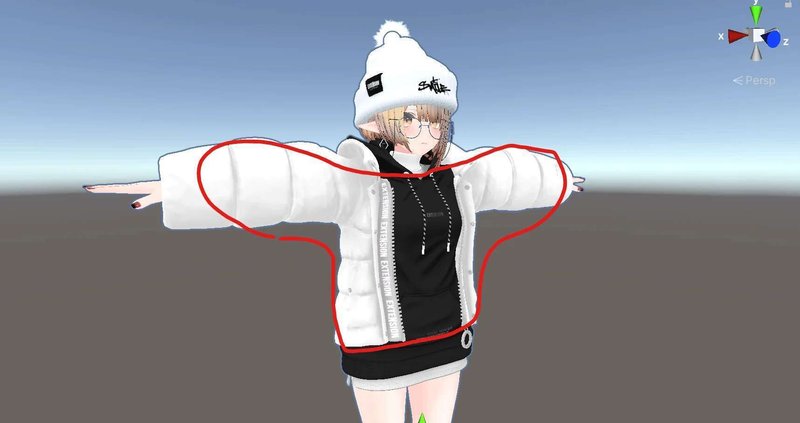
The area circled by the red line is the target for erasing polygons because the element is not visible.
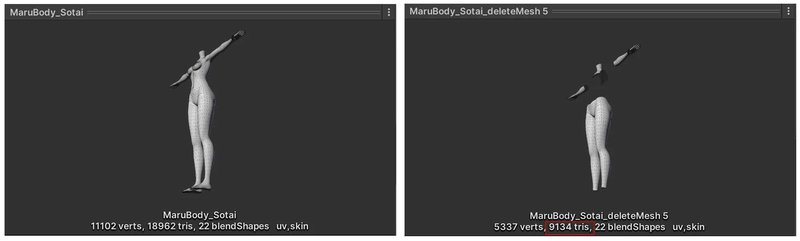
After eliminating the upper arms, chest, waist, and ankles, the original 18,962 polygons were reduced to 9,134 polygons. This method can be used to adjust the polygon count to some extent when the figure is almost 70,000 or less.
When the effect is shown in numbers, it is tempting to go as far as you can, but once it is determined that the other parts together will be 70,000 polygons or less, there is no return on the work, as there is no effect on the performance rank, even if you try harder to cut down beyond that. (Up to the Good rank, less than 70,000 is acceptable.)
1-3. For boldly reducing the polygon count
There is a tool for Unity called Mesh Simplify (but it is rather pricey at 66$, so I do not recommend it. Please use your own judgment if you decide to purchase it for this matter). This tool allows you to reduce the polygon count by a specified percentage, and if you don't like it, you can restore the original mesh as well.
However, since the flow of the mesh vertices and lines will be significantly altered, there is a risk that the shape and shadows will be affected when used on an avatar.
In particular, it is not recommended to apply it to Skinned Mesh, including the face, but also the body and clothing. Even if the mesh looks fine when it is not moving, it often breaks down when it is bent or moved. If you are going to apply it, limit the application to meshes that do not bend.
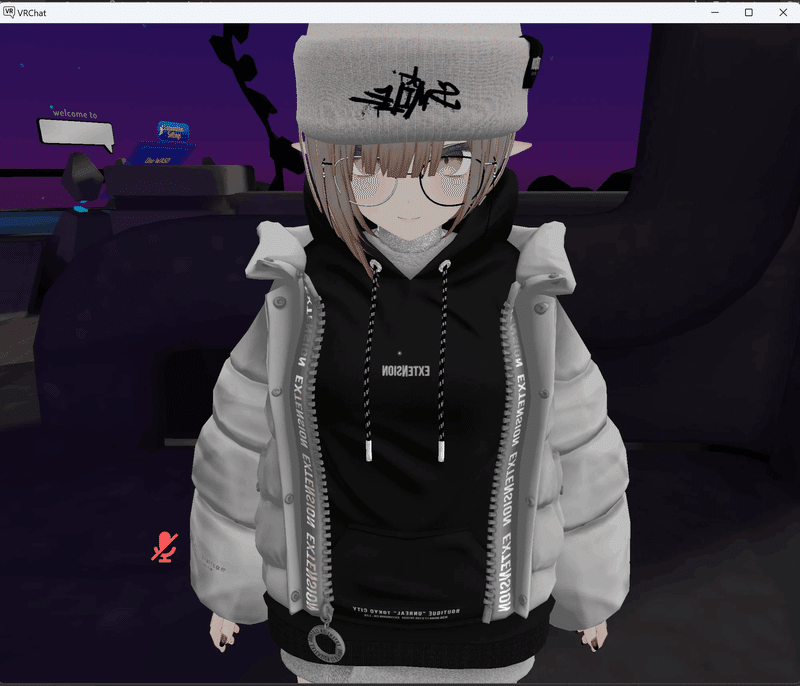
I will use the above Mesh Simplify on the subject of the modified Lukifel-chan, a "polygon count monster" that I have on hand.
Number of polygons in the above state: 139,014 polygons
Breakdown:
Head ... 11,718 polygons
Hair ... 7,039 polygons
Body ... 18,962 -> 9,134 polygons (hidden parts removed)
Underwear ... 586 polygons
Hoodie ... 19,610 polygons
Jacket ... 26,611 polygons
Shorts ... 3,396 polygons
Turtleneck ... 456 polygons
Knit cap ... 4,624 polygons
Socks ... 1,700 polygons
Sneakers ... 35,576 polygons
Glasses ... 4,384 polygons
Cross on glasses ... 764 polygons
Earrings ... 2,688 polygons (both ears)
Nails ... 900 polygons
As for the body, the number of polygons required to be reduced to be less than 70,000 is 59,186, since we eliminated the hidden parts earlier. Therefore, we will process as follows.
My Policy:
The head and body are untouched to prevent the shape from changing, which may cause the Blend Shape to not function properly.
Underwear is not visible, so it should be removed. (-586 polygons)
The earring on the left ear is not visible because it is hidden by the hair. (-1,344 polygons)
The cross on the glasses should be deleted because it is too small to be noticed. (-764 polygons)
Reduce the polygon count of the remaining objects to the extent that there is no change in appearance.
Let's start with a sneaker with a high polygon count (35,576) and use Mesh Simplify.
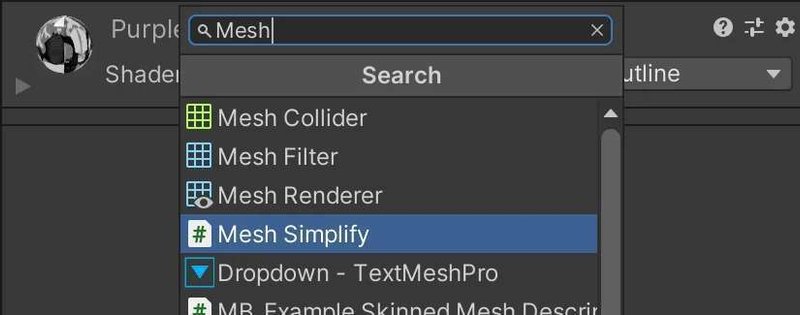
To use the software, as usual, after downloading and importing from the Package Manager, select the object for polygon reduction from the Hierarchy column and attach "Mesh Simplify" to it by "Add Compornent" from the Inspector column.
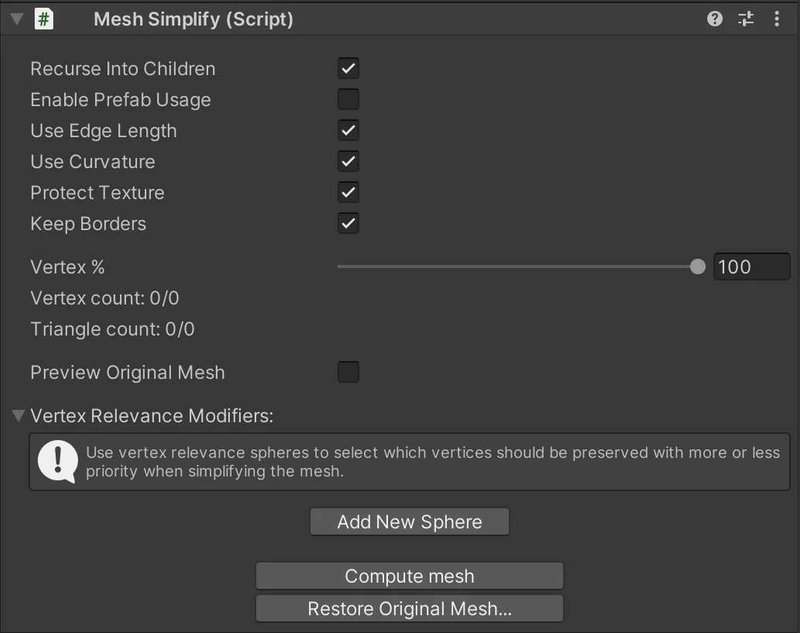
Specify the residual percentage from the "Vertex %" slide bar. If the "Recurce Into Children" checkbox is checked, it will be applied to the child objects as well. When ready, press "Compute mesh.

Above is the change in appearance for each remaining percentage. As expected, the less the amount of detail, the more the detail will deteriorate. Although there is a considerable amount of deterioration, I decided that it would be less noticeable compared to clothing, so I reduced the number of
Sneakers (35%) ... from 35,576 polygons to 11,830 polygons (-23,746).
Other objects are reduced in the same way. I reduced the polygon count to the extent that the appearance is not degraded, such as by holes in the mesh.
Hoodies (45%) ... 19,610 polygons → 8,526 polygons (-11,084)
Jacket (40%) ... 26,611 polygons → 10,538 polygons (-16,073)
Turtleneck (40%) ... 456 polygons → 134 polygons (-322)
Shorts (40%) ... 3,396 polygons → 1,268 polygons (-2,128)
Hair (70%) ... 7,039 polygons → 4,843 polygons (-2,196)
Glasses (70%) ... 4,384 polygons → 3,044 polygons (-1,340)
Socks (50%) ... 1,700 polygons → 816 polygons (-884)
Nails (65%) ... 900 polygons → 472 polygons (-428)
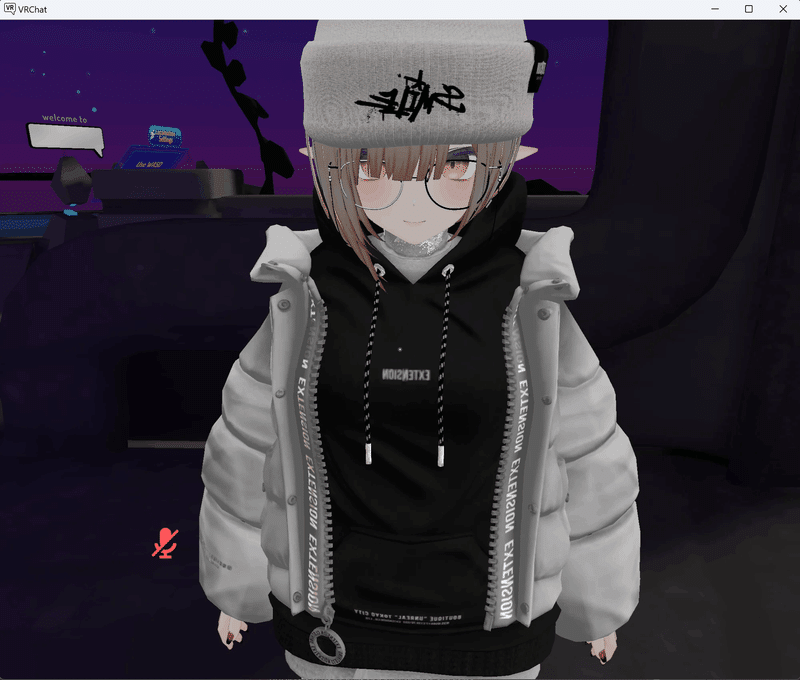
Reducing the polygon count may cause the inner object to penetrate the outer object in motion, even if no holes are visible in a static state. When adjusting the appearance strictly, I recommend making a copy of the avatar you are working on and then uploading it to VRChat as shown below to actually check it. The measures to prevent penetration are the same as in "1-2. Erase polygons in invisible areas.
Once adjusted, upload once to VRChat.
Before you do so, there are two things to note.

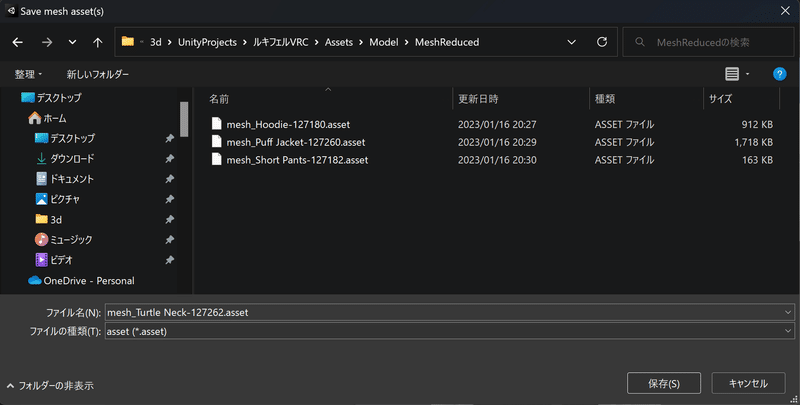
Note #1: In this Mesh Simplify component, check the "Enable Prefab Usage" checkbox. Otherwise, it will be uploaded with the mesh that uses it missing. If you turn it on, you will be asked to save the polygon-reduced mesh to an appropriate folder.
Note #2: Uploading with the VRChat SDK seems to cause the Mesh Simplify script component to peel off and the polygons cannot be put back together. Make a duplicate of your avatar in your Hierarchy before uploading, if you may need to modify it later.
And finally...

I managed to clear the polygon count section!
2. Combine materials and meshes
The Poor Avatar standard is that the number of material slots should be no more than 32, skin mesh renderers should be no more than 16, and mesh renderers should be no more than 24.
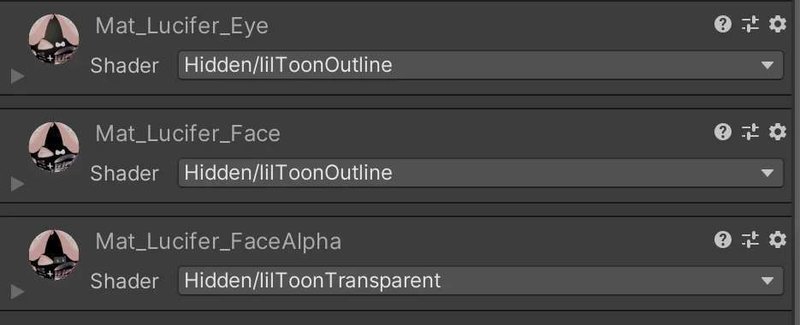
The material slot is this one that you often see in the Inspector column when you select an object.
The greater the number of these, the greater the number of drawing instructions, so it is recommended that they be grouped together whenever possible.
Next, let's talk about mesh renderers. What is a mesh? In 3DCG, a mesh is a hollow structure made up of a collection of polygonal faces created by vertices, edges, faces, and normals. It is what we have been calling polygons. There are two types of meshes
Static mesh ... not deformable
Skinned mesh ... deformable
A skinned mesh is usually a mesh that has bones (also called rigs) that tell the drawing engine to move and deform the mesh based on the movement of the bones. The more this is, the heavier the drawing load will be. This works by having a component called "Skinned Mesh Renderer" in the object.

To reduce this number of mesh renderers, Mesh Baker is a useful tool. This is another pricey tool ($86.90: as of January 2022), so please use caution when deciding whether to purchase this tool to reduce the weight of your avatar.
*Although not mentioned in the article, other tools exist that have similar functionality to BOOTH.
This is an indispensable lightweight tool that can be used for both avatars and worlds, and can combine many meshes and materials into one. The usage is a bit unique, and the procedure is as follows
Create an execution environment on the Hierarchy from a given menu operation
Select materials and objects to be merged with the mesh
Set the export destination for the generated objects
Combine materials and export to a single material and texture
Combine and export meshes
Place the exported objects in the avatar's prefab and delete duplicate source objects
Now, let's start from the top.
As usual, download Mesh Baker from Package Manger and import it into Project.
Note: There seems to be a problem with mesh integration for avatars that already have dress-up bones incorporated. Please proceed with this section "2. Combine materials and meshes" in the state before incorporating the bones for the change of clothes.
2-1. Create an execution environment on the Hierarchy from a given menu
In the Unity menu, choose Game Object > Create Other > Mesh Baker > TextureBaker and MeshBaker.

Try to interpret it as "putting the application on the Hierarchy".

TextureBaker (0) ... an app that combines materials and makes a single picture of the texture
MeshBaker ... an app that takes over the results of the above and combines meshes
The parent object's TextureBaker is executed, and then the child object's MeshBaker is executed. (It is like a parent and child object so that the results of the work can be passed on to the next tool.)
2-2. Select the object to be combined on material and mesh
Now, select the "Texture Baker (0)" object above and manipulate the Inspector column to add the object to be combined.
Here's the important part: some objects can be combined and some cannot.
Objects that may be merged are
Must be the same shader
Not contain any materials with transparency or emmision settings
No textures with special UVs (coordinates, tiling, scrolling, etc.)
Please take care to meet these requirements. Integrating materials means that the texture (metallic, smoothness, etc.) specified by the material will be consistent. Keep in mind that the same shader can cause some objects to look completely different if the texture settings are different.
I counted the number of material slots for each object in the avatar and found 17, which meets the Poor's standard of 32 or less, so for the purposes of this article, no action is necessary, but I will consider reducing the number of material slots to the Medium standard of 8 or less.
I planned to reduce the number of material slots as follows
Head ... 3 (eyes, face, transparent part of face) → Do nothing
Body ... 1 → Do nothing because lilToonOutline is used.
Hair ... 1 → Do nothing because lilToonOutline is used and the shadow setting is different from that of the body
Hoodie ... 1 → Combine as clothing
Jacket ... 1 → Combine as clothing
Shorts ... 1 → Combine as clothing
Turtleneck ... 1 → Combine as clothing
Knit cap ... 1 → Do nothing because lilToonFur is used.
Sneakers ... 1 → Combine as clothing
Socks ... 1 → Combine as clothing
Glasses ... 2 → Remove one material and combine with earrings
Nails ... 1 → Do nothing because the color setting is special
Earrings ... 2 → Combine with eyeglasses
The above estimation would be exactly eight. Let's try it then.

There are two ways to select objects to be combined.
a: You can drag and drop objects from the Hierarchy column yourself and throw them on top.
b: You can ask the tool to select it for you based on some criteria.
The proposal type in b. is useful when you want to group several materials at once, without worrying about the quality of the workmanship, because you can have the tool group several materials at once.

This time, since I want to arbitrarily select and converge materials, I will go with a. manual drag-and-drop.
Now let's try to make one material from hoodies, jackets, shorts, turtlenecks, sneakers, and even socks.

Once you are done dragging and dropping, change a few options.
The maximum size of the texture atlas (i.e., the texture to be made into a single picture) is 8,192px by default, but since this is for lightening purposes, I will set it to 4,096px, which is a reasonable size.

Next, there is a component called "MB3_Mesh Baker Grouper" below it, and some settings are made in this component. Since the object to be combined is a deformable mesh, set the Renderer to "Skinned Mesh Renderer. Then, check "Include Blend Shapes" and "Merge Blend Shape With Same Names".

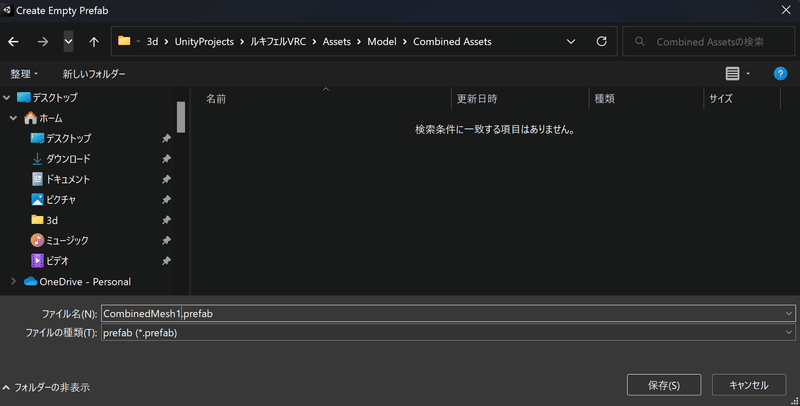
2-3. Set the export destination for the material
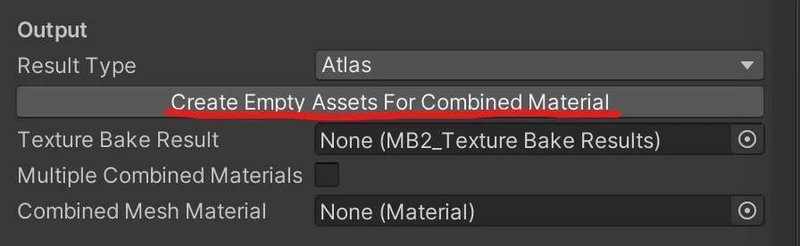
After completing these settings, press "Create Empty Assets For Combined Material" in the Output item of the MB_3Texture Baker component and specify the destination and save file name. If you do not do this, the material integration will not be executed.
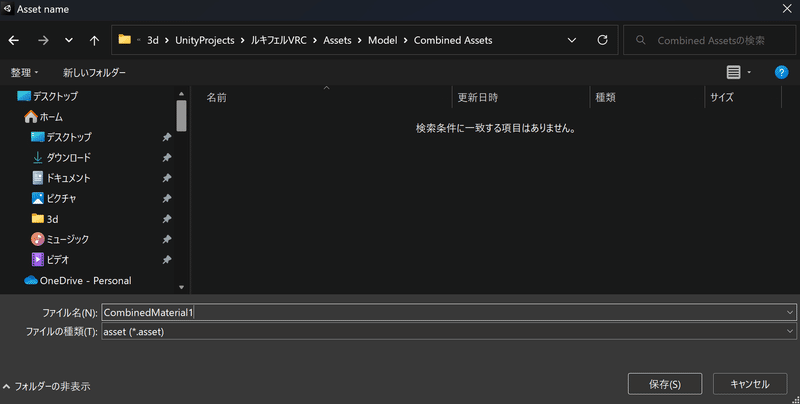
I created a folder named "Combined Assets" and saved an export file named "CombinedMaterial1". (The location and name of the file can be arbitrary.)
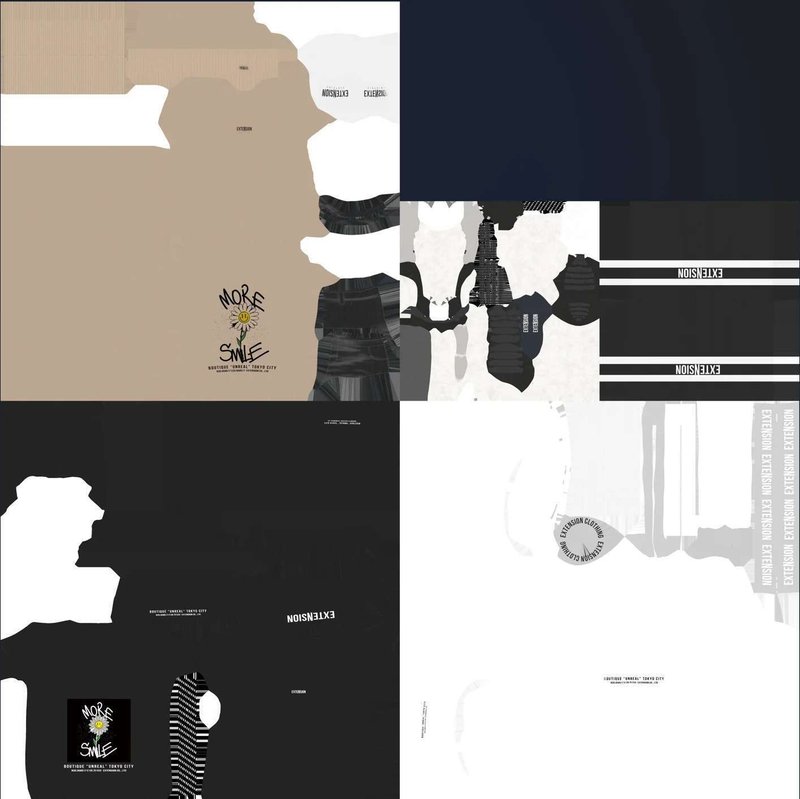
2-4. Combine materials and export to a single material and texture
Then press "Bake Materials Into Combined Material" in the middle of the Inspector column to combine the materials.


Textures are exported as well as MatCap and normal maps.
2-5. Combining and exporting meshes
The above has been the work of the "Texture Baker. From this point forward, it is the job of the "Mesh Baker. The mesh is combined by taking over the information of the object whose material was combined in the previous step.

Select "Mesh Baker" from the Hierarchy column and check the Inspector column to see that the Texture Bake Result item contains the information of the material that was just integrated. Please make sure that "Banker" is checked in the "Object To Be Combined" box.
Next, specify where the combined mesh should be exported: from the Output items, set Output to "Bake Into Prefab" and press "Create Empty Prefab" to the right of the Combined Mesh Prefab item to create an empty prefab. Name it CombinedMesh1 (you can name it whatever you like).
When the destination is specified, the settings for the Output item group are as follows.

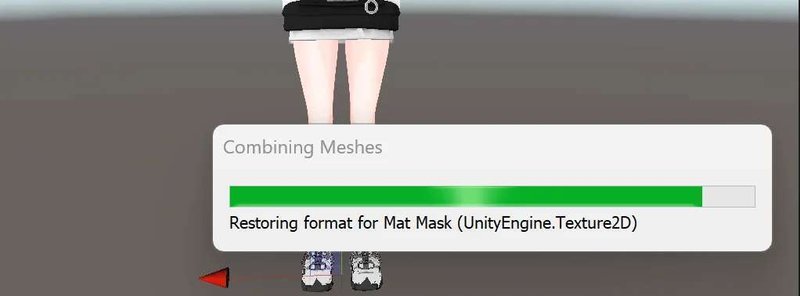
Then press "Bake" to perform mesh combined.

This process should take less time than material combining.
If a mesh is not generated here, there is some kind of malfunction. As mentioned above, one of the confirmed causes is that modifications to the avatar's bone structure did not generate the mesh properly. Please be careful when performing this on an avatar that has been changed.
2-6. Put the exported mesh into the avatar's Prefab and erase the duplicate original object
The mesh generated earlier is stored in the Prefab created in the previous section.
Drag and drop the Prefab into the Hierarchy column.
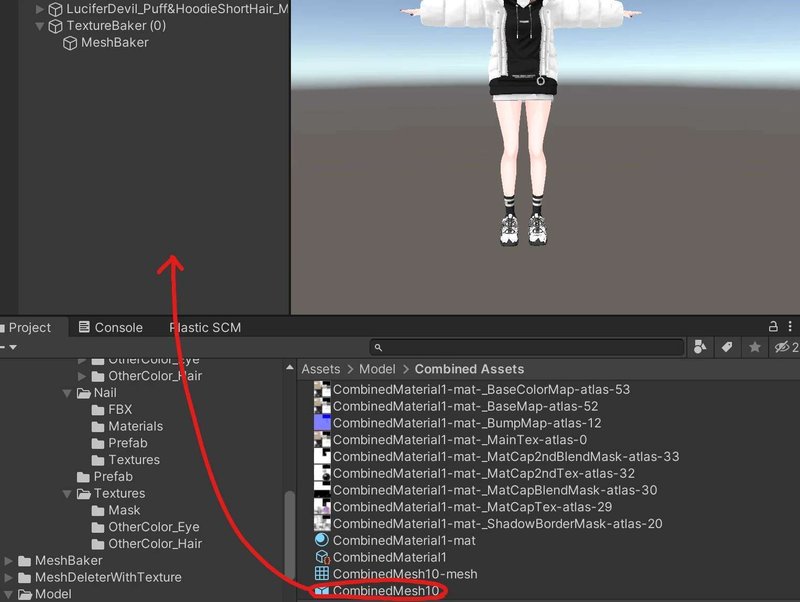
Here you will see the merged mesh and material for the first time. Check carefully for any significant changes in color or texture. (Since they are merged into the same material, I will overlook some changes as inevitable.)
This Prefab contains two things.
MeshBaker-mesh-mesh ... merged mesh
"Avatar name"(Clone) ... a copy of the original avatar
After this, it is the ""avatar name"(Clone)" that will be uploaded to VRChat.
Open the Prefab and put "MeshBaker-mesh-mesh" under this object.

In addition, the object that was just combined in the ""Avatar Name"(Clone)" is still there, but if you look at the inspector column, you will see that the component has been stripped out.

This means that the combining has been completed successfully, so we will erase them one by one.
Then, if there are other objects to be combined in this prefab, repeat the process from item 2-1. (In this example, glasses and earrings were subsequently combined.)
If you had trouble understanding the explanations in this chapters, this document is easy to follow!
3. Reduce Bone count
At this point, if there are dress-up objects, you can incorporate the bones into the original avatar. In doing so, I recommend also reduce unnecessary bones. For example,
Bones related to objects that have already been deleted
Bones that don't have much visual impact when shaken
Bones that are hidden by something
Bones that are small and hard to see the shaking
And as for the Poor criterion
Number of PhysBone components ... 32 or less *Same for DynamicBone
Number of bones ... 400 or less
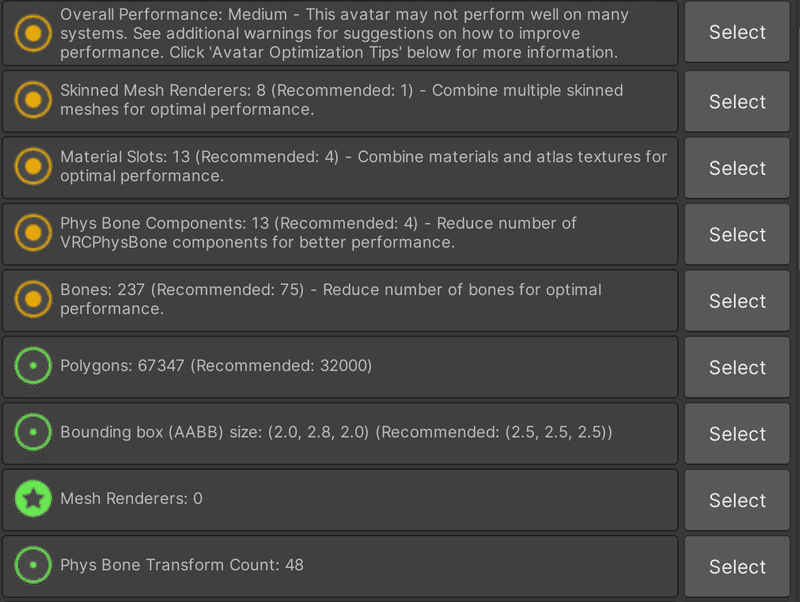
So, in light of Avatar's current situation

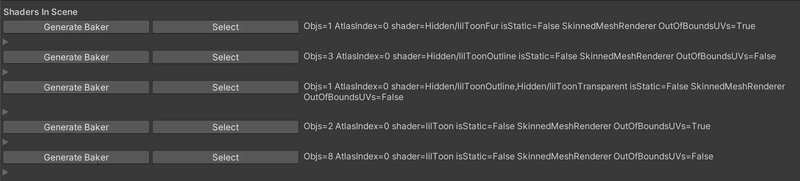
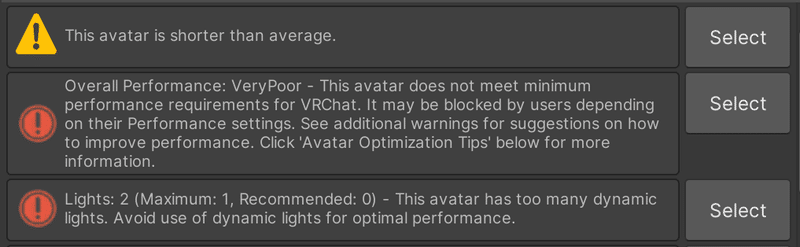
As you can see above, the number of Bone itself is good, but the number of Phys Bone components is over. So, let's press "Select" on the right side to see which object is causing the problem.
Among them, there were a total of 8 Phys Bone components and a total of 24 bones that were included in the bones of the hairstyle before the modification. I also deleted the Phys Bone Collider, which does not affect the avatar rank this time, but is not related to the current hairstyle.
Now I have achieved the Poor standard!
But it's not interesting, so I'm going for the Medium standard.
Number of PhysBone components ... 16 or less
Number of bones ... 256 or less
So, I will plan to reduce 12 more and which PhysBone components. I have divided them as follows. (The numbers in parentheses are the number of components)
What I want to shake:
Bangs(2)
Side hair(2)
Both breasts (2)
Tip of knit cap(3)
Earrings (1)
String of hoodie(2)
Zipper ring (1)
Things that don't need to be shaken:
Shoelaces (8) ... because they are inconspicuous on the feet.
Hair on the back(7) ... because it is sandwiched between the knit cap and the hood and does not seem to move.
This plan will help me meet the standards.

Take backups and proceed with care so as not to accidentally delete the wrong bones. Since erasing bones may cause the mesh to collapse, it is recommended to check the results one by one to ensure that the Undo function works, and check the play mode frequently to see if there is any effect on the shaking.
Well, this cleared the number of Phys Bone components, but this was still not good enough.

It just need to reduce it by 11 more, so I should be able to make it work!
Again, I will press "Select" on the right to see where it applies.
As far as the face and body are concerned, I will not touch them as much as possible and set our sights on objects that can tolerate a reduction in the quality of the shaking. Candidates are the strings of glasses, which are inconspicuous and hidden by the hood.
This tool is useful for reducing the number of bones in Unity.
After downloading and unzipping, drag and drop the .unitypackage into the Project column and Import. After successful installation, you will see GatoTool > ModelBoneDeleter in the Unity menu.

Run ModelBoneDeleter from the menu and a small window will appear. Drag and drop the avatar whose bones you want to adjust into the "avatar" frame.

This will bring up a list of bones under Armature, so find the appropriate one and delete it. Note that the hierarchy is organized by body parts and the names are confusing.

When finished, execute "Delete Bones" at the bottom of the window.

If Copy Avatar is checked, the original avatar will be kept and a new avatar with deleted bones will be created on the Hierarchy.

So...
I was able to modify the avatar I bought on BOOTH to make it medium rank while keeping the appearance of the avatar minimal!
4. Turn off components that cause poor performance
I will now mension some of the components that will lower the performance rank. The following components are subject to strict criteria. Avoid using them or remove them as much as possible.
Dynamic Bones ... The number of dynamic bones used is set more strictly than Phys Bones.
Particles ... 16 or less for Poor and 8 or less for Medium.
Physics Colliders ... 8 or less for both Poor and Medium.
Physics Rigidbodies ... 8 or less for both Poor and Medium.
Crosses ... 1 or less even under the Poor standard.
Lights ... 1 or less even under the Poor standard.
Check for warnings when uploading with the VRChat SDK.
5. Reduce texture size
Last item. I have made improvements to VRChat's performance ranks, but to truly eliminate the burden on other users, we also need to consider the download size.

This download size can be reduced by optimizing the textures.
Reduce texture size: 8,192px > 4,096px > 2,048px > 1,024px, as a power of 2.
Compress the texture: 4 levels of compression and with or without Crunch compression.
Normally, texture size and degree of compression are specified for each object or material (e.g., increase the texture size for detailed parts such as eyes, and decrease the texture size for plain clothing, etc.), but in this case, the material and texture are integrated into a single picture, so the texture size is reduced while taking this into consideration.
Below, I have tried only Atlasized textures in three different sizes and three different patterns. I hope you can see a sample of how much it degrades.
Texture size 4,096px, uncompressed … 37.07MB
Texture size 2,048px, uncompressed … 19.34MB
Texture size 1,024px, uncompressed … 15.06MB

So, based on the above results, I decided to use 2,048px, looking at the balance between quality and data reduction. Next, I will look at the difference in quality and data size with and without compression.
From left to right.
Texture size 2,048px, Crunch compression quality 25 … 15.48MB
Texture size 2,048px, Crunch compression quality 50 … 15.75MB
Texture size 2,048px, Crunch compression quality 75 … 16.14MB

As for Crunch compression, I did not get the impression that the appearance would change much, and there was no significant difference in the amount of data. Therefore, I will adopt Quality 50 as a safe choice.
In addition, textures used for non-Combined meshes were dropped to a maximum of 1,024 to 2,048px. As a result,

Finally, I got my diet down to 9.27 MB!
Is it enough to make it this light for the time being? That's all for now!
There are many elements of trial and error involved, but once you get used to it, I think you will be able to handle the whole process smoothly. I hope you too will make your avatar lightweight and enjoy your overseas DJ events to the fullest!
もしサポートをいただけましたら、制作活動を行う際のソフトウェア、アセットの購入資金に充てたいと思います!