ChatGPTとGoogle Mapsの連携ノウハウ

はじめに
こんにちは!前回はGoogle Apps Script(GAS)を用いて、Googleカレンダーイベントの管理やGoogle Formの自動作成方法についてご紹介しました。今回は、Google MapsとGPTsの連携に焦点を当てます。この連携を通じて、経度情報の取得や経路検索などが可能になります。
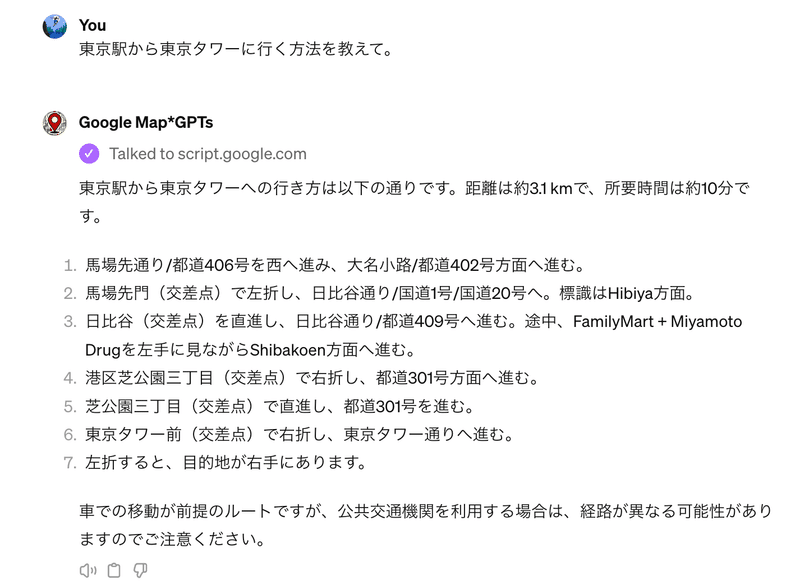
実際に、「東京駅から東京タワーに行く方法を教えて」と命令すると、GASと連携して経路情報を教えてくれます。
この記事の対象者:
GPTsのCustom Actionsを自作したい方
GASとGPTsの基本的な連携方法を学びたい方
必要な準備:
Googleアカウント:GASスクリプトを作成・実行するために必要です。
ChatGPTの課金アカウント:GPTsを作成するために必要です。
手順① GASを準備する
まず、Google Apps ScriptでGoogle Maps APIにアクセスし、特定の住所のジオコーディング情報(緯度と経度)を取得する機能と、二つの地点間のルート情報を検索する機能を提供するスクリプトを作成します。
GASプロジェクトの作成:
Google Apps Scriptのホームページにアクセスし、「新しいプロジェクト」をクリックして開始します。
スクリプトのコーディング:
新しいプロジェクトが開いたら、下記のコードをエディタにコピー&ペーストします。
スクリプトの機能
ジオコーディング (getGeocode関数): 指定された住所に対応する地理的な緯度と経度を返します。
ルート検索 (getRoute関数): 二つの地点(出発点と目的地)間のルート情報を提供します。
function doGet(e) {
  var result;

  var operation = e.parameter.operation;
  var address = e.parameter.address;

  if (operation === "getGeocode") {
    result = getGeocode(address);
  } else if (operation === "getRoute") {
    var origin = e.parameter.origin;
    var destination = e.parameter.destination;
    result = getRoute(origin, destination);
  } else {
    result = {
      "status": "error",
      "message": "Invalid operation"
    };
  }


  var jsonResult = JSON.stringify(result);
  return ContentService.createTextOutput(jsonResult)
    .setMimeType(ContentService.MimeType.JSON);
}

function getGeocode(address) {
  try {
    var geocoder = Maps.newGeocoder().geocode(address);
    var results = geocoder.results;

    if (results && results.length > 0) {
      var location = results[0].geometry.location;
      return {
        "status": "OK",
        "latitude": location.lat,
        "longitude": location.lng
      };
    } else {
      return {
        "status": "error",
        "message": "Address not found"
      };
    }
  } catch (e) {
    return {
      "status": "error",
      "message": "Geocoding failed"
    };
  }
}

function getRoute(origin, destination) {
  try {
    var directionFinder = Maps.newDirectionFinder();
    directionFinder.setOrigin(origin);
    directionFinder.setDestination(destination);
    var directions = directionFinder.getDirections();

    if (directions && directions.routes && directions.routes.length > 0) {
      var route = directions.routes[0];
      return {
        "status": "OK",
        "summary": route.summary,
        "distance": route.legs[0].distance.text,
        "duration": route.legs[0].duration.text,
        "steps": route.legs[0].steps
      };
    } else {
      return {
        "status": "error",
        "message": "Route not found"
      };
    }
  } catch (e) {
    return {
      "status": "error",
      "message": "Error finding route: " + e.toString()
    };
  }
}
手順② 作成したGASをWebアプリとしてデプロイする
作成したGASスクリプトを外部からアクセス可能にするため、Webアプリとしてデプロイします。
デプロイの準備:
GASエディタの上部にある「デプロイ」ボタンをクリックし、「新しいデプロイ」を選択します。
デプロイ設定:
「⚙️設定」アイコンを選択し、「ウェブアプリ」を選びます。
以下の情報を設定欄に入れます。
新しい説明文:適切な文章
次のユーザとして実行:自分
アクセスできるユーザー:全員
デプロイの実行:
全ての設定が完了したら、「デプロイ」をクリックします。Googleによるアクセス承認が求められる場合がありますので、指示に従って承認してください。
WebアプリケーションのURLを取得:
デプロイが完了すると、生成されたWebアプリケーションのURLが表示されます。このURLは、GPTsからのリクエストを受け付けるために使用しますので、メモしておいてください。
手順③ GPTsを作成する。
次に、GASと連携するGPTsを設定します。
GPTsの設定:
以下のページに移動し、新しいGPTsを作成します。
設定リンク:https://chat.openai.com/gpts/editor
基本情報の入力:
名前と説明:GPTsの目的を簡潔に説明する名前と詳細な説明を入力します。
Instructions:特に設定不要です。
Capabilities:GASとのデータ連携を主な機能としているため、特別な機能設定は不要です。
Actionsの定義:
「Actions」セクションに移動し、「Scheme」を選択して、上記で作成したGASのWebアプリケーションと通信するための設定を記入します。
{
  "openapi": "3.0.0",
  "info": {
    "title": "Geocoding and Routing Service",
    "version": "1.0.0",
    "description": "This service provides geocoding functionality to return latitude and longitude for a specified address, and routing functionality to calculate routes between two locations."
  },
  "servers": [
    {
      "url": "YOUR_SCRIPT_ID",
      "description": "The base URL for the geocoding and routing service"
    }
  ],
  "paths": {
    "/exec": {
      "get": {
        "summary": "Perform geocoding or routing operations",
        "operationId": "getService",
        "parameters": [
          {
            "name": "operation",
            "in": "query",
            "required": true,
            "description": "The operation to perform, should be either 'getGeocode' or 'getRoute'",
            "schema": {
              "type": "string",
              "enum": [
                "getGeocode",
                "getRoute"
              ]
            }
          },
          {
            "name": "address",
            "in": "query",
            "required": false,
            "description": "The address to get geocode information for, required for 'getGeocode' operation",
            "schema": {
              "type": "string"
            }
          },
          {
            "name": "origin",
            "in": "query",
            "required": false,
            "description": "The starting point of the route, required for 'getRoute' operation",
            "schema": {
              "type": "string"
            }
          },
          {
            "name": "destination",
            "in": "query",
            "required": false,
            "description": "The destination of the route, required for 'getRoute' operation",
            "schema": {
              "type": "string"
            }
          }
        ],
        "responses": {
          "200": {
            "description": "Successful operation",
            "content": {
              "application/json": {
                "schema": {
                  "oneOf": [
                    {
                      "type": "object",
                      "properties": {
                        "status": {
                          "type": "string",
                          "example": "OK"
                        },
                        "latitude": {
                          "type": "number",
                          "format": "float",
                          "example": 40.714224
                        },
                        "longitude": {
                          "type": "number",
                          "format": "float",
                          "example": -73.961452
                        }
                      },
                      "required": [
                        "status"
                      ]
                    },
                    {
                      "type": "object",
                      "properties": {
                        "status": {
                          "type": "string",
                          "example": "OK"
                        },
                        "summary": {
                          "type": "string",
                          "example": "Shibuya Station to Tokyo Station"
                        },
                        "distance": {
                          "type": "string",
                          "example": "10 km"
                        },
                        "duration": {
                          "type": "string",
                          "example": "30 minutes"
                        },
                        "steps": {
                          "type": "array",
                          "items": {
                            "type": "string"
                          }
                        }
                      },
                      "required": [
                        "status",
                        "summary",
                        "distance",
                        "duration",
                        "steps"
                      ]
                    }
                  ]
                }
              }
            }
          },
          "400": {
            "description": "Invalid request",
            "content": {
              "application/json": {
                "schema": {
                  "type": "object",
                  "properties": {
                    "status": {
                      "type": "string",
                      "example": "error"
                    },
                    "message": {
                      "type": "string",
                      "example": "Invalid operation or parameters not found"
                    }
                  },
                  "required": [
                    "status",
                    "message"
                  ]
                }
              }
            }
          }
        }
      }
    }
  }
}
スクリプトIDの置き換え:Scheme内の10行目の'YOUR_SCRIPT_ID'を、手順②で得たWebアプリケーションのURL内のスクリプトIDに置き換えます。
こちらで、GPTsの設定は完了です。
終わりに
GASでGPTsとGoogle Mapと連携する方法を紹介しました。
この記事を参考にご自身でパーソナライズされたGPTの開発する際の一助になれば、幸いです。
最後までご精読いただき、ありがとうございました。
ご質問やフィードバックがあれば、ぜひ私のTwitter @junichikawaAI までお寄せください。
Image Credit: Open AI Inc. and Google LLC
この記事が気に入ったらサポートをしてみませんか?