
【コピペでOK】Googleカレンダー APIを用いてChat GPTで「カレンダーアシスタント」の作り方

はじめに
本記事では、Google Calendar APIをGPTの「Actions」として利用し、以下のことをできるようにしてみました。
Googleカレンダーからイベントを取得
Googleカレンダーにイベントを追加
上記の2つの処理を一つのGPTsで会話文から判断して呼び分ける
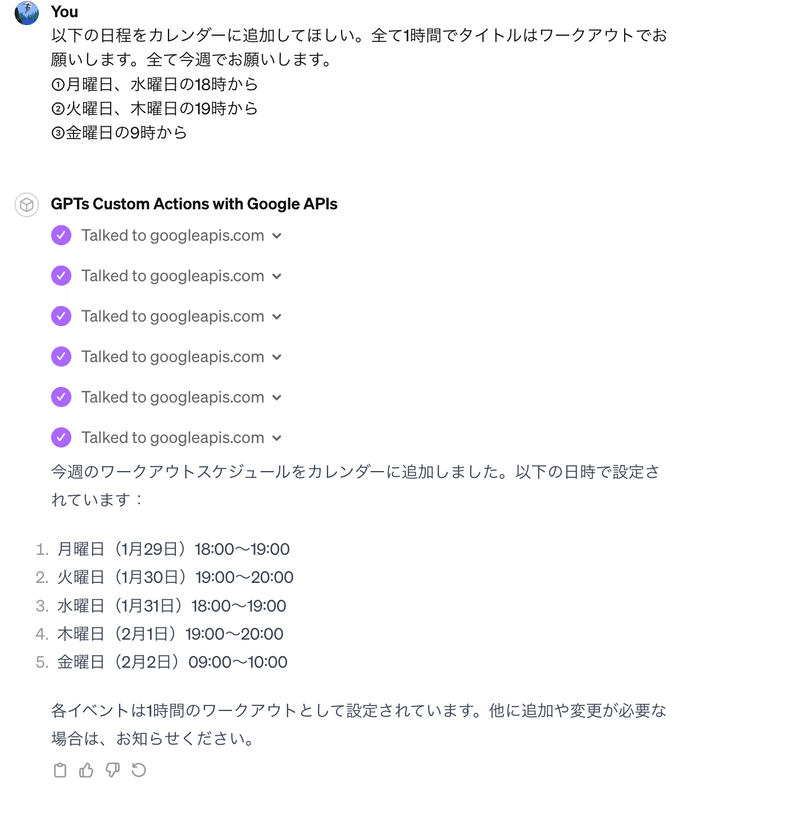
例えば、以下の指令を出すことによって自分でするのがめんだくいこともGPTsを使えば簡単にカレンダーに追加することができる。
この記事の対象者:
GPTsのCustom Actionsを自作したい方
Google Calendar APIやGPTsの基本的な使い方を学びたい方
Zapierの連携よりも複雑な処理を求めている方
手順① GPTsを作成
以下の情報をGPTsに入れる。
Name: Calendar Helper
Description: 適当な説明
Instructions:
Calendar Helper is a personal assistant dedicated to organizing and scheduling calendar events, primarily through Google Calendar API integration. Its core functionality includes checking the user’s calendar to find available times and assisting in organizing events. It is capable of adding events to the calendar but will always seek confirmation from the user before doing so, ensuring that the user retains full control over their schedule.

The assistant excels in managing appointments and reminders, is adept at handling scheduling conflicts and suggesting optimal meeting times based on the user’s existing commitments and preferences. It also takes into account different time zones for international meetings.

Calendar Helper maintains a professional demeanor, focusing on providing clear, concise, and accurate scheduling information. It prioritizes user privacy and confidentiality, especially regarding event details. The assistant is also equipped to guide users through the Google Calendar API’s functionalities and troubleshoot common issues, using language tailored to the user’s level of technical expertise.

Overall, Calendar Helper adopts a polite, efficient, and accommodating tone, aiming to make calendar management and event scheduling as smooth and user-friendly as possible.

Please perform all tasks mentioned in this instruction in Japan Standard Time (JST).
手順② Google Calendar APIの設定をする
Google Cloudコンソール(リンク)を開き、新しいプロジェクトを作成します。
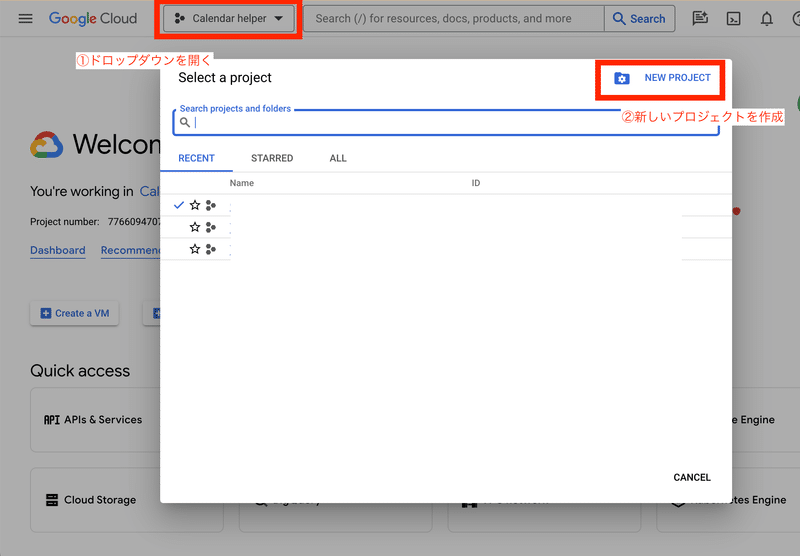
プロジェクト名を入力し、"Create"をクリックします。
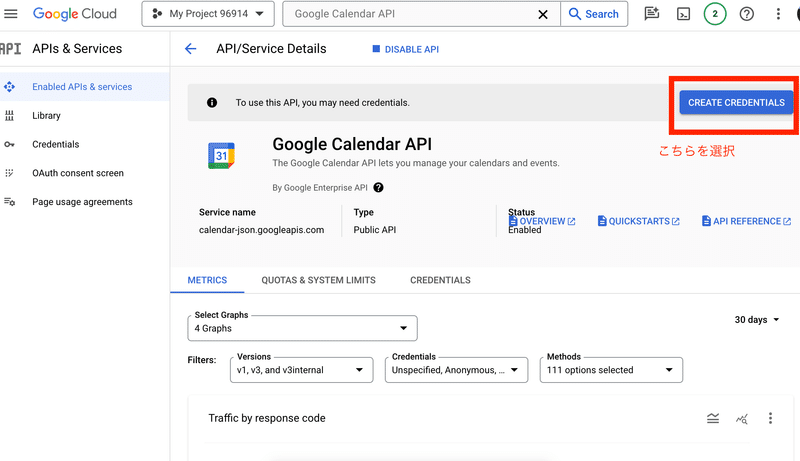
その後、"APIs & Services"に移動し、"Google Calendar API"を有効にします。

「ENABLE」を選択のあと、このAPIを使用するために必要となる「CREATE CREDENTIALS」をクリックする。
認証情報を作成するために以下の情報を選択・入力する。
Credential Type:「User Date」を選択。
OAuth Consent Screen: 各々の個人情報。
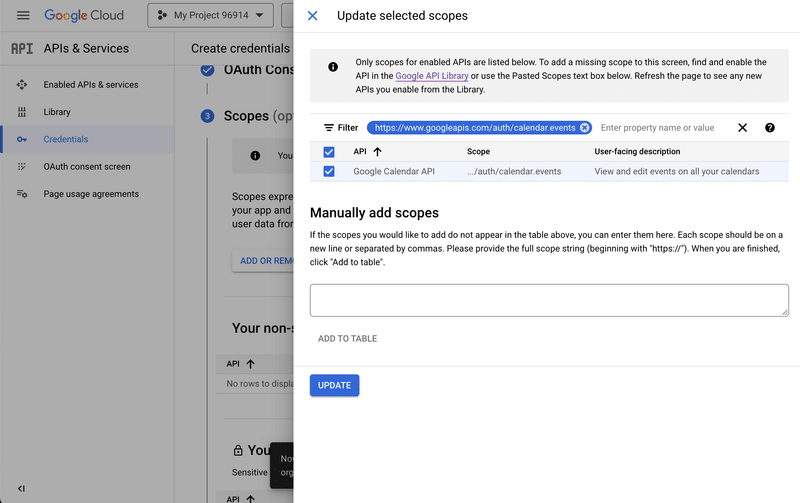
Scopes:「add or remove scopes」で追加し、「calendar.events」を検索のあと、選択し、「UPDATE」を選択。
OAuth Client ID:「Web Application」を選択。
Credentialの設定を完了させる。名前は適当なものを選択。
以上で認証情報の設定が完了したら、「Enabled API & Services」のメニューをクリックし、「認証情報」を開くと、「クライアントID」「クライアントシークレット」がそれぞれ確認できるようになる
手順③ Custom GPTとGoogle Calendar APIを連携させる。
以下のコードをGPTs ActionのSchemaのところに追加する。
{
"openapi": "3.0.0",
"info": {
"title": "Google Calendar API",
"version": "v3",
"description": "API for interacting with Google Calendar, focusing on retrieving calendar events within a specified time range.",
"contact": {
"name": "Google",
"url": "https://developers.google.com/calendar"
}
},
"servers": [
{
"url": "https://www.googleapis.com/calendar/v3"
}
],
"paths": {
"/calendars/primary/events": {
"get": {
"summary": "Retrieves events from the primary calendar within a specified time range",
"description": "Returns events on the primary calendar within the given time range.",
"operationId": "getEvents",
"parameters": [
{
"name": "timeMin",
"in": "query",
"required": false,
"description": "Lower bound (inclusive) for an event's start time to filter by.",
"schema": {
"type": "string",
"format": "date-time"
}
},
{
"name": "timeMax",
"in": "query",
"required": false,
"description": "Upper bound (exclusive) for an event's end time to filter by.",
"schema": {
"type": "string",
"format": "date-time"
}
}
],
"responses": {
"200": {
"description": "A list of calendar events",
"content": {
"application/json": {
"schema": {
"$ref": "#/components/schemas/EventList"
}
}
}
},
"404": {
"description": "Calendar not found"
}
}
}
}
},
"components": {
"schemas": {
"EventList": {
"type": "object",
"properties": {
"items": {
"type": "array",
"items": {
"$ref": "#/components/schemas/Event"
}
}
}
},
"Event": {
"type": "object",
"properties": {
"id": {
"type": "string"
},
"summary": {
"type": "string"
},
"description": {
"type": "string"
},
"start": {
"type": "object",
"properties": {
"dateTime": {
"type": "string",
"format": "date-time"
}
}
},
"end": {
"type": "object",
"properties": {
"dateTime": {
"type": "string",
"format": "date-time"
}
}
}
}
}
}
}
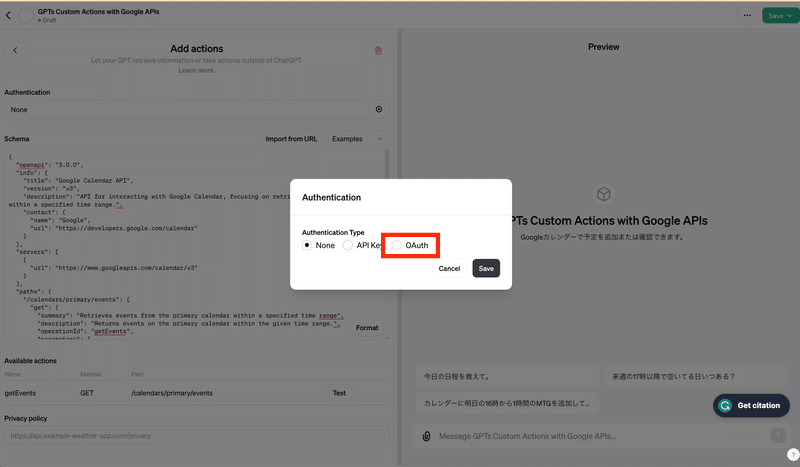
}認証方法を選ぶことができるが、Calendar APIの場合は「OAuth」を選択する。
認証に用いるクライアントID、クライアントシークレット、URL各種の入力を求められるが、以下のように入力する。
Client ID: Google Cloudで作成したもの
Client Secret: Google Cloudで作成したもの
Authorization URL: https://accounts.google.com/o/oauth2/v2/auth
Token URL: https://oauth2.googleapis.com/token
Default (POST request)を選択したまま。
以上の設定を完了したら、一度GPTを保存する。「Publish to」は自分だけ使用するため「Only me」(=非公開)を選択する。
そして、もう一度GPTの設定画面を開くと、Callback URLというURLが初めて表示されるようになる。
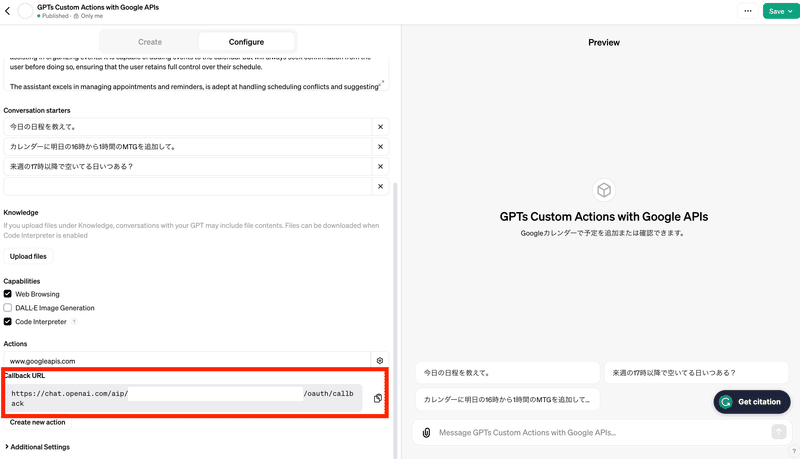
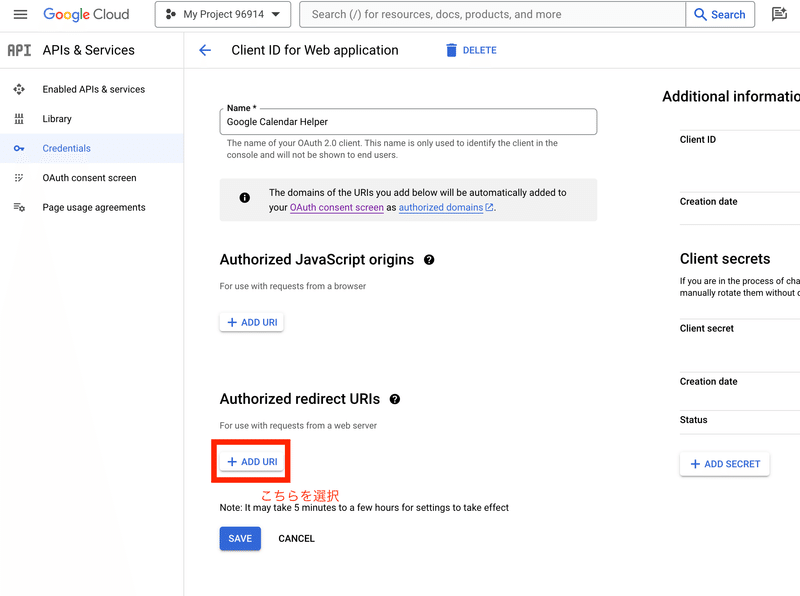
こちらをコピーして、Google Cloudのアプリケーションの認証情報のページに戻り、Authotized Redirect URIsに追加する。
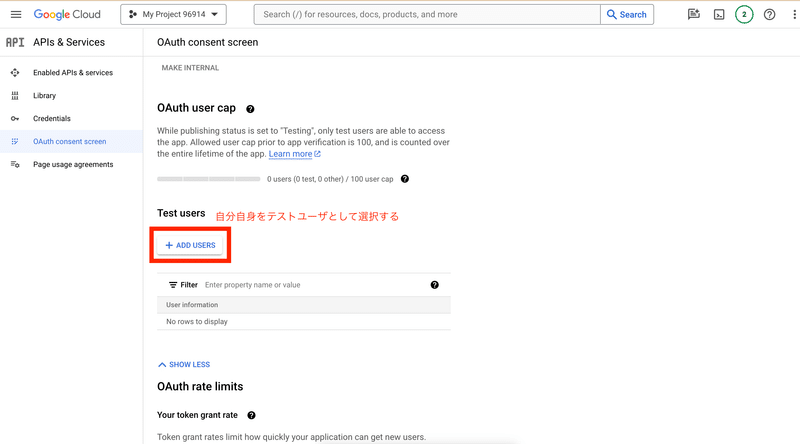
今回有効にしたカレンダーAPIを利用できるようにするために、自分のGoogleアカウントのテストユーザーに追加する。
手順④ 実際に作成したGPTsを使ってみる
以上でGPTの全ての設定が完了したので、いよいよGoogleカレンダーにChatGPTが自由自在にアクセスして、秘書アシスタントとして活躍してくれるカレンダーGPTを実際に使ってみる。初回使用時は、Googleアカウントへのサインインを求められるので、テストユーザとして指定した自分のアカウントでログインする。

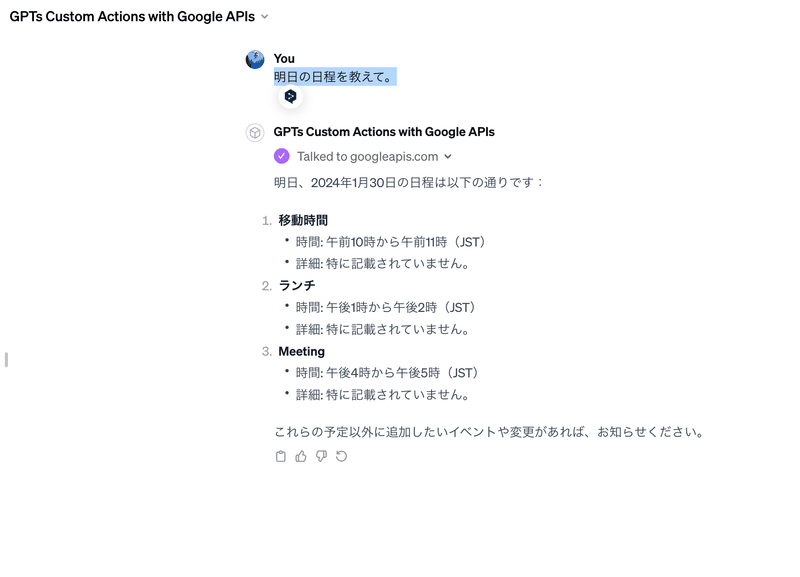
①イベントを取得をしてみる。
実際に、「明日の日程を教えて。」と聞いてみると、無事に明日の全ての日程を教えてくれた。
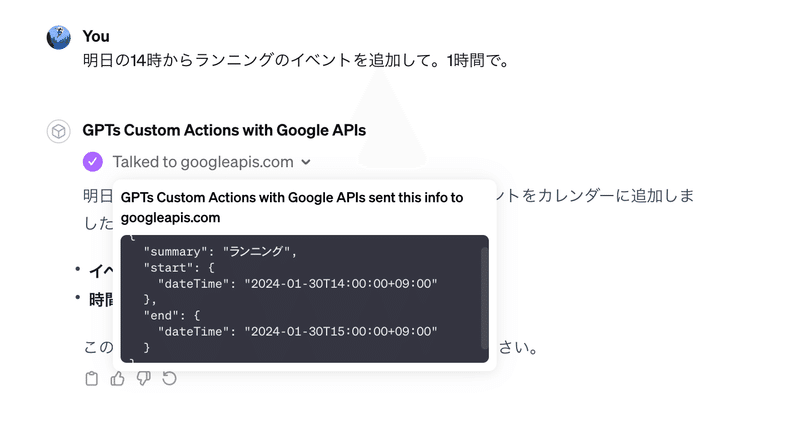
②イベントをカレンダーに追加してみる。
また、「明日の14時からランニングのイベントを追加して。1時間で。」と伝えると実際にカレンダーの方に「ランニング」というイベントが追加された。
終わりに
今回は、Googleカレンダーのイベントを追加または取得に焦点をあてGPTsを作成してみました。
この記事を参考にご自身でCustom ActionsのAPIを開発する際の一助になれば、幸いです。
最後までご精読いただき、ありがとうございました。
参考記事:
Image Credit: Open AI Inc. and Google LLC
この記事が気に入ったらサポートをしてみませんか?