
【 Dify 0.6.9 対応 】 n8n と Dify を VPS 上の Docker 環境で動かして連携させる。セキュリティや nginx 設定までのオマケつき

はじめに
前提にあたる記事
Claude 3 Opus さんより
※
この導入部分は、それ以外の記事を書き終えた上で、Claude 3 Opus によって生成されました。
なお AI による執筆はこの項のみで、あとは自筆です。
本記事では、n8n と Dify を連携させることに主眼を置いて、VPS 上でそれぞれの環境を構築し、実際に連携させるまでの手順を解説します。
n8n は、様々なサービスやアプリケーションを連携させ、ワークフローを自動化できるオープンソースのノーコードツールです。
一方、Dify はオープンソースの LLM プラットフォームで、自然言語処理を活用したアプリケーションを構築できます。
これらのツールを組み合わせることで、例えば以下のようなことが実現できます。
n8n のワークフローで、ユーザーからの入力を受け取り、Dify に渡して自然言語処理を行う
Dify で処理した結果を、n8n のワークフローに戻して、別のサービスやアプリケーションと連携させる
定期的に Dify でデータを分析し、結果を n8n を通じて通知する
このように、n8n と Dify を連携させることで、自然言語処理を活用した様々な自動化が可能になります。
しかし、n8n と Dify を連携させるためには、それぞれの環境を構築する必要があります。
クラウドサービスを利用する方法もありますが、より自由度の高い環境を構築したい場合は、VPS を利用するのがおすすめです。
VPS を利用することで、リソースをコントロールしやすくなり、ネットワークトラフィックの従量課金も発生しません。また、国内の VPS を選べば、為替の影響を受けにくいというメリットもあります。
本記事では、このような VPS 上で n8n と Dify の環境を構築し、実際に連携させるまでの手順を、わかりやすく解説していきます。
n8n と Dify に興味がある方、それらを連携させて自動化を実現したい方は、ぜひ本記事を参考にしてみてください。
人間による補足
はい、ということでおおむね重要な部分は書いてくれていますね。
あと補足としては、本記事は超初心者! 本職が IT エンジニアじゃないよ! Ubuntu 触ったことないよ! という方でもわかるように仕立ててあるつもりです。
シンプルに、
n8n と Dify が連携できるだってー!?
そもそも n8n って? Dify って?
という興味本位でお読みいただけると嬉しいです!🙌
煽り的なことを書くなら「有料級!」な情報でして、実際に「有料部分」の設定もしているのですが、記事の本筋は全て無料で読めるようになっています。
n8n に関する Zenn 上の参考記事
Dify に関する note 上の参考記事
※2024/05/07 時点
VPS 契約手順
Xserver 紹介
既に VPS をお持ちの方などは、この章はすっ飛ばしてしまってください🚀
VPS ベンダーはたくさんありますが、ここでは Xserver VPS を紹介します。
なぜ Xserver かというと、
管理画面が使いやすい。見やすい。軽くてサクサク動く
VPS のハードウェア/パフォーマンスが新しめで良い
キャンペーン割引適用させると、他ベンダーと比較して底値圏でコスパよし
といったあたりになります。
なお Xserver での「お友達紹介」は規約の変更があり、不特定多数への公開リンクを利用することができなくなりました。
もし紹介コードが欲しいという方は、お声がけいただけたらお渡しいたします。
もし適用されたい場合、現時点 2024/05 での紹介割引は以下の通りで、申込の際にこちらの金額分が割引される表示になっているかどうかをご確認ください。

プランはサーバーの性能ごとに段階づけられていて、契約期間の組み合わせで料金が決まります。
なお時期によってキャンペーン割引率が異なり、大きい時だと 60% オフのタイミングもあるので、狙ってみるのもよいでしょう。

Xserver 申込
今回の要件で申し込む場合は メモリ 8GB 以上を選択しておくことをオススメします。
メモリ容量はそのまま Docker コンテナ上で動作する n8n, Dify の動作感に直結しますので、 8GB あると安心です。
他のコンテナも同時に立ち上げて遊びたいという方は、16GB 以上積んでも損はしないと思いますが、64GB はコスパがあまりよくないので非推奨です。
一応、検証環境として最小の 2GB でもそこそこに動作することは確認できましたが、本格的に活用するにはオススメできません。

ちなみに、低スペックのプランで 1 ヶ月利用、といった「様子見」をすると、初回割引が安いところでしか効かなくなるというデメリットが発生します。
それなりに色々使いたいなという場合には 12 ヶ月以上にしておくのが無難です。

申込時に早くも OS の選択まで迫られます。
本記事では、Ubuntu を使用します。
よほどのこだわりがなければ Ubuntu で良いでしょう。

あとは root パスワードの設定と SSH Key の設定をしてください。
SSH Key についてはログイン時のパスワードログインを無効化して鍵認証だけにしておくと、よりセキュアにできます。

初回申込時は「キーを作成する」を選びます。
手元に SSH Key を持っていない方は、「自動作成」を選んで進めてください。

いつも使っているキーがあるという方は「インポート」を選んで公開鍵を貼り付けてください。

あとは料金確認画面を経て決済し、契約完了となります。
VPS を契約したら、SSH ログインしましょう。
以降の手順は、SSH でログインした状態で進めていきます。
VPS での初期設定(一部)
この章は、一部を除いては、末尾の「有料部分」にて、以下のような内容をご案内していますので、よろしければそちらをご参照ください。
ひとつひとつの項目は、調べたり LLM に伺えば情報を拾えますが、そもそも何をすべきかというのが分かりづらいかと思います。
それでもがんばれば自力でできるかと思いますが、面倒で時間を買いたいという方はぜひ。
Xserver 管理画面でおこなうべきセキュリティ設定
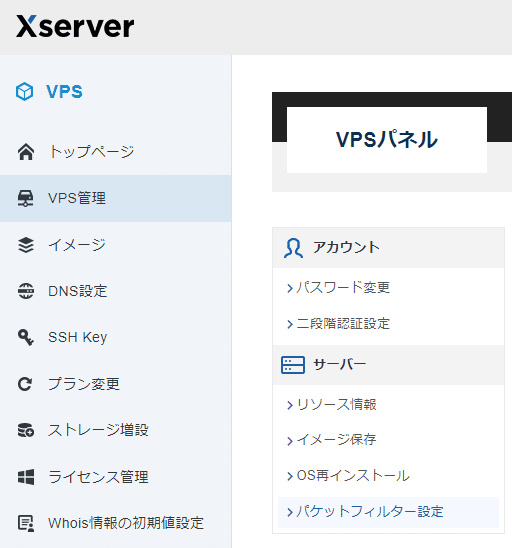
最低限設定しておかないといけないこととして、Xserver 管理画面における `パケットフィルター設定` をおこないます。
以下画像の通り、該当の VPS を選んで管理画面に入った後で `パケットフィルター設定` を選んでください。
パケットフィルター設定 を ON にしてください。

フィルターとして、
手動で設定
TCP
で、 ポート番号 `8101` と `8102` の許可を追加してください。
番号は予約されていない範囲のユーザー番号のものなら何でも構いません。

また、あわせて SSH 接続も許可されていることを確認しておいてください。
認証キーは間違っていないはずなのに SSH ログインができないという場合には、そもそもシャットダウンされているか、ポートが塞がれているか、あたりを疑ってみるとよいです。
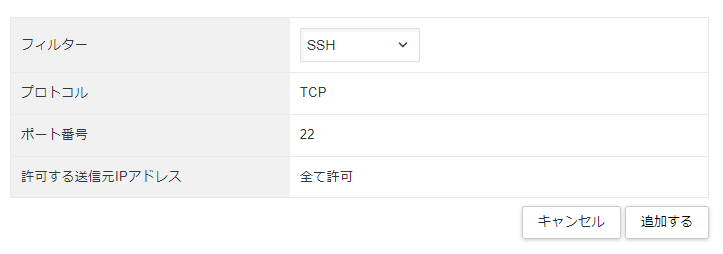
最後にまた `変更する` ボタンを押します。
これを押さないと反映されません。
正直ここは気づきづらくて、ちょっとしたハマりポイントです……

以下のモーダルが表示されたら大丈夫です👍

その他「有料部分」で紹介される項目について
パケットフィルター設定で他にやった方がよいこと
SSH ログイン時のパスワード無効化
root 以外のユーザ作成
sudo を使えるようにする
ユーザの切り替え
パッケージ更新
……など
Docker / Docker Compose パッケージのインストール
さて VPS の準備ができたところで、Docker / Docker Compose をインストールしていきましょう。
パッケージ更新は済んでいる前提です。
まずは以下のコマンドを実行して、必要なパッケージをインストールします。
sudo apt install -y docker.io docker-composeインストールされたかどうかは、
sudo docker
sudo docker-compose
といったコマンドを打ってみて確認することができます。
入力・実行した後で、ヘルプ的に使い方がズラーッと表示されればヨシです。
なお docker / docker-compose コマンドを sudo 無しで打てるようにしたい場合は、末尾の「有料部分」でご紹介していますのでそちらをご参照ください。
以下では sudo を省略していきます。
n8n を Docker Compose で構築
いよいよ n8n 環境の構築です。
まずは、`/home/user/` 配下に `docker-compose` と `n8n` のディレクトリを作成します。
`user` ディレクトリ名は自身の環境に応じて変更してください。
mkdir /home/user/docker-compose
mkdir /home/user/docker-compose/n8n
cd /home/user/docker-compose/n8n
加えて `/home/user/docker-compose/n8n/` 配下に `data` フォルダを作成します。
ここに永続的な情報を溜め込むようにします。
さらに n8n コンテナで使われる 1000:1000 ( user:group ) からアクセス可能なように所有設定をおこないます。
mkdir /home/user/docker-compose/n8n/data
sudo chown -R 1000:1000 /home/user/docker-compose/n8n/data
そして n8n ディレクトリに `docker-compose.yml` ファイルを作成します。
以下のコードを転記し、保存してください。
version: '3.9'

services:
  n8n:
    image: docker.n8n.io/n8nio/n8n
    ports:
      - '8101:5678'
    environment:
      - GENERIC_TIMEZONE=Asia/Tokyo
      - N8N_SECURE_COOKIE=FALSE
    volumes:
      - ./data:/home/node/.n8n
ここまでできたら、以下コマンドを実行すると、イメージがダウンロードされ、コンテナとしてビルドされた上で、バックグラウンドにて起動します。
docker-compose up -d最後にブラウザで起動確認してみましょう。
IP アドレスの後に `:8101` というかたちでポート番号を指定してください。
たとえば 192.168.1.1 というアドレスであれば 192.168.1.1:8101 とします。
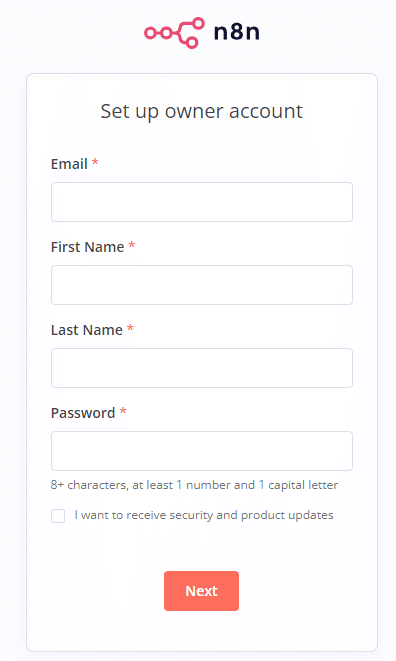
以下のように n8n の初期画面が表示されれば大丈夫です!👍
なおこの時点では SSL 設定がされておらず、http プロトコルでの通信となっています。
テスト用途に留め、個人情報や API Key など重要な情報を入力しないようにしてください。
Let's Encrypt を用いた SSL 設定をおこなうには、ドメインを所有しておく必要があり、そのあたりの解説は末尾の「有料部分」をご参照ください。
Dify を Docker Compose で構築
Dify の構築も似たような流れで進めます。
`/home/user/docker-compose` 配下に `dify` のディレクトリを作成します。
`user` ディレクトリ名は自身の環境に応じて変更してください。
mkdir /home/user/docker-compose/dify
cd /home/user/docker-compose/dify
続けて `nginx` ディレクトリと、さらにその中に `conf.d` ディレクトリも作成します。
mkdir /home/user/docker-compose/dify/nginx
mkdir /home/user/docker-compose/dify/nginx/conf.d
そうしたら、以下の Dify 公式 GitHub リポジトリから、`nginx.conf` `proxy.conf` `/conf.d/default.conf` ファイルをそれぞれ中身そのままに持ってきて配置してください。
配置の仕方についての詳細は「有料部分」にて解説しています。
Dify 0.6.8 以後では `ssrf_proxy` が導入されたため、さらに、`/home/user/docker-compose/dify/volumes/` ディレクトリ内に `ssrf_proxy` ディレクトリを作成します。
まだ `volumes` ディレクトリがなければ、そこから作成してください。
mkdir /home/user/docker-compose/dify/volumes
mkdir /home/user/docker-compose/dify/volumes/ssrf_proxy
そうしたら、以下の Dify 公式 GitHub リポジトリから、`squid.conf` ファイルを中身そのままに持ってきて配置してください。
配置の仕方についての詳細は「有料部分」にて解説しています。
続けて `docker-compose.yaml` です。
Dify の `docker-compose.yaml` は GitHub リポジトリに置いてありますので、そこから取ってくるのですが、一部設定を書き換えたものが以下です。
現時点 2024/05/29 で 0.6.9 に準拠しています。
これを n8n の時と同様に配置してください。
version: '3'
services:
  # API service
  api:
    image: langgenius/dify-api
    restart: always
    environment:
      # Startup mode, 'api' starts the API server.
      MODE: api
      # The log level for the application. Supported values are `DEBUG`, `INFO`, `WARNING`, `ERROR`, `CRITICAL`
      LOG_LEVEL: INFO
      # enable DEBUG mode to output more logs
      # DEBUG : true
      # A secret key that is used for securely signing the session cookie and encrypting sensitive information on the database. You can generate a strong key using `openssl rand -base64 42`.
      SECRET_KEY: sk-9f73s3ljTXVcMT3Blb3ljTqtsKiGHXVcMT3BlbkFJLK7U
      # The base URL of console application web frontend, refers to the Console base URL of WEB service if console domain is
      # different from api or web app domain.
      # example: http://cloud.dify.ai
      CONSOLE_WEB_URL: ''
      # Password for admin user initialization.
      # If left unset, admin user will not be prompted for a password when creating the initial admin account.
      INIT_PASSWORD: ''
      # The base URL of console application api server, refers to the Console base URL of WEB service if console domain is
      # different from api or web app domain.
      # example: http://cloud.dify.ai
      CONSOLE_API_URL: ''
      # The URL prefix for Service API endpoints, refers to the base URL of the current API service if api domain is
      # different from console domain.
      # example: http://api.dify.ai
      SERVICE_API_URL: ''
      # The URL prefix for Web APP frontend, refers to the Web App base URL of WEB service if web app domain is different from
      # console or api domain.
      # example: http://udify.app
      APP_WEB_URL: ''
      # File preview or download Url prefix.
      # used to display File preview or download Url to the front-end or as Multi-model inputs;
      # Url is signed and has expiration time.
      FILES_URL: ''
      # File Access Time specifies a time interval in seconds for the file to be accessed.
      # The default value is 300 seconds.
      FILES_ACCESS_TIMEOUT: 300
      # When enabled, migrations will be executed prior to application startup and the application will start after the migrations have completed.
      MIGRATION_ENABLED: 'true'
      # The configurations of postgres database connection.
      # It is consistent with the configuration in the 'db' service below.
      DB_USERNAME: postgres
      DB_PASSWORD: difyai123456
      DB_HOST: db
      DB_PORT: 5432
      DB_DATABASE: dify
      # The configurations of redis connection.
      # It is consistent with the configuration in the 'redis' service below.
      REDIS_HOST: redis
      REDIS_PORT: 6379
      REDIS_USERNAME: ''
      REDIS_PASSWORD: difyai123456
      REDIS_USE_SSL: 'false'
      # use redis db 0 for redis cache
      REDIS_DB: 0
      # The configurations of celery broker.
      # Use redis as the broker, and redis db 1 for celery broker.
      CELERY_BROKER_URL: redis://:difyai123456@redis:6379/1
      # Specifies the allowed origins for cross-origin requests to the Web API, e.g. https://dify.app or * for all origins.
      WEB_API_CORS_ALLOW_ORIGINS: '*'
      # Specifies the allowed origins for cross-origin requests to the console API, e.g. https://cloud.dify.ai or * for all origins.
      CONSOLE_CORS_ALLOW_ORIGINS: '*'
      # CSRF Cookie settings
      # Controls whether a cookie is sent with cross-site requests,
      # providing some protection against cross-site request forgery attacks
      #
      # Default: `SameSite=Lax, Secure=false, HttpOnly=true`
      # This default configuration supports same-origin requests using either HTTP or HTTPS,
      # but does not support cross-origin requests. It is suitable for local debugging purposes.
      #
      # If you want to enable cross-origin support,
      # you must use the HTTPS protocol and set the configuration to `SameSite=None, Secure=true, HttpOnly=true`.
      #
      # The type of storage to use for storing user files. Supported values are `local` and `s3` and `azure-blob` and `google-storage`, Default: `local`
      STORAGE_TYPE: local
      # The path to the local storage directory, the directory relative the root path of API service codes or absolute path. Default: `storage` or `/home/john/storage`.
      # only available when STORAGE_TYPE is `local`.
      STORAGE_LOCAL_PATH: storage
      # The S3 storage configurations, only available when STORAGE_TYPE is `s3`.
      S3_ENDPOINT: 'https://xxx.r2.cloudflarestorage.com'
      S3_BUCKET_NAME: 'difyai'
      S3_ACCESS_KEY: 'ak-difyai'
      S3_SECRET_KEY: 'sk-difyai'
      S3_REGION: 'us-east-1'
      # The Azure Blob storage configurations, only available when STORAGE_TYPE is `azure-blob`.
      AZURE_BLOB_ACCOUNT_NAME: 'difyai'
      AZURE_BLOB_ACCOUNT_KEY: 'difyai'
      AZURE_BLOB_CONTAINER_NAME: 'difyai-container'
      AZURE_BLOB_ACCOUNT_URL: 'https://<your_account_name>.blob.core.windows.net'
      # The Google storage configurations, only available when STORAGE_TYPE is `google-storage`.
      GOOGLE_STORAGE_BUCKET_NAME: 'your-bucket-name'
      # if you want to use Application Default Credentials, you can leave GOOGLE_STORAGE_SERVICE_ACCOUNT_JSON_BASE64 empty.
      GOOGLE_STORAGE_SERVICE_ACCOUNT_JSON_BASE64: 'your-google-service-account-json-base64-string'
      # The type of vector store to use. Supported values are `weaviate`, `qdrant`, `milvus`, `relyt`.
      VECTOR_STORE: weaviate
      # The Weaviate endpoint URL. Only available when VECTOR_STORE is `weaviate`.
      WEAVIATE_ENDPOINT: http://weaviate:8080
      # The Weaviate API key.
      WEAVIATE_API_KEY: WVF5YThaHlkYwhGUSmCRgsX3tD5ngdN8pkih
      # The Qdrant endpoint URL. Only available when VECTOR_STORE is `qdrant`.
      QDRANT_URL: http://qdrant:6333
      # The Qdrant API key.
      QDRANT_API_KEY: difyai123456
      # The Qdrant client timeout setting.
      QDRANT_CLIENT_TIMEOUT: 20
      # The Qdrant client enable gRPC mode.
      QDRANT_GRPC_ENABLED: 'false'
      # The Qdrant server gRPC mode PORT.
      QDRANT_GRPC_PORT: 6334
      # Milvus configuration Only available when VECTOR_STORE is `milvus`.
      # The milvus host.
      MILVUS_HOST: 127.0.0.1
      # The milvus host.
      MILVUS_PORT: 19530
      # The milvus username.
      MILVUS_USER: root
      # The milvus password.
      MILVUS_PASSWORD: Milvus
      # The milvus tls switch.
      MILVUS_SECURE: 'false'
      # relyt configurations
      RELYT_HOST: db
      RELYT_PORT: 5432
      RELYT_USER: postgres
      RELYT_PASSWORD: difyai123456
      RELYT_DATABASE: postgres
      # pgvector configurations
      PGVECTOR_HOST: pgvector
      PGVECTOR_PORT: 5432
      PGVECTOR_USER: postgres
      PGVECTOR_PASSWORD: difyai123456
      PGVECTOR_DATABASE: dify
      # Mail configuration, support: resend, smtp
      MAIL_TYPE: ''
      # default send from email address, if not specified
      MAIL_DEFAULT_SEND_FROM: 'YOUR EMAIL FROM (eg: no-reply <no-reply@dify.ai>)'
      SMTP_SERVER: ''
      SMTP_PORT: 587
      SMTP_USERNAME: ''
      SMTP_PASSWORD: ''
      SMTP_USE_TLS: 'true'
      # the api-key for resend (https://resend.com)
      RESEND_API_KEY: ''
      RESEND_API_URL: https://api.resend.com
      # The DSN for Sentry error reporting. If not set, Sentry error reporting will be disabled.
      SENTRY_DSN: ''
      # The sample rate for Sentry events. Default: `1.0`
      SENTRY_TRACES_SAMPLE_RATE: 1.0
      # The sample rate for Sentry profiles. Default: `1.0`
      SENTRY_PROFILES_SAMPLE_RATE: 1.0
      # Notion import configuration, support public and internal
      NOTION_INTEGRATION_TYPE: public
      NOTION_CLIENT_SECRET: you-client-secret
      NOTION_CLIENT_ID: you-client-id
      NOTION_INTERNAL_SECRET: you-internal-secret
      # The sandbox service endpoint.
      CODE_EXECUTION_ENDPOINT: "http://sandbox:8194"
      CODE_EXECUTION_API_KEY: dify-sandbox
      CODE_MAX_NUMBER: 9223372036854775807
      CODE_MIN_NUMBER: -9223372036854775808
      CODE_MAX_STRING_LENGTH: 80000
      TEMPLATE_TRANSFORM_MAX_LENGTH: 80000
      CODE_MAX_STRING_ARRAY_LENGTH: 30
      CODE_MAX_OBJECT_ARRAY_LENGTH: 30
      CODE_MAX_NUMBER_ARRAY_LENGTH: 1000
      # SSRF Proxy server
      SSRF_PROXY_HTTP_URL: 'http://ssrf_proxy:3128'
      SSRF_PROXY_HTTPS_URL: 'http://ssrf_proxy:3128'
      # Indexing configuration
      INDEXING_MAX_SEGMENTATION_TOKENS_LENGTH: 1000
      # filesize limit in MB
      UPLOAD_FILE_SIZE_LIMIT: 100
    depends_on:
      - db
      - redis
    volumes:
      # Mount the storage directory to the container, for storing user files.
      - ./volumes/app/storage:/app/api/storage
    # uncomment to expose dify-api port to host
    # ports:
    #   - "5001:5001"
    networks:
      - ssrf_proxy_network
      - default

  # worker service
  # The Celery worker for processing the queue.
  worker:
    image: langgenius/dify-api
    restart: always
    environment:
      CONSOLE_WEB_URL: ''

      # Startup mode, 'worker' starts the Celery worker for processing the queue.
      MODE: worker

      # --- All the configurations below are the same as those in the 'api' service. ---

      # The log level for the application. Supported values are `DEBUG`, `INFO`, `WARNING`, `ERROR`, `CRITICAL`
      LOG_LEVEL: INFO
      # A secret key that is used for securely signing the session cookie and encrypting sensitive information on the database. You can generate a strong key using `openssl rand -base64 42`.
      # same as the API service
      SECRET_KEY: sk-9f73s3ljTXVcMT3Blb3ljTqtsKiGHXVcMT3BlbkFJLK7U
      # The configurations of postgres database connection.
      # It is consistent with the configuration in the 'db' service below.
      DB_USERNAME: postgres
      DB_PASSWORD: difyai123456
      DB_HOST: db
      DB_PORT: 5432
      DB_DATABASE: dify
      # The configurations of redis cache connection.
      REDIS_HOST: redis
      REDIS_PORT: 6379
      REDIS_USERNAME: ''
      REDIS_PASSWORD: difyai123456
      REDIS_DB: 0
      REDIS_USE_SSL: 'false'
      # The configurations of celery broker.
      CELERY_BROKER_URL: redis://:difyai123456@redis:6379/1
      # The type of storage to use for storing user files. Supported values are `local` and `s3` and `azure-blob` and `google-storage`, Default: `local`
      STORAGE_TYPE: local
      STORAGE_LOCAL_PATH: storage
      # The S3 storage configurations, only available when STORAGE_TYPE is `s3`.
      S3_ENDPOINT: 'https://xxx.r2.cloudflarestorage.com'
      S3_BUCKET_NAME: 'difyai'
      S3_ACCESS_KEY: 'ak-difyai'
      S3_SECRET_KEY: 'sk-difyai'
      S3_REGION: 'us-east-1'
      # The Azure Blob storage configurations, only available when STORAGE_TYPE is `azure-blob`.
      AZURE_BLOB_ACCOUNT_NAME: 'difyai'
      AZURE_BLOB_ACCOUNT_KEY: 'difyai'
      AZURE_BLOB_CONTAINER_NAME: 'difyai-container'
      AZURE_BLOB_ACCOUNT_URL: 'https://<your_account_name>.blob.core.windows.net'
      # The Google storage configurations, only available when STORAGE_TYPE is `google-storage`.
      # if you want to use Application Default Credentials, you can leave GOOGLE_STORAGE_SERVICE_ACCOUNT_JSON_BASE64 empty.
      GOOGLE_STORAGE_BUCKET_NAME: 'your-bucket-name'
      GOOGLE_STORAGE_SERVICE_ACCOUNT_JSON_BASE64: 'your-google-service-account-json-base64-string'
      # The type of vector store to use. Supported values are `weaviate`, `qdrant`, `milvus`, `relyt`, `pgvector`.
      VECTOR_STORE: weaviate
      # The Weaviate endpoint URL. Only available when VECTOR_STORE is `weaviate`.
      WEAVIATE_ENDPOINT: http://weaviate:8080
      # The Weaviate API key.
      WEAVIATE_API_KEY: WVF5YThaHlkYwhGUSmCRgsX3tD5ngdN8pkih
      # The Qdrant endpoint URL. Only available when VECTOR_STORE is `qdrant`.
      QDRANT_URL: http://qdrant:6333
      # The Qdrant API key.
      QDRANT_API_KEY: difyai123456
      # The Qdrant client timeout setting.
      QDRANT_CLIENT_TIMEOUT: 20
      # The Qdrant client enable gRPC mode.
      QDRANT_GRPC_ENABLED: 'false'
      # The Qdrant server gRPC mode PORT.
      QDRANT_GRPC_PORT: 6334
      # Milvus configuration Only available when VECTOR_STORE is `milvus`.
      # The milvus host.
      MILVUS_HOST: 127.0.0.1
      # The milvus host.
      MILVUS_PORT: 19530
      # The milvus username.
      MILVUS_USER: root
      # The milvus password.
      MILVUS_PASSWORD: Milvus
      # The milvus tls switch.
      MILVUS_SECURE: 'false'
      # Mail configuration, support: resend
      MAIL_TYPE: ''
      # default send from email address, if not specified
      MAIL_DEFAULT_SEND_FROM: 'YOUR EMAIL FROM (eg: no-reply <no-reply@dify.ai>)'
      SMTP_SERVER: ''
      SMTP_PORT: 587
      SMTP_USERNAME: ''
      SMTP_PASSWORD: ''
      SMTP_USE_TLS: 'true'
      # the api-key for resend (https://resend.com)
      RESEND_API_KEY: ''
      RESEND_API_URL: https://api.resend.com
      # relyt configurations
      RELYT_HOST: db
      RELYT_PORT: 5432
      RELYT_USER: postgres
      RELYT_PASSWORD: difyai123456
      RELYT_DATABASE: postgres
      # pgvector configurations
      PGVECTOR_HOST: pgvector
      PGVECTOR_PORT: 5432
      PGVECTOR_USER: postgres
      PGVECTOR_PASSWORD: difyai123456
      PGVECTOR_DATABASE: dify
      # Notion import configuration, support public and internal
      NOTION_INTEGRATION_TYPE: public
      NOTION_CLIENT_SECRET: you-client-secret
      NOTION_CLIENT_ID: you-client-id
      NOTION_INTERNAL_SECRET: you-internal-secret
      # Indexing configuration
      INDEXING_MAX_SEGMENTATION_TOKENS_LENGTH: 1000
      # filesize limit in MB
      UPLOAD_FILE_SIZE_LIMIT: 100
    depends_on:
      - db
      - redis
    volumes:
      # Mount the storage directory to the container, for storing user files.
      - ./volumes/app/storage:/app/api/storage
    networks:
      - ssrf_proxy_network
      - default

  # Frontend web application.
  web:
    image: langgenius/dify-web
    restart: always
    environment:
      # The base URL of console application api server, refers to the Console base URL of WEB service if console domain is
      # different from api or web app domain.
      # example: http://cloud.dify.ai
      CONSOLE_API_URL: ''
      # The URL for Web APP api server, refers to the Web App base URL of WEB service if web app domain is different from
      # console or api domain.
      # example: http://udify.app
      APP_API_URL: ''
      # The DSN for Sentry error reporting. If not set, Sentry error reporting will be disabled.
      SENTRY_DSN: ''
    # uncomment to expose dify-web port to host
    # ports:
    #   - "3000:3000"

  # The postgres database.
  db:
    image: postgres:15-alpine
    restart: always
    environment:
      PGUSER: postgres
      # The password for the default postgres user.
      POSTGRES_PASSWORD: difyai123456
      # The name of the default postgres database.
      POSTGRES_DB: dify
      # postgres data directory
      PGDATA: /var/lib/postgresql/data/pgdata
    volumes:
      - ./volumes/db/data:/var/lib/postgresql/data
    # uncomment to expose db(postgresql) port to host
    # ports:
    #   - "5432:5432"
    healthcheck:
      test: [ "CMD", "pg_isready" ]
      interval: 1s
      timeout: 3s
      retries: 30

  # The redis cache.
  redis:
    image: redis:6-alpine
    restart: always
    volumes:
      # Mount the redis data directory to the container.
      - ./volumes/redis/data:/data
    # Set the redis password when startup redis server.
    command: redis-server --requirepass difyai123456
    healthcheck:
      test: [ "CMD", "redis-cli", "ping" ]
    # uncomment to expose redis port to host
    # ports:
    #   - "6379:6379"

  # The Weaviate vector store.
  weaviate:
    image: semitechnologies/weaviate:1.19.0
    restart: always
    volumes:
      # Mount the Weaviate data directory to the container.
      - ./volumes/weaviate:/var/lib/weaviate
    environment:
      # The Weaviate configurations
      # You can refer to the [Weaviate](https://weaviate.io/developers/weaviate/config-refs/env-vars) documentation for more information.
      QUERY_DEFAULTS_LIMIT: 25
      AUTHENTICATION_ANONYMOUS_ACCESS_ENABLED: 'false'
      PERSISTENCE_DATA_PATH: '/var/lib/weaviate'
      DEFAULT_VECTORIZER_MODULE: 'none'
      CLUSTER_HOSTNAME: 'node1'
      AUTHENTICATION_APIKEY_ENABLED: 'true'
      AUTHENTICATION_APIKEY_ALLOWED_KEYS: 'WVF5YThaHlkYwhGUSmCRgsX3tD5ngdN8pkih'
      AUTHENTICATION_APIKEY_USERS: 'hello@dify.ai'
      AUTHORIZATION_ADMINLIST_ENABLED: 'true'
      AUTHORIZATION_ADMINLIST_USERS: 'hello@dify.ai'
    # uncomment to expose weaviate port to host
    # ports:
    #  - "8080:8080"

  # The DifySandbox
  sandbox:
    image: langgenius/dify-sandbox:0.2.0
    restart: always
    environment:
      # The DifySandbox configurations
      # Make sure you are changing this key for your deployment with a strong key.
      # You can generate a strong key using `openssl rand -base64 42`.
      API_KEY: dify-sandbox
      GIN_MODE: 'release'
      WORKER_TIMEOUT: 15
      ENABLE_NETWORK: 'true'
      HTTP_PROXY: 'http://ssrf_proxy:3128'
      HTTPS_PROXY: 'http://ssrf_proxy:3128'
    volumes:
      - ./volumes/sandbox/dependencies:/dependencies
    networks:
      - ssrf_proxy_network

  # ssrf_proxy server
  # for more information, please refer to
  # https://docs.dify.ai/getting-started/install-self-hosted/install-faq#id-16.-why-is-ssrf_proxy-needed
  ssrf_proxy:
    image: ubuntu/squid:latest
    restart: always
    volumes:
      # pls clearly modify the squid.conf file to fit your network environment.
      - ./volumes/ssrf_proxy/squid.conf:/etc/squid/squid.conf
    networks:
      - ssrf_proxy_network
      - default

  # Qdrant vector store.
  # uncomment to use qdrant as vector store.
  # (if uncommented, you need to comment out the weaviate service above,
  # and set VECTOR_STORE to qdrant in the api & worker service.)
  # qdrant:
  #   image: langgenius/qdrant:v1.7.3
  #   restart: always
  #   volumes:
  #     - ./volumes/qdrant:/qdrant/storage
  #   environment:
  #     QDRANT_API_KEY: 'difyai123456'
  #   # uncomment to expose qdrant port to host
  #   # ports:
  #   #  - "6333:6333"
  # # - "6334:6334"

  # The pgvector vector database.
  # Uncomment to use qdrant as vector store.
  # pgvector:
  # image: pgvector/pgvector:pg16
  # restart: always
  # environment:
  # PGUSER: postgres
  # # The password for the default postgres user.
  # POSTGRES_PASSWORD: difyai123456
  # # The name of the default postgres database.
  # POSTGRES_DB: dify
  # # postgres data directory
  # PGDATA: /var/lib/postgresql/data/pgdata
  # volumes:
  # - ./volumes/pgvector/data:/var/lib/postgresql/data
  # # uncomment to expose db(postgresql) port to host
  # # ports:
  # # - "5433:5432"
  # healthcheck:
  # test: [ "CMD", "pg_isready" ]
  # interval: 1s
  # timeout: 3s
  # retries: 30

  # The nginx reverse proxy.
  # used for reverse proxying the API service and Web service.
  nginx:
    image: nginx:latest
    restart: always
    volumes:
      - ./nginx/nginx.conf:/etc/nginx/nginx.conf
      - ./nginx/proxy.conf:/etc/nginx/proxy.conf
      - ./nginx/conf.d:/etc/nginx/conf.d
      #- ./nginx/ssl:/etc/ssl
    depends_on:
      - api
      - web
    ports:
      - "8102:80"
      #- "443:443"

networks:
  # create a network between sandbox, api and ssrf_proxy, and can not access outside.
  ssrf_proxy_network:
    driver: bridge
    internal: true
ここまでできたら、以下コマンドを実行すると、イメージがダウンロードされ、コンテナとしてビルドされた上で、バックグラウンドにて起動します。
docker-compose up -d最後にブラウザで起動確認してみましょう。
IP アドレスの後に `:8102` というかたちでポート番号を指定してください。
たとえば 192.168.1.1 というアドレスであれば 192.168.1.1:8102 とします。
以下のように Dify の初期画面が表示されれば大丈夫です!👍

繰り返しになりますが、この時点では SSL 設定がされておらず、http プロトコルでの通信となっています。
テスト用途に留め、個人情報や API Key など重要な情報を入力しないようにしてください。
Let's Encrypt を用いた SSL 設定をおこなうには、ドメインを所有しておく必要があり、そのあたりの解説は末尾の「有料部分」をご参照ください。
実際に以下では SSL 通信できる状態にしたものとして、話を進めます。
Dify で Workflow の設定と API キーを発行する
それでは Dify から話を進めます。
なお、本記事の主眼は n8n と Dify とを連携させることにありますので、細かい設定については割愛します。
Dify そのものの使い方については既に他記事もありますのでそちらをご参照ください。
ニーズがありましたら(コメント等ありましたら)「有料部分」にて解説したいと思います。
以下のようなノードを置いて繋げていきます。
開始ノードで入力変数を受けたら、
それをナレッジで確認した上で、
Cohere API を実行して Command R + からの回答を得て、
返してあげる
という流れです。

手動でも動作検証できるので、正しく実行されるかどうかこの場でご確認ください。
なお最初のテスト実行時には `知識取得` 要するに RAG まで含めなくてもよいかとは思います。
上記のように作成した Workflow を保存したら、`API アクセス` メニューから、エンドポイントと API キーを得てください。
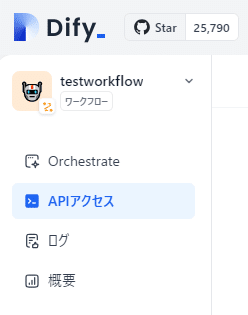
Dify のエンドポイントは一意なものになっておらず `/v1/workflows/run` というものしか持たないのですが、シークレットキーにチャットやワークフローの識別子を持っているようで、それにより特定のものが実行されます。
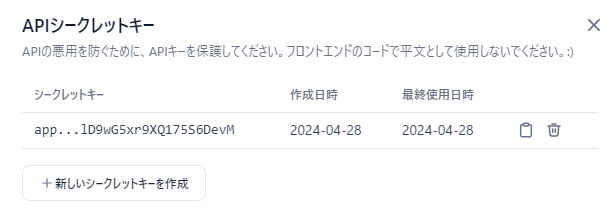
さて、このシークレットキーを得たら n8n へ移ります。
n8n でトリガーと実行ノードを設定して動作確認
n8n の設定です。
こちらも Dify と同じく、n8n そのものの使い方の詳細については割愛します。
ニーズがありましたらコメントでお知らせいただけると嬉しいです😀
シンプルに動作確認できるようにしたいので、手動で実行できるトリガーから、 HTTP リクエストのノードへと繋げます。
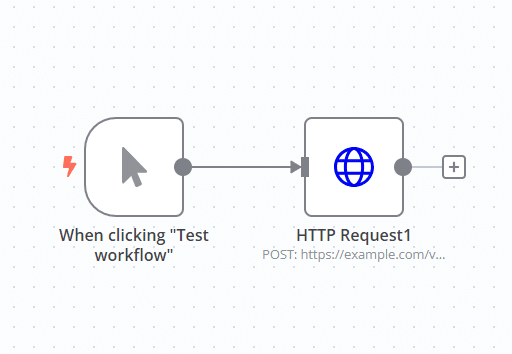
HTTP リクエストの中の設定が肝ですね。
以下の画像のように設定してください。

{
  "content-type": "application/json"
}
Custom Auth の中身を以下のようにします。
ここで Dify 側で取得してきた API シークレットキーを使います。

続けて `Send Body` も設定します。

{
  "inputs":{
    "text": "質問したい内容"
  },
  "response_mode": "blocking",
  "user": "abc-123"
}
ここでは `株式会社きみよりの創業は?` という、ナレッジを通さないと正解を出せないであろう弊社固有の情報を尋ねてみます。
そしてナレッジにはあえて嘘の情報を登録させています。
n8n と Dify の連携動作検証
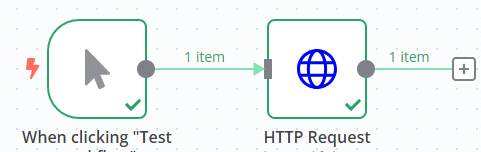
さあ! いよいよ準備が整いました!
n8n からボタンをポチッとな。
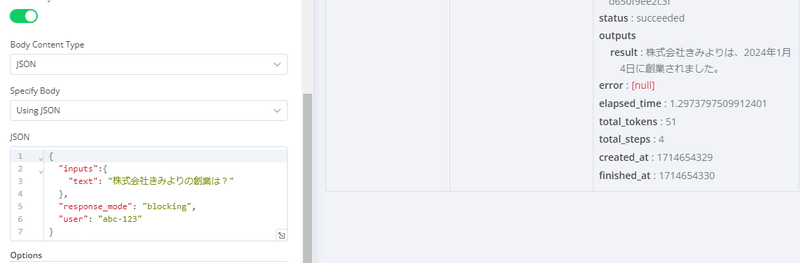
outputs
result:株式会社きみよりは、2024年1月4日に創業されました。
はい、ナレッジに登録している嘘情報が返ってきました!
ということで n8n と Dify を連携させることに成功しました🎉
あとはもう n8n も Dify も似たようなタイプのノードを設定して繋げて実行させるノーコードなワークフローオートメーションツールなので、お好きなようにしてやってください😀
実際の連携例
実際の連携例として、
Gmail で受信したメールに対して、特定のラベルを人間が付けた場合、
ラベルの付いたメールをチェックして、
LLM が返信文面を作成して、
下書きとして保存
というワークフローの記事をご用意いたしました。
おわりに
ということで n8n と Dify を VPS 上で連携させてみました。
あらためて VPS を使ってセルフホスティング環境を構築することの何が嬉しいかって、リソースコントロールの自由が利く上に、ネットワークトラフィックなどでの従量課金が発生しない点ですね。
また、国内 VPS であれば為替相場の影響を大手クラウドベンダーほどには受けづらく、そして日本円が外国企業に流れていかないということも良いことだと思います。
具体的に n8n と Dify とを連携させることでどんなことができるかというのは、アイディア次第でいくらでも! という感じではありますが、もし記事にして欲しいネタなどありましたらコメントでお知らせいただけると嬉しいです😀
「そうは言っても難しいよ!」「代わりに構築してくれん?」という場合はお気軽にご相談ください🙌
以下「有料部分」
主にこれまで「割愛」してきた補足部分の解説になります。
VPS での初期設定
セキュリティまわりを中心に
手持ちのドメインで動作させたい
SSL 対応
ということで、コンパクトにまとまっておりますので、「時間を買いたい」「本記事の内容が良かったから投げ銭したい」という方は、講読いただけるとたいへん喜ばしい限りです🙏
リクエストに応じて随時追記していきたいと思います。
また、読者限定の Discord サーバーも用意いたしましたので、こちらを使ってご質問いただくこともできるようになっております。
ここから先は
この記事が気に入ったらサポートをしてみませんか?