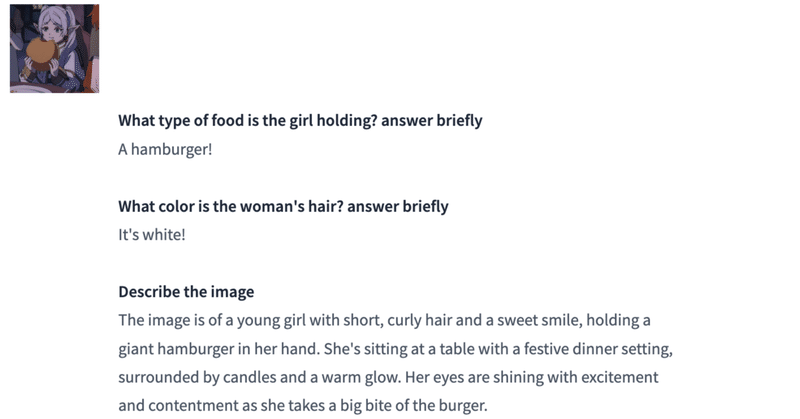
llama-3-vision-alpha : LLaMA-3をVision Modelにする方法

LLaMAはMeta社が開発した大規模な言語モデルですが、元々はVisionの機能を備えていません。しかし最近、LLaMA-3をVision Modelに拡張する手法が考案されました。そのリポジトリ「llama-3-vision-alpha」では、SigLIPを用いてLLaMA-3にVision機能を付加する方法が紹介されています。
本記事では、そのリポジトリの内容をさらに掘り下げ、LLaMA-3をVision Modelにする具体的なプロセスを解説します。必要なモジュールのインストール方法から、コードの説明、実行例までを丁寧に紹介しますので、ぜひ最後までお読みください。LLaMA-3のVision化に興味がある方、言語モデルとVisionモデルの融合に関心がある方におすすめの内容です。
実装方法の確認
以下のコードをclaude 3に解説してもらいます。
1. 必要なモジュールのインポートと引数の解析
import argparse
import sys
import torch
import torch.nn as nn
from PIL import Image
from transformers import (
    AutoTokenizer,
    BitsAndBytesConfig,
    LlamaForCausalLM,
    SiglipImageProcessor,
    SiglipVisionModel,
)
from transformers import TextStreamer

parser = argparse.ArgumentParser(description="Answer questions based on an image")
parser.add_argument("-i", "--image", required=True, help="Path to the image file")
args = parser.parse_args()
PyTorch、Transformersライブラリ、PILなどの必要なモジュールをインポートします。
argparseを使用して、コマンドライン引数から画像ファイルのパスを取得します。
2. モデルの初期化 (`initialize_models()` 関数)
def initialize_models():
    bnb_config = BitsAndBytesConfig(
        load_in_4bit=True, bnb_4bit_compute_dtype=torch.float16
    )

    tokenizer = AutoTokenizer.from_pretrained(
        "unsloth/llama-3-8b-Instruct", use_fast=True
    )
    model = LlamaForCausalLM.from_pretrained(
        "unsloth/llama-3-8b-Instruct",
        torch_dtype=torch.float16,
        device_map="auto",
        quantization_config=bnb_config,
    )

    for param in model.base_model.parameters():
        param.requires_grad = False

    model_name = "google/siglip-so400m-patch14-384"
    vision_model = SiglipVisionModel.from_pretrained(
        model_name, torch_dtype=torch.float16
    )
    processor = SiglipImageProcessor.from_pretrained(model_name)

    vision_model = vision_model.to("cuda")

    return tokenizer, model, vision_model, processor
Tokenizer、Language Model (LlamaForCausalLM)、Vision Model (SiglipVisionModel)、Image Processor (SiglipImageProcessor) を初期化します。
4bit量子化を適用することで、モデルのサイズを大幅に削減でき、メモリ使用量を抑えつつ、精度をある程度維持することができます。
3. 投影モジュールの定義と読み込み (`ProjectionModule` クラスと `load_projection_module()` 関数)
class ProjectionModule(nn.Module):
    def __init__(self, mm_hidden_size, hidden_size):
        super(ProjectionModule, self).__init__()

        # Directly set up the sequential model
        self.model = nn.Sequential(
            nn.Linear(mm_hidden_size, hidden_size),
            nn.GELU(),
            nn.Linear(hidden_size, hidden_size),
        )

    def forward(self, x):
        return self.model(x)

def load_projection_module(mm_hidden_size=1152, hidden_size=4096, device="cuda"):
    projection_module = ProjectionModule(mm_hidden_size, hidden_size)
    checkpoint = torch.load("./mm_projector.bin")
    checkpoint = {k.replace("mm_projector.", ""): v for k, v in checkpoint.items()}
    projection_module.load_state_dict(checkpoint)
    projection_module = projection_module.to(device).half()
    return projection_module
Vision ModelとLanguage Modelの中間表現をマッピングするための投影モジュールを定義します。
事前に学習された投影モジュールの重みを読み込みます。
4. 質問に答える (`answer_question()` 関数)
def answer_question(
    image_path, tokenizer, model, vision_model, processor, projection_module
):
    image = Image.open(image_path).convert("RGB")

    tokenizer.eos_token = "<|eot_id|>"

    try:
        q = input("\nuser: ")
    except EOFError:
        q = ""
    if not q:
        print("no input detected. exiting.")
        sys.exit()


    question = "<image>" + q

    prompt = f"<|start_header_id|>user<|end_header_id|>\n\n{question}<|eot_id|><|start_header_id|>assistant<|end_header_id|>\n\n"

    input_ids = (
        tokenizer_image_token(prompt, tokenizer)
        .unsqueeze(0)
        .to(model.device)
    )

    streamer = TextStreamer(tokenizer, skip_prompt=True, skip_special_tokens=True)

    with torch.inference_mode():
        image_inputs = processor(
            images=[image],
            return_tensors="pt",
            do_resize=True,
            size={"height": 384, "width": 384},
        ).to("cuda")

        image_inputs = image_inputs["pixel_values"].squeeze(0)

        image_forward_outs = vision_model(
            image_inputs.to(device="cuda", dtype=torch.float16).unsqueeze(0),
            output_hidden_states=True,
        )

        image_features = image_forward_outs.hidden_states[-2]

        projected_embeddings = projection_module(image_features).to("cuda")

        embedding_layer = model.get_input_embeddings()

        new_embeds, attn_mask = process_tensors(
            input_ids, projected_embeddings, embedding_layer
        )
        device = model.device
        attn_mask = attn_mask.to(device)
        new_embeds = new_embeds.to(device)

        model_kwargs = {
            "do_sample": True,
            "temperature": 0.2,
            "max_new_tokens": 2000,
            "use_cache": True,
            "streamer": streamer,
            "pad_token_id": tokenizer.eos_token_id
        }

        while True:
            print('assistant: ')
            generated_ids = model.generate(
                inputs_embeds=new_embeds, attention_mask=attn_mask, **model_kwargs
            )[0]

            generated_text = tokenizer.decode(generated_ids, skip_special_tokens=False)
            try:
                q = input("\nuser: ")
            except EOFError:
                q = ""
            if not q:
                print("no input detected. exiting.")

            new_text = (
                generated_text
                + "<|start_header_id|>user<|end_header_id|>\n\n"
                + q
                + "<|start_header_id|>assistant<|end_header_id|>\n\n"
            )
            new_input_ids = tokenizer(new_text, return_tensors="pt").input_ids.to(
                device
            )
            new_embeddings = embedding_layer(new_input_ids)

            new_embeds = torch.cat([new_embeds, new_embeddings], dim=1)
            attn_mask = torch.ones(new_embeds.shape[:2], device=device)
ユーザーからの画像と質問を受け取ります。
画像をVision Modelに入力し、中間表現を取得します。
投影モジュールを使用して、Vision Modelの中間表現をLanguage Modelの埋め込み空間にマッピングします。
質問をトークン化し、画像の埋め込みと結合します。
Language Modelを使用して、結合された埋め込みから回答を生成します。
生成された回答を表示し、ユーザーからの次の入力を待ちます。
5. メインの実行 (`if __name__ == "__main__":` ブロック)
if __name__ == "__main__":
    tokenizer, model, vision_model, processor = initialize_models()
    projection_module = load_projection_module()

    answer_question(
        args.image,
        tokenizer,
        model,
        vision_model,
        processor,
        projection_module,
    )
コマンドライン引数から画像ファイルのパスを取得します。
モデルと投影モジュールを初期化します。
`answer_question()` 関数を呼び出して、質問に答えるプロセスを開始します。
このコードは、Vision ModelとLanguage Modelを組み合わせて、画像に基づいて質問に答えるシステムを実現しています。ユーザーは画像を提供し、その画像に関連する質問を入力すると、システムが画像の内容を理解し、適切な回答を生成します。
コードの中では、Transformersライブラリを活用して、事前学習済みのVision ModelとLanguage Modelを使用しています。また、量子化や投影モジュールなどの技術を用いて、メモリ効率と性能の向上を図っています。
この記事が気に入ったらサポートをしてみませんか?