
アドベンチャーゲームの画面からの対話データの抽出

「GTP-2」の学習などで利用する「対話データ」がほしかったので、アドベンチャーゲームの画面から対話データを抽出してみました。
・macOS 10.15.7
・Python 3.7
1. Tesseract OCR
「Tesseract OCR」は、オープンソースなOCRエンジンです。今回は、文字認識にこのツールを利用します。
2. Tesseract OCRのインストール
macOSでのインストール方法は、次のとおりです。
(1) Homebrewで「tesseract」をインストール。
$ brew install tesseract(2) 対応言語を確認。
日本語は含まれていません。
$ tesseract --list-langs
List of available languages (3):
eng
osd
snum(3) 「tessadata_best」から日本語辞書「jpn.traineddata」「jpn_vert.traineddata」をダウンロード。
(4) tesseractの「tessadata」フォルダの確認。
「tessdata」フォルダ(/usr/local/Cellar/tesseract/4.1.1/share/tessdata/)が辞書を配置するフォルダになります。
$ brew list tesseract
/usr/local/Cellar/tesseract/4.1.1/bin/tesseract
/usr/local/Cellar/tesseract/4.1.1/include/tesseract/ (19 files)
/usr/local/Cellar/tesseract/4.1.1/lib/libtesseract.4.dylib
/usr/local/Cellar/tesseract/4.1.1/lib/pkgconfig/tesseract.pc
/usr/local/Cellar/tesseract/4.1.1/lib/ (2 other files)
/usr/local/Cellar/tesseract/4.1.1/share/tessdata/ (37 files)
(5) 「tessdata」フォルダに「jpn.traineddata」を配置。
(6) 対応言語を確認。
日本語(jpnとjpn_vert)が含まれるようになりました。
$ tesseract --list-langs
List of available languages (5):
eng
jpn
jpn_vert
osd
snum
3. Tesseract OCRの利用
TesseractのWikipediaページの文言の画像(wiki.png)で試してみます。
・wiki.png

実行コマンドは、次のとおりです。出力ファイル名を「-」とすることで、標準出力になります。
$ tesseract wiki.png - -l jpn
Tesseract (テッ セラ クト ) は 、 さ ま ざ ま な オペ レー ティ ング シス テム 上 で 動作 する 光学 式 文字 認識 エン ジン |。 名称 の
Tesseract と は 四 次 元 超 立 方 体 の 意 で ある 。Apache License の 下 で リリ ー ス され た フリ ー ソ フト ウェ ア で ある [ 則 四 各 。
文字 認識 を 行う ライ ブラ リ と 、 そ れ を 用 いた コマ ンド ライ ン イ ンタ ー フ ェ イ ス を 持つ 。
も と も と は 1980 年 代 に プロ プラ イエ タリ ソフ トウ ェ ア と し て ヒュ ー レ ッ ト ・ パ ッ カ ー ド が 開発 し て いた が 、2005 年 に オ
ー プ ン ソ ー ス と し て リリ ー ス され 、 開 発 は 2006 年 か ら Google が 後援 し て いる 【6!。
2006 年 、Tesseract は 当時 入手 可能 な 最も 正確 な オー プン ソー ス OCR エ ンジ ン の 1 つと 見 な され た 51[71。スペースが気になりますが、それなりな精度で読み取れてることがわかります。
4. アドベンチャーゲームの画面からの対話データの抽出
アドベンチャーゲームの画面の対話データの抽出するPythonスクリプトを作成します。
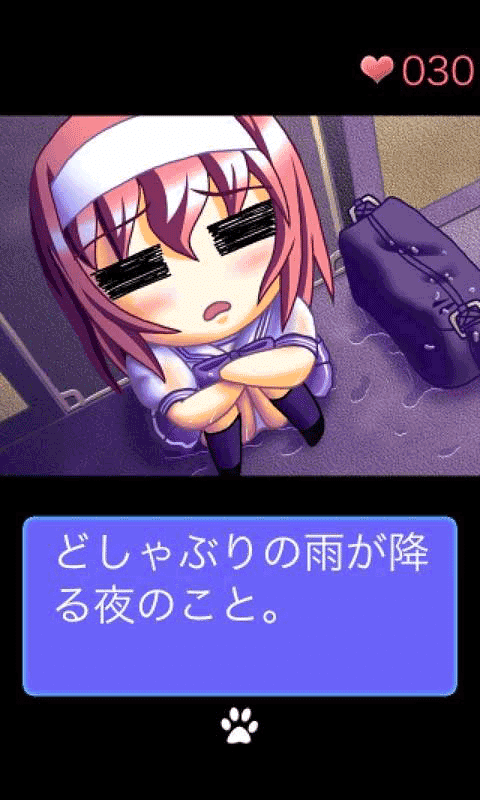
(1) 「images」フォルダを作成し、アドベンチャーゲームの画面の画像を配置。
今回は練習で、「images」フォルダに以下の画像を配置します。
・e1.png
(2) Pythonの仮想環境を作成し、OpenCVとPillowsをインストール。
$ pip install opencv-python
$ pip install pillows
(3) Pythonスクリプト「create_dataset.py」を作成。
・create_dataset.py
import os
import PIL.Image as im
import cv2
import subprocess
from subprocess import PIPE

# パラメータ
crop_rect = (30,520,30+420,520+170) # 画像のクロップ領域
threshold = 180 # 2値化のしきい値

# 画像ファイル名の取得
images_path = 'images/'
crops_path = 'crops/'
os.makedirs(crops_path, exist_ok=True)
filenames = os.listdir(images_path)
filenames.sort()
for filename in filenames:
    if filename.startswith('.'):
        continue

    # セリフ部分のクロップ
    image = im.open(images_path+filename)
    trimmed = image.crop(crop_rect)
    trimmed.save(crops_path+filename)

    # 2値化
    image = cv2.imread(crops_path+filename, 0)
    ret, image = cv2.threshold(image, threshold, 255, cv2.THRESH_BINARY)
    cv2.imwrite(crops_path+filename, image)

    # テキスト抽出
    proc = subprocess.run('tesseract '+crops_path+filename+' - -l jpn',
        shell=True, stdout=PIPE, stderr=PIPE, text=True)
    result = proc.stdout

    # スペースと改行の削除
    result = result.replace(' ', '')
    result = result.replace('\n', '')

    # ファイル出力
    with open('dataset.txt', 'a') as f:
f.write(result+'\n')精度向上のため、前処理として「セリフ部分のクロップ」と「2値化」、後処理として「スペースと改行の削除」も行っています。
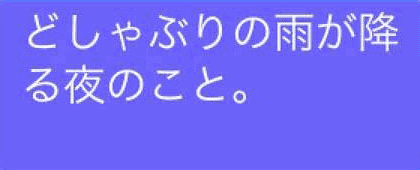
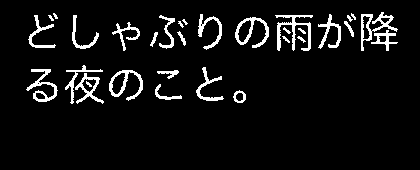
実行コマンドと、実行結果は次のとおりです。
$ python create_dataset.py・dataset.txt
どしゃぶりの雨が降る夜のこと。【おまけ】 tesseractのパラメータ
◎ 使い方
tesseract --help | --help-extra | --help-psm | --help-oem | --version
tesseract --list-langs [--tessdata-dir PATH]
tesseract --print-parameters [options...] [configfile...]
tesseract imagename|imagelist|stdin outputbase|stdout [options...] [configfile...]
◎ OCRオプション
--tessdata-dir PATH : tessdataパスの指定
--user-words PATH : ユーザーワードファイルの指定
--user-patterns PATH : ユーザーパターンファイルの指定
--dpi VALUE : 入力画像のDPIの指定
-l LANG[+LANG] : OCRを行う言語の指定
-c VAR=VALUE : コンフィグ変数の指定。複数の-c引数を使用できる
--psm NUM : ページセグメンテーションモードの指定
--oem NUM : OCRエンジンモードの指定
【注意】 これらのオプションは、configfileの前に配置する必要があります。
◎ ページセグメンテーションモード
0 : Orientation and script detection (OSD)のみ
1 : OSDによる自動ページセグメンテーション
2 : 自動ページセグメンテーション。ただし、OSDまたはOCRはなし (未実装)
3 : 完全自動のページセグメンテーション。ただし、OSDはなし(デフォルト)
4 : 可変サイズのテキストの単一列を想定
5 : 垂直に配置されたテキストの単一の均一なブロックを想定
6 : テキストの単一の均一なブロックを想定
7 : 画像を単一のテキスト行として扱う
8 : 画像を1つの単語として扱う
9 : 画像を円の中の1つの単語として扱う
10 : 画像を1文字として扱う
11 : スパーステキスト。特定の順序でできるだけ多くのテキストを検索
12 : OSDを使用したスパーステキスト。
13 : 生のライン。画像を単一のテキスト行として扱い、tesseract固有のハックをバイパス
◎ OCRエンジンモード
0 : レガシーエンジンのみ
1 : LSTMエンジンのみ
2 : レガシー + LSTMエンジン
3 : 利用可能なもの (デフォルト)
◎ シングルオプション
-h, --help : ヘルプの表示
--help-extra : 上級ユーザー向けの追加のヘルプの表示
--help-psm : ページセグメンテーションモードの表示
--help-oem : OCRエンジンモードの表示
-v, --version : バージョンの表示
--list-langs : 対応言語の表示
--print-parameters : tesseractパラメータの出力
この記事が気に入ったらサポートをしてみませんか?