Unityアプリ(デスクトップ)でTensorFlow.jsを使う

「Unityアプリ(デスクトップ)」で「TensorFlow.js」を使って画像分類を行う方法をまとめました。
1. UnityアプリでTensorFlow.jsを使う方法
UnityアプリでTensorFlow.jsを使う方法には、次の2つがあります。
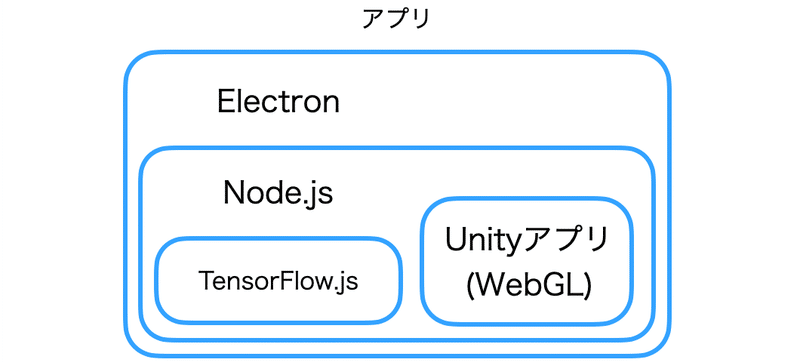
◎ Unityアプリ(WebGL)+Electron
Unityアプリ(WebGL)とTensorFlow.jsを連携させるNode.jsアプリを作成し、Electronでデスクトップアプリに変換する方法です。UnityアプリとTensorFlow.jsは蜜に連携がとれますが、Unityアプリの性能は制限されます。
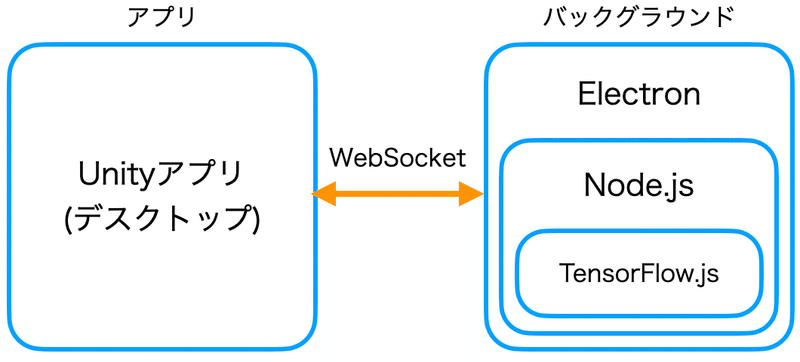
◎ Unityアプリ(デスクトップ)+Electron
TensorFlow.jsを使うNode.jsアプリを作成し、Electronでデスクトップアプリ(バックグラウンド)を作成し、UnityアプリとWebSocketで連携する方法です。Unityアプリの性能を最大限活かせますが、UnityアプリとTensorFlow.jsの連携は制限されます。
今回は、「Unityアプリ(デスクトップ)+Electron」を作成します。
「Unityアプリ(WebGL)+Electron」については、「Unityアプリ(WebGL)でTensorFlow.jsを使う」を参照。
2. 画像分類サーバの作成
Node.jsで「画像分類サーバ」を作成します。Node.jsとElectronはインストール済みとします。
◎ プロジェクトの作成
Node.jsのプロジェクトを作成します。
$ mkdir classificationex
$ cd classification
$ npm init -y
◎ パッケージのインストール
「base64-to-uint8array」は、画像のbase64をテンソルに変換します。
$ npm install @tensorflow/tfjs-node
$ npm install @tensorflow-models/mobilenet
$ npm install base64-to-uint8array
$ npm install ws
◎ コードの記述
画像分類サーバのコードを以下のように記述します。
// パッケージのインポート
const tf = require('@tensorflow/tfjs-node')
const mobilenet = require('@tensorflow-models/mobilenet')
const toUint8Array = require('base64-to-uint8array')
const ws = require('ws')

// モデル
let model

// 画像分類
const classify = async (base64img) => {
  // base64 → テンソル
  const imageArray = toUint8Array(base64img)
  const tensor3d = tf.node.decodeJpeg(imageArray, 3)

  // 画像分類
  const result = await model.classify(tensor3d)

  // 結果生成
  return result[0].className+':'+result[0].probability.toFixed(3)+'\n'+
    result[1].className+':'+result[1].probability.toFixed(3)+'\n'+
    result[2].className+':'+result[2].probability.toFixed(3)
}

// メイン
(async () => {
  // モデルの読み込み
  model = await mobilenet.load()

  // クライアントからのデータ受信時に呼ばれる
  const onMessage = async (base64img) => {
    // 画像分類
    let result = await classify(base64img)

    // クライアントにデータを返信
    server.clients.forEach(client => {
        client.send(result)
    })
  }

  // WebSocketのサーバの生成
  const server = new ws.Server({port:5001})
  server.on('connection', socket => {
    socket.on('message', onMessage)
  })
  console.log('server start...')
})().catch((err) => console.error(err))
◎ 実行
モデルのロードに時間がかかります。クライアントがWebSocketで接続できるのは、「server start...」表示後になります。
$ electron .3. 画像分類サーバをデスクトップアプリに変換
画像分類サーバをデスクトップアプリに変換するには、プロジェクトフォルダが存在するフォルダで、以下のコマンドを入力します。
$ asar pack classificationex classificationex.asar
$ electron-packager classificationex classificationex --platform=darwin --arch=x64 --electronVersion=9.0.0
成功すると、「classificationex.app」が生成されます。
4. Unityアプリのリソースの準備
UnityプロジェクトのAssetsに「StreamingAssetsフォルダ」を作成し、以下の2つを追加します。
・cat.jpg (256x256の入力画像)
・classificationex.app (画像分類サーバ)
5. WebSocketのプラグインの追加
UnityプロジェクトのAssetsに「Pluginsフォルダ」を作成し、WebSocketのプラグインを追加します。
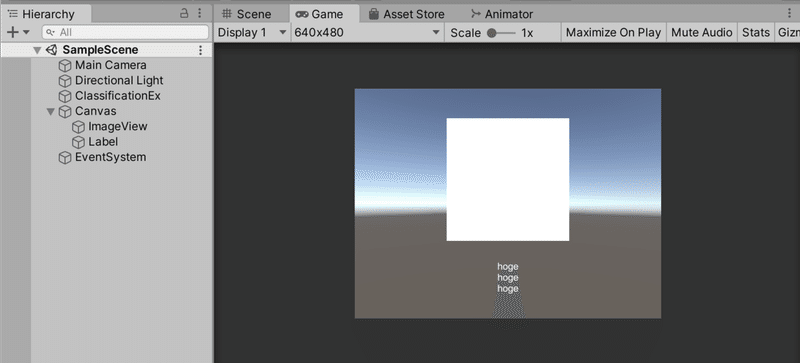
6. UnityアプリのUIの作成
UnityアプリのUIの作成手順は、次のとおりです。
(1) 「RawImage」を追加し、「ImageView」と名前を指定。
(2) 「Text」を追加し、「Label」と名前を指定。
(3) 空の「GameObject」を追加し、「ClassificationEx」と名前を指定し、スクリプト「ClassificationEx」を追加。
7. Unityアプリのコードの記述
Unityアプリのコードを以下のように記述します。
◎ ClassificationEx.cs
using System.Collections;
using System.Collections.Generic;
using System.IO;
using UnityEngine;
using UnityEngine.UI;
using WebSocketSharp;
using WebSocketSharp.Net;

public class ClassificationEx : MonoBehaviour
{
    // 参照
    public RawImage imageView;
    public Text label;

    // WebSocket
    private WebSocket ws;
    private bool connect = false;
    private float connectTime = 0.0f;

    // 画像データと結果
    private byte[] imageData;
    private string result = "";

    // スタート時に呼ばれる
    public void Start()
    {
        // 画像の読み込み
        this.imageData = File.ReadAllBytes(Application.streamingAssetsPath+"/cat.jpg");

        // 画像の表示
        Texture2D texture = new Texture2D(256, 256);
        texture.LoadImage(this.imageData);
        this.imageView.texture = texture;

        // サーバの開始
        StartProcess("classificationex");
    }

    // WebSocketの接続
    private void connectWebSocket()
    {
        this.ws = new WebSocket("ws://localhost:5001/");
        this.ws.OnOpen += (sender, e) =>
        {
            this.connect = true;
        };
        this.ws.OnMessage += (sender, e) =>
        {
            this.result = e.Data;
        };
        this.ws.OnClose += (sender, e) =>
        {
            this.connect = false;
        };
        this.ws.OnError += (sender, e) =>
        {
            this.connect = false;
        };
        try
        {
            this.ws.Connect();
        }
        catch (System.InvalidOperationException e)
        {
        }
    }

    // フレーム毎に呼ばれる
    public void FixedUpdate()
    {
        // サーバ接続できるか1秒毎のポーリング
        if (!connect) {
            this.connectTime += Time.deltaTime;
            if (this.connectTime > 1f)
            {
                this.connectTime = 0.0f;
                connectWebSocket();
            }
            return;
        }

        // 画像分類
        if (this.imageData != null)
        {
            string enc = System.Convert.ToBase64String(this.imageData);
            this.ws.Send(enc);
            this.imageData = null;
        }

        // 結果の更新
        if (this.result != null)
        {
            this.label.text = this.result;
            this.result = null;
        }
    }

    // アプリ終了時に呼ばれる
    public void OnApplicationQuit()
    {
        // WebSocketの破棄
        this.ws.Close();
        this.ws = null;

        // サーバの終了
        KillProcess("classificationex");
    }

    // プロセスの開始
    public void StartProcess(string name)
    {
        System.Diagnostics.Process process = new System.Diagnostics.Process();
        process.StartInfo.FileName =
            Application.streamingAssetsPath + "/"+name+".app";
        process.StartInfo.CreateNoWindow = true;
        process.Start();
    }

    // プロセス終了
    public void KillProcess(string name)
    {
         System.Diagnostics.Process[] ps =
             System.Diagnostics.Process.GetProcessesByName(name);
         foreach (System.Diagnostics.Process p in ps)
         {
             p.Kill();
         }
    }
}
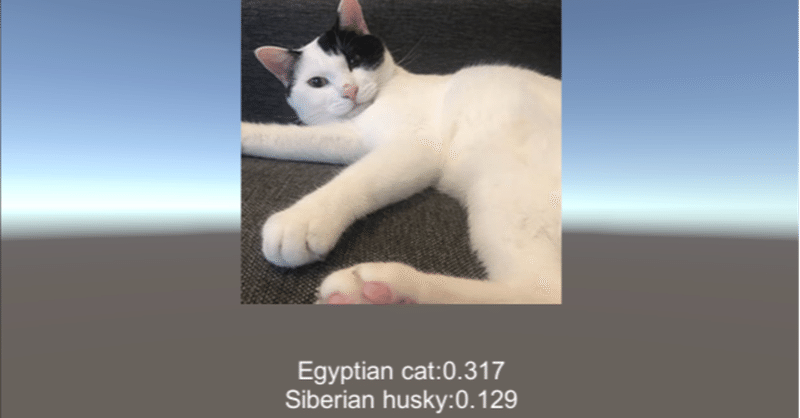
8. アプリの実行
アプリを実行します。推論結果が表示されます。

この記事が気に入ったらサポートをしてみませんか?