FireAuth(Google認証)について
今回はFirebaseのAuthentication(認証)について書いていこうと思います。Authenticationは現在たくさんの認証方法があります。その中でもよく使うであろうGoogle認証についてやっていこうと思います。実際僕のプロジェクトでもGoogle認証を使用しています。
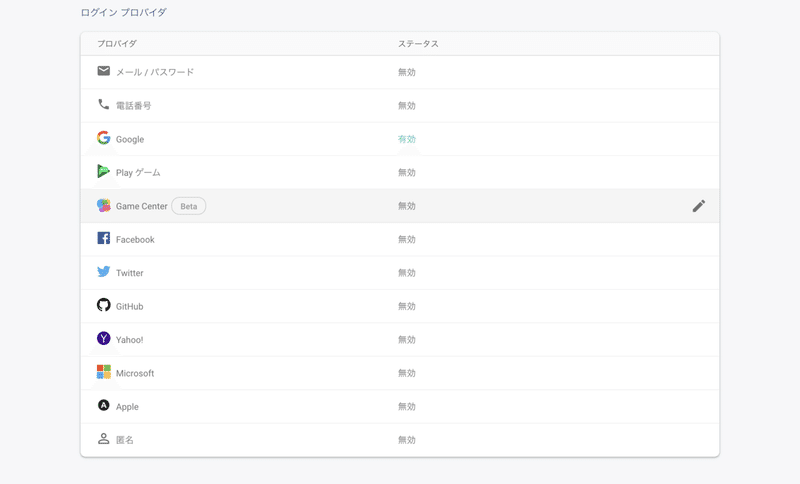
まず始めにやることは、FirebaseのAuthenticationからGoogle認証を有効にします。

次にserviceファイルを作成する。
ng g s services/auth sはserviceの略です。servicesの直下にauth.service.tsを作成しました。ファイル名はなんでも大丈夫です。
auth.service.tsにコードを書いていきます。Rx.jsを使っています。
//auth.service.ts//
import { Injectable } from '@angular/core';
import { AngularFireAuth } from '@angular/fire/auth';
import { auth, User } from 'firebase/app';
import { Observable } from 'rxjs';

@Injectable({
 providedIn: 'root'
})
export class AuthService {
 afUser$: Observable<User> = this.afAuth.user;

 constructor(
   private afAuth: AngularFireAuth,
 ) {
    //User情報を受け取っている
   this.afUser$.subscribe(user => {
     console.log(user);
   });
 }

 login() {
    //GoogleログインのPopUpが出てくる//
   this.afAuth.auth.signInWithPopup(
     new auth.GoogleAuthProvider()
   );
 }
}
まずこれらが何をやっているか簡単に説明すると、constructor()の中ではここで使いたいものを呼び出しています。AngularFireAuthを呼び出していて、Firebaseの認証機能を使えるようにしています。
//html//
  <button mat-raised-button color="accent" (click)="login()">Login</button>
(click)="Login()"でログインボタンが押された、クリックされた時にクリックイベントが走ります。
//ts//
import { Component, OnInit } from '@angular/core';
import { AuthService } from 'src/app/services/auth.service';

@Component({
 selector: 'app-header',
 templateUrl: './header.component.html',
 styleUrls: ['./header.component.scss']
})
export class HeaderComponent implements OnInit {

 constructor(
//AuthServiceをここで呼び出している点に注意//
   private auth: AuthService,
 ) { }

 ngOnInit() {
 }

 login() {
   this.auth.login();
 }

}
これでログイン処理は完了だと思います。
次にログアウト処理です。ログアウトはログイン処理より簡単です。まずHTML側でボタンなりリンクなりを置いてログイン関数を定義します。
<button mat-raised-button color="basic" (click)="logout()">Logout</button>次にauth.service.tsでlogout関数の中身を書きます。
//auth.service.ts

  logout() {
   this.afAuth.auth.signOut();
}signOut()これでログアウトできます。
//そして使いたいtsで//

  logout() {
   this.auth.logout();
 }
これでログイン・ログアウト処理は完了です。
次にログインした時、ログアウトした時に「ログインしました」などのメッセージを表示してみたいと思います。Angular MaterialからSnackBarというものがあるのでそれを使います。
まず使いたいところでモジュールを importします。*NgModuleの中でのimportも忘れないでください。
import {MatSnackBarModule} from '@angular/material/snack-bar';そうしたら、auth.service.tsの方で使っていきたいと思います。
import { Injectable } from '@angular/core';
import { AngularFireAuth } from '@angular/fire/auth';
import { auth, User } from 'firebase/app';
import { Observable } from 'rxjs';
import { MatSnackBar } from '@angular/material/snack-bar';

@Injectable({
 providedIn: 'root'
})
export class AuthService {
 afUser$: Observable<User> = this.afAuth.user;

 constructor(
   private afAuth: AngularFireAuth,
   private snackBar: MatSnackBar
 ) {
   this.afUser$.subscribe(user => {
     console.log(user);
   });
 }

 login() {
   this.afAuth.auth.signInWithPopup(
     new auth.GoogleAuthProvider())
      //追記//
     .then(() => {
     this.snackBar.open('ログインしました。', null, {
       duration: 3000
     });
   });
 }

 logout() {
   this.afAuth.auth.signOut()
    //追記//
   .then(() => {
     this.snackBar.open('ログアウトしました。', null, {
       duration: 3000
     });
   });

 }
}
やっていることはシンプルでconstructorの中で
private snackBar: MatSnackBarMatSnackBarを呼ぶ。そうすると上でsnackBarが自動インポートされます。次にここの処理
 .then(() => {
     this.snackBar.open('ログインしました。', null, {
       duration: 3000
     });
   });
promiseで処理をしますここでsnackBarを使います。.open()で表示したいテキスト、durationは表示時間です。この場合3秒です。より厳密にやりたい場合は
.catch(() => {
)}
を使ってエラー処理を行えます。ログアウト処理も同様に行います。
  logout() {
   this.afAuth.auth.signOut()
   .then(() => {
     this.snackBar.open('ログアウトしました。', null, {
       duration: 3000
     });
   });
}
これでsnackBarの表示完了です。
次に、ログインした時にどこかのページに飛んで欲しい、ログアウトした時に必ずルートのページに飛ぶようにして欲しい時はサービスにおいてほとんどだと思います。これも簡単です。まず
//constructorの中にRouterをimport//
 private router: Router
そしてログイン、ログアウト関数の中で使います。
  login() {
   this.afAuth.auth.signInWithPopup(
     new auth.GoogleAuthProvider())
     .then(() => {
     this.snackBar.open('ログインしました。', null, {
       duration: 3000
     });
   });
    //追記
   this.router.navigateByUrl('/home');
 }

 logout() {
   this.afAuth.auth.signOut()
   .then(() => {
     this.snackBar.open('ログアウトしました。', null, {
       duration: 3000
     });
   });
    //追記
   this.router.navigateByUrl('/');
 }
追記の部分をみてもらえばわかる通りこの1行だけです。.navigateByUrl()に飛ばしたいパスを入れます。これで完了です。
他にも認証ガード機能があるんですがそれは後日書きたいと思います。
この記事は僕が忘れないように書いているのでかなり分かりずらいと思います。と言うかこれをコピペしただけだと実装はできないと思いますw
僕の記事をみてここがわからないとかありましたらtwiterなりでDMなどいただければ答えられる範囲でしたらお答えします。
