
マイコンESP32を使った温度監視IoT装置(ChatGPT/MicroPython/GoogleAppsScript)

作ったもの
タイトルの通り、遠隔で利用する温度監視です。久しぶりにWeb以外のコーディング、電子工作を行ったので共有しておきます。
今回はChatGPTを使ってプログラムを書き、こうした簡単かつ適当なものはかなり工数を短縮できると実感しました。
背景
温度管理のIoT製品は市販でありますが、スマホアプリ管理の物が多く、メール通知に対応してない物が多かったこと、将来的にも有料サブスクになることを避けたかったことが制作の理由です。
構成
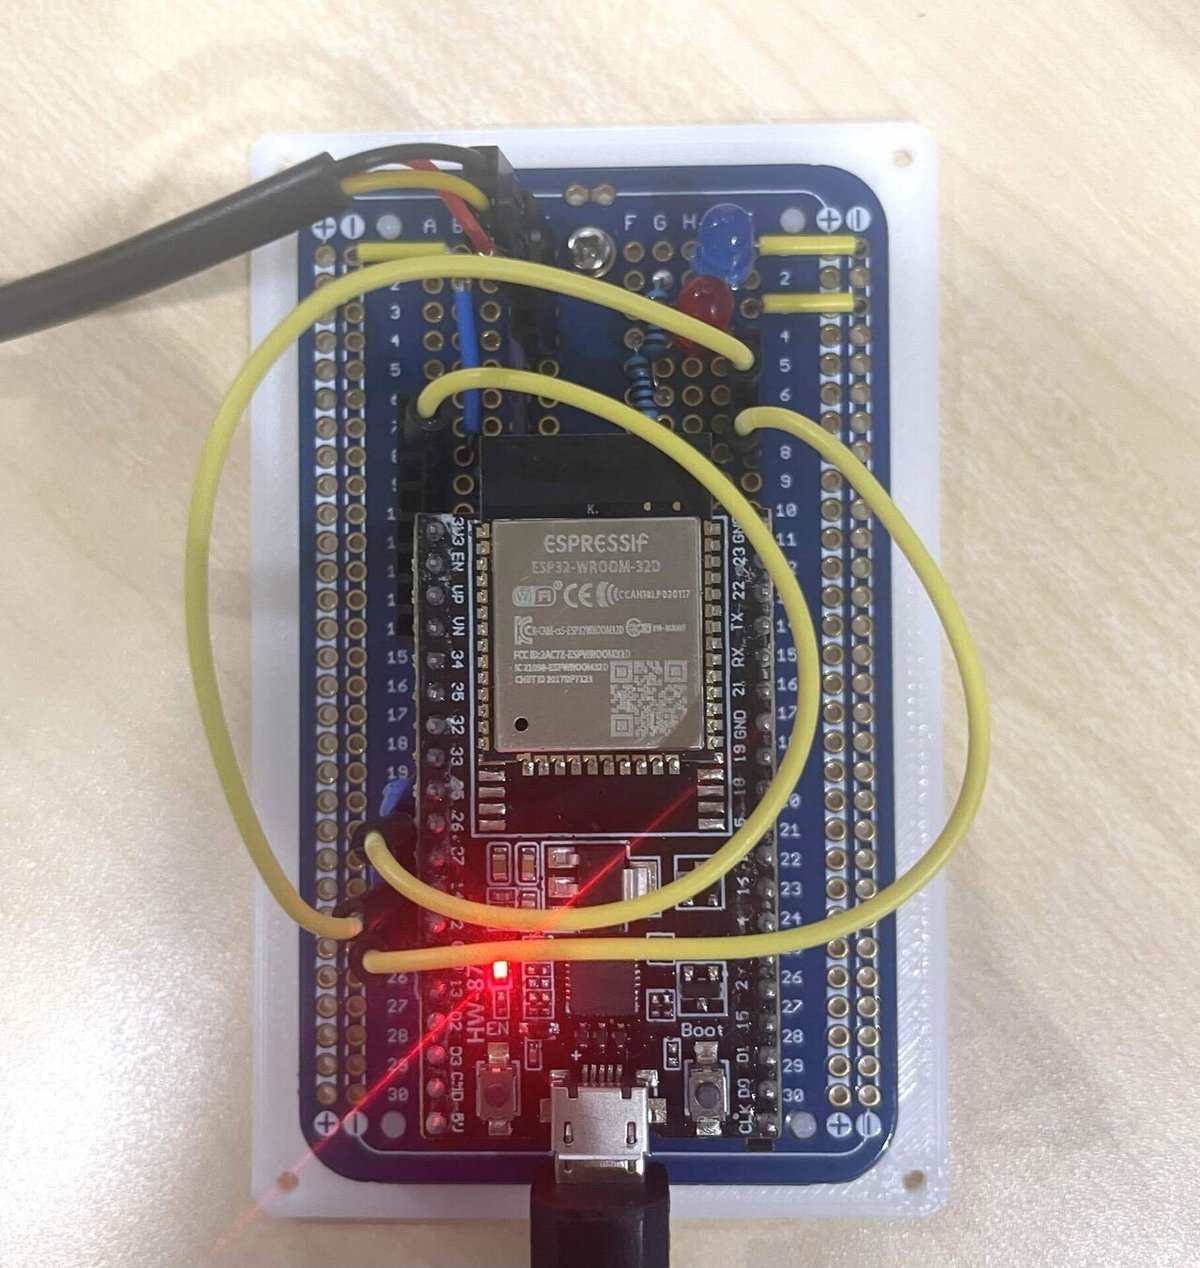
配線図は省略しますが、温度センサー、LEDそれぞれに抵抗を入れているくらいです。
LED(青・赤)
抵抗
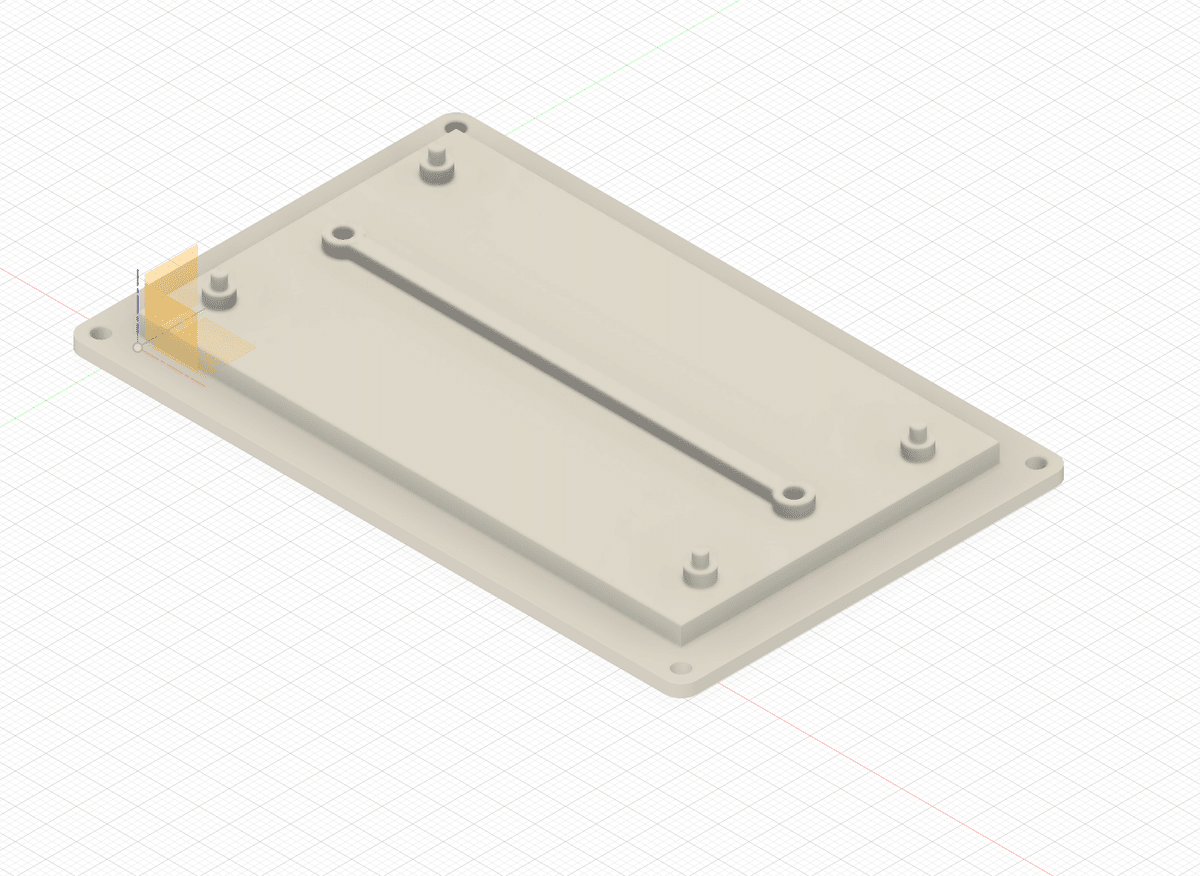
筐体(3Dプリンタ)
室内用かつ自分用なのでだいぶざっくり作ってます。カバーもつけてます。
仕組み
以下の流れで動作します。
温度センサーを繋げたESP32で温度を定期取得
Wi-Fi経由、GASを使ってSpreadSheetに記載
定期的にSpreadSheetを監視、一定以上の数値が見つかればメール送信
コード
仕様を変更しつつ出力させたので、合理性に欠ける構造です。参考まで。
MicroPython(ESP32)
通信時にLED(青)ライト点滅
エラー時にLED(赤)ライト点滅
一定温度でLED(赤)点灯
import network
import time
import uasyncio as asyncio
from machine import Pin, reset
import onewire
import ds18x20
import usocket
import urequests

# Wi-Fi接続の設定
SSID = 'XXXXXX'
PASSWORD = 'YYYYYY'

# LEDの初期化(GPIO 14 - 通常のLED、GPIO 12 - 赤LED)
led = Pin(14, Pin.OUT)
red_led = Pin(12, Pin.OUT)

async def blink_led_fast(led_pin):
    while True:
        led_pin.on()
        await asyncio.sleep(0.1)
        led_pin.off()
        await asyncio.sleep(0.1)

async def blink_led_rapid(led_pin):
    for _ in range(20):
        led_pin.on()
        await asyncio.sleep(0.05)
        led_pin.off()
        await asyncio.sleep(0.05)

def reset_wifi():
    wlan = network.WLAN(network.STA_IF)
    if wlan.isconnected():
        wlan.disconnect()
    wlan.active(False)
    time.sleep(1)  # Wi-Fiモジュールが完全にリセットされるように少し待機
    wlan.active(True)

async def connect_wifi():
    reset_wifi()  # Wi-Fi設定をリセット
    wlan = network.WLAN(network.STA_IF)
    wlan.active(True)
    wlan.connect(SSID, PASSWORD)

    # LEDを激しく点滅させるタスクを開始
    blink_task = asyncio.create_task(blink_led_fast(led))

    while not wlan.isconnected():
        print('Connecting to network...')
        await asyncio.sleep(1)

    # Wi-Fi接続が完了したら点滅タスクを停止
    blink_task.cancel()
    led.off()
    print('Network config:', wlan.ifconfig())

async def connect_wifi_with_retry():
    for _ in range(5):  # 最大5回再試行
        try:
            await connect_wifi()
            return
        except Exception as e:
            log_error(f"Wi-Fi connection failed: {e}")
            await asyncio.sleep(2)
    # Wi-Fi接続が失敗した場合、赤LEDを激しく点滅させる
    await blink_led_rapid(red_led)
    raise Exception("Failed to connect to Wi-Fi")

def is_reachable(host, port):
    try:
        addr_info = usocket.getaddrinfo(host, port)
        addr = addr_info[0][-1]
        s = usocket.socket()
        s.settimeout(5)
        s.connect(addr)
        s.close()
        return True
    except:
        return False

async def connect_internet_with_retry():
    for _ in range(5):  # 最大5回再試行
        if is_reachable('8.8.8.8', 53):  # GoogleのDNSサーバーに対して接続を試みる
            print('Internet connection established.')
            return True
        else:
            print('Internet not reachable. Retrying...')
            await asyncio.sleep(2)
    # インターネット接続が失敗した場合、赤LEDを激しく点滅させる
    await blink_led_rapid(red_led)
    return False

async def connect_wifi_and_internet_with_retry():
    await connect_wifi_with_retry()
    return await connect_internet_with_retry()

# DS18B20センサーの初期化(26番ピンを使用)
dat_pin = Pin(26)
ds_sensor = ds18x20.DS18X20(onewire.OneWire(dat_pin))
roms = ds_sensor.scan()
if not roms:
    raise Exception("No DS18B20 sensor found!")

# エラーログをファイルに書き出す関数
def log_error(message):
    try:
        with open('errors.txt', 'a') as f:
            f.write(f"{time.time()}: {message}\n")
    except Exception as e:
        print(f"Failed to log error: {e}")

# GASスクリプトのURL
gas_url = 'https://script.google.com/macros/s/XXXXXXXX/exec'

# 温度をGASスクリプトに送信するための関数
async def send_temperature(temperature):
    try:
        print(f"Sending temperature: {temperature}°C")
        led.on()  # データ送信時にLEDを点灯
        url_with_temp = f"{gas_url}?temperature={temperature}"
        print(f"Request URL: {url_with_temp}")  # デバッグ用にURLを出力
        response = urequests.get(url_with_temp)
        print(f"Response status: {response.status_code}")
        response.close()
        print("Temperature sent successfully.")
        await asyncio.sleep(5)  # LEDを5秒間点灯
        await blink_led_rapid(led)  # LEDを激しく点滅
        led.off()
    except Exception as e:
        print("Error sending temperature:", e)
        log_error(f"Error sending temperature: {e}")
        await blink_led_rapid(red_led)  # データ送信失敗時に赤LEDを激しく点滅
        led.off()

async def check_temperature():
    while True:
        try:
            print("Starting temperature check...")
            led.on()  # 温度読み取り開始時にLEDを点灯
            ds_sensor.convert_temp()
            await asyncio.sleep(1)  # 温度変換に少し時間がかかるため待機
            for rom in roms:
                temperature = ds_sensor.read_temp(rom)
                print(f"Temperature: {temperature}°C")
                led.off()  # 温度読み取り終了時にLEDを消灯

                # 温度を送信
                await send_temperature(temperature)

                # 温度が30℃を超えた場合に赤LEDを点灯
                if temperature >= 30:
                    red_led.on()
                else:
                    red_led.off()

        except Exception as e:
            print("Unexpected error in temperature check:", e)
            log_error(f"Unexpected error in temperature check: {e}")
            led.off()
            red_led.off()

        await asyncio.sleep(600)  # 10分間隔でチェック

async def restart_timer():
    try:
        await asyncio.sleep(24 * 60 * 60)  # 24時間後に再起動
        print("Rebooting...")
        reset()
    except Exception as e:
        print("Unexpected error in restart timer:", e)
        log_error(f"Unexpected error in restart timer: {e}")

# メイン関数
async def main():
    try:
        if await connect_wifi_and_internet_with_retry():  # Wi-Fiとインターネット接続
            await asyncio.gather(
                check_temperature(),
                restart_timer()
            )
    except Exception as e:
        print("Unexpected error in main:", e)
        log_error(f"Unexpected error in main: {e}")
        led.off()
        red_led.off()

# スクリプトの実行
try:
    asyncio.run(main())
except Exception as e:
    print("Error running main function:", e)
    log_error(f"Error running main function: {e}")
    led.off()
    red_led.off()
Javascript(GAS)
このように、時間、温度、通知済みか否かを入力したスプレッドシートを制御します。

何度も通知させないよう、チェック時にまとめて該当する測定を通知
何度もメールが来ないよう、前回の送信から時間を空ける
トリガー設定で定期実行
// スプレッドシートのID
const SPREADSHEET_ID = 'スプレッドシートID'; // ここにスプレッドシートIDを入力

// 温度が30以上になったときに通知するメールアドレス
const RECIPIENT_EMAIL = 'example@example.com'; // ここに通知先のメールアドレスを入力

// 最後の送信時刻を記録するためのプロパティ
const SCRIPT_PROPERTIES = PropertiesService.getScriptProperties();
const LAST_EMAIL_TIME_KEY = 'lastEmailTime';

function checkTemperatureAndSendEmail() {
  const sheet = SpreadsheetApp.openById(SPREADSHEET_ID).getActiveSheet();
  const data = sheet.getDataRange().getValues();
  const header = data[0];
  const temperatureIndex = header.indexOf('temperature');
  const notifiedIndex = header.indexOf('notified');

  if (temperatureIndex === -1 || notifiedIndex === -1) {
    Logger.log('温度列または通知済み列が見つかりません。');
    return;
  }

  let emailBody = '以下の温度記録が30°Cを超えました:\n\n';
  let shouldSendEmail = false;

  // 現在の時刻を取得
  const now = new Date();
  const lastEmailTime = new Date(SCRIPT_PROPERTIES.getProperty(LAST_EMAIL_TIME_KEY));

  for (let i = 1; i < data.length; i++) {
    const row = data[i];
    const temperature = row[temperatureIndex];
    const notified = row[notifiedIndex];

    if (temperature >= 30 && !notified) {
      const timestamp = row[0]; // timestamp列は最初の列にあると仮定
      emailBody += `時刻: ${timestamp}, 温度: ${temperature}°C\n`;
      shouldSendEmail = true;
    }
  }

  // 8時間以上経過している場合にのみメール送信
  if (shouldSendEmail && (!lastEmailTime || (now - lastEmailTime) >= 8 * 60 * 60 * 1000)) {
    sendEmailNotification(emailBody);
    SCRIPT_PROPERTIES.setProperty(LAST_EMAIL_TIME_KEY, now.toISOString());
    // メール送信後に通知済みフラグを設定
    for (let i = 1; i < data.length; i++) {
      const row = data[i];
      const temperature = row[temperatureIndex];
      if (temperature >= 30 && !row[notifiedIndex]) {
        sheet.getRange(i + 1, notifiedIndex + 1).setValue(true);
      }
    }
  }
}

function sendEmailNotification(emailBody) {
  const subject = '温度警告: 高温検出';
  MailApp.sendEmail(RECIPIENT_EMAIL, subject, emailBody);
}

function deleteOldData() {
  const sheet = SpreadsheetApp.openById(SPREADSHEET_ID).getActiveSheet();
  const data = sheet.getDataRange().getValues();
  const today = new Date();
  today.setHours(0, 0, 0, 0); // 今日の日付のみを取得

  // timestamp 列のインデックスを取得
  const timestampIndex = data[0].indexOf('timestamp');

  for (let i = data.length - 1; i > 0; i--) {
    const row = data[i];
    const timestamp = new Date(row[timestampIndex]); // タイムスタンプ列は最初の列にあると仮定
    if (timestamp < today) {
      sheet.deleteRow(i + 1); // 行インデックスは1から始まるため、+1する
    }
  }
}

// トリガーを設定する関数
function createTimeDrivenTriggers() {
  // 既存のトリガーをすべて削除
  const triggers = ScriptApp.getProjectTriggers();
  for (let i = 0; i < triggers.length; i++) {
    ScriptApp.deleteTrigger(triggers[i]);
  }

  // 30分ごとに実行されるトリガーを作成
  ScriptApp.newTrigger('runDailyTasks')
           .timeBased()
           .everyMinutes(30)
           .create();
}

// データ削除と温度チェックのタスクをまとめた関数
function runDailyTasks() {
  deleteOldData();
  checkTemperatureAndSendEmail();
}
手順スプレッドシートの設定:
タイムスタンプのあるデータ列に「timestamp」という列ヘッダーを追加します。
「notified」列を追加します。列ヘッダーに「notified」と入力します。
Google Apps Script の設定:
スクリプトエディタを開き、上記のスクリプトを貼り付けます。
SPREADSHEET_ID と RECIPIENT_EMAIL を設定します。
トリガーの設定:
createTimeDrivenTriggers 関数を手動で実行してトリガーを設定します。
スクリプトの説明
checkTemperatureAndSendEmail: スプレッドシートの温度データを確認し、温度が30以上で通知が送信されていないレコードに対して、まとめてメールを送信します。最後のメール送信から8時間経過している場合にのみ送信します。
sendEmailNotification: まとめて作成されたメール本文を送信します。
deleteOldData: 昨日以前のデータをスプレッドシートから削除します。
createTimeDrivenTriggers: 30分ごとに runDailyTasks 関数を実行するトリガーを作成します。
runDailyTasks: 古いデータを削除し、温度をチェックしてメールを送信するタスクをまとめて実行します。
参考
以上、参考まで。
この記事が気に入ったらサポートをしてみませんか?