
詳細・編集機能 #WebアプリケーショのUIパターン #Laravelの教科書

この記事はWebアプリケーションのUIパターンについて解説しています。その他のUIパターンについてはこちらのマガジンからどうぞ。
# はじめに
UIがパターンの一つ、詳細・編集のパターンについて解説します。
前提として作成パターンが必要となります。作成パターンについて書かれた記事はこちらです。
作成パターンで「レシピ情報モデル(Recipe)」を作成しています。こちらを利用します。
app/Models/Recipe.php
<?php
namespace App\Models;
use Illuminate\Database\Eloquent\Factories\HasFactory;
use Illuminate\Database\Eloquent\Model;
class Recipe extends Model
{
	use HasFactory;

	protected $table = "user_recipe";

	protected $fillable = ['name', 'url', 'description', 'user_id'];
}
作成機能で登録されたレシピの詳細機能、編集機能を作りながら詳細・編集パターンについて解説していきます。
別記事でも説明していますが、Laravelの機能は次の流れで開発を行います。
1. 作成機能のControllerの作成
2. 作成機能のViewの作成
3. ルーティングの設定
# 詳細・編集パターン
登録したデータを編集する機能は一度作成したデータを編集する必要のある場合に発生します。TwitterなどのSNSアプリでは投稿したものを再編集できないものが多いですが、一般的なWebアプリケーションでは登場する機能です。
画面遷移については一覧画面からの誘導であったり、作成後に詳細に遷移する場合があります。
詳細と編集ですが、Controllerでは次の処理が共通で発生します。
・URLに識別子(一般的にはID)が含まれる
・データを1件取り出す(無い場合はエラー)
・Viewで取り出したデータを表示する
詳細機能では表示のみですが、編集の機能では作成機能と同じ「フォームの遷移先」の処理が追加されます。
# 設計
次のような機能を作成していきます。
■ 詳細機能
URL: /recipe/{id}
・URLにIDを指定する
・詳細画面に「編集ボタン」を表示(押したら編集機能
・Controller: RecipeController@show
■ 編集機能
URL: /recipe/edit/{id}
・URLにIDを指定する
・Controller: RecipeController@form
■ フォームの遷移先
URL: /recipe/edit/{id}
・URLにIDを指定する
・Controller: RecipeController@update
今回は詳細・編集機能を同じControllerで行いましたが、別にすることも考えられます。
分けるか共通にするかの基準は「処理が長くなるか」という点です。
詳細画面、編集画面のコードは値を渡すだけで短いため、今回は同じControllerで作成していきます。
# Controllerの作成
詳細・編集機能のためのRecipeControllerを作成します。
今回はmake:controllerコマンドを使って「RecipeController」を作成します。
php artisan make:controller RecipeController
RecipeControllerには次の3個の関数を用意します。
・詳細画面:show
・編集画面:form
・編集画面の遷移先:update
app/Http/Controllers/RecipeController.php
<?php
namespace App\Http\Controllers;
use Illuminate\Http\Request;
/* 認証を使う */
use Auth;
/* 必要なモデルをuseする */
use App\Models\Recipe;
class RecipeController extends Controller
{
/**
* バリデーションのルール
*/
protected $validationRules = [
"name" => ["required", "string"],
"url" => ["nullable", "url"],
"description" => ["nullable","string"]
];
function __construct(){
$this->middleware('auth');
}
function show(Request $request, $id){
$recipe = Recipe::find($id);
if(!$recipe){
return back()->withError("このレシピは編集できません");
}
return view("recipe.recipe_detail",["recipe" => $recipe]);
}
function form(Request $request, $id){
$recipe = Recipe::find($id);
if(!$recipe){
return back()->withError("このレシピは編集できません");
}
//自分以外を編集
if(false == $this->isEditable($recipe)){
return back()->withError("このレシピは編集できません");
}
return view("recipe.recipe_edit_form",["recipe" => $recipe]);
}
function update(Request $request, $id){
$recipe = Recipe::find($id);
if(!$recipe){
return back()->withError("このレシピは編集できません");
}
//自分以外を編集
if(false == $this->isEditable($recipe)){
return back()->withError("このレシピは編集できません");
}
//入力値の受け取り
$validatedData = $request->validate($this->validationRules);
//更新
$recipe->update($validatedData);
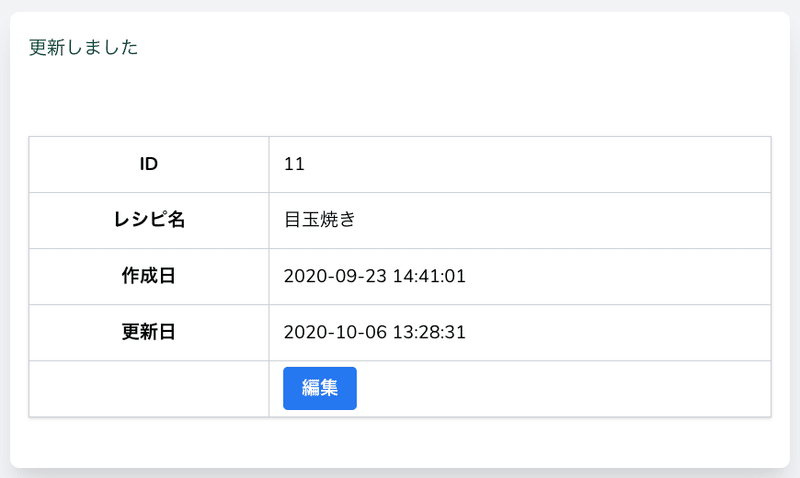
return redirect()->action(__CLASS__ . "@show",[
"id" => $id
])->withStatus("更新しました");
}
/**
* 編集可能かどうか
*/
private function isEditable(Recipe $recipe) : bool{
return $recipe->user_id == Auth::id();
}
}詳細・編集パターンのControllerの役割はこの3つです。
・データを1件取り出す(無い場合はエラー)
・Viewで取り出したデータを表示する
・フォームから値を受け取ってデータを更新する
データの取り出しはModelの機能を使います。
$recipe = Recipe::find($id);
if(!$recipe){
	return back()->withError("このレシピは編集できません");
}「Recipe::find($id)」で指定したIDのデータを取出すことができます。IDがおかしいまたは不正なIDを指定される場合があります。その場合は前の画面に戻る処理を入れています。
back()->withError("エラー文言")この処理は「前の画面に戻る+エラー文言指定」というよく使うパターンなので覚えておくと良いです。
Viewへ値を渡す方法は詳細画面、編集画面どちらも共通です。
return view("recipe.recipe_detail",["recipe" => $recipe]);
return view("recipe.recipe_edit_form",["recipe" => $recipe]);
つまり、詳細画面と編集画面はほとんど同じ処理で作ることが出来る、ということです。
編集画面のみ、編集可能かどうかを判断する機能が追加されています。
//自分以外を編集
if(false == $this->isEditable($recipe)){
	return back()->withError("このレシピは編集できません");
}
編集可能かどうかの判定は編集フォームの遷移先でも共通で使うため、関数としてわけてあります。
/**
* 編集可能かどうか
*/
private function isEditable(Recipe $recipe) : bool{
	return $recipe->user_id == Auth::id();
}
取出したRecipeのユーザーIDが自分と同じかどうかを比較しています。一致していればtrue = 編集可能です。
関数にわけず、次のように書いても良いです。
//自分以外を編集
if($recipe->user_id != Auth::id()){
	return back()->withError("このレシピは編集できません");
}
編集画面からの遷移先、更新処理は詳細・編集画面の処理に作成機能を混ぜたような作りになっています。
更新処理について詳しく見ると、次のような流れで行っています。
1. データを1件取り出す(編集画面と同じ👌)
2. 編集可能か判定する(編集画面と同じ👌)
3. フォームの値を受け取る(作成機能と同じ💯)
4. バリデーションを行う(作成機能と同じ💯)
5. フォームの値をモデルに登録して保存する
6. 詳細画面に遷移する
バリデーションの実行は作成画面と要素が同じなので、作成用のControllerからそのままコピーしてきました。
フォームの値をモデルに登録する部分ですが、次のように書いています。
//更新
$recipe->update($validatedData);
どの要素が更新されるかどうかはRecipeクラスの「protected $fillable」で指定しています。
class Recipe extends Model {
   ...

   protected $fillable = ['name', 'url', 'description', 'user_id'];
}
update()関数でname, url, description, user_idの値を更新して保存してくれます。値が無い場合はそのまま使うため、バリデーションによってuser_idが書き換わらないようにしています。
このように$fillableとバリデーションを組み合わせることで安心してデータを更新することができます。
これを個別に書くと次のようなコードになります。
$recipe->name = $validatedData["name"];
$recipe->url = $validatedData["url"];
$recipe->description = $validatedData["description"];
$recipe->save();
こちらの方が何を更新しているのかわかるため、優れているコードに思えます。
それでは、update()と$fillableを使うメリットとは何でしょうか?
メリットは今後仕様の変更が発生した時にわかります。
例えばレシピに今後「カロリー」が追加されたとします。そうすると単純に次のようなタスクが発生します。
・マイグレーションの作成と実行
・作成画面のテンプレートの修正
・作成機能のバリデーションの修正
・作成機能の作成処理の修正
・更新画面のテンプレートの修正
・更新機能のバリデーションの修正
・更新機能の作成処理の修正
update()と$fillableを利用していた場合カロリーは自動的に$fillableで指定して更新されるため「作成機能の作成処理の修正」と「更新機能の作成処理の修正」が不要になります。
システムが複雑になっていけばいくほど修正箇所が減るということになります。
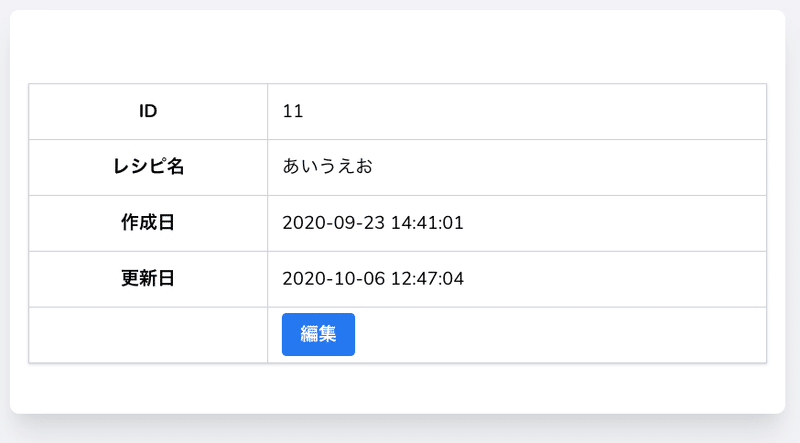
# 詳細画面: Viewの作成
詳細画面のViewは一覧画面をコピーして作るのが早いです。見出しがヘッダーに表示されているテーブルを行ごとに見出し、値で左右に並べるだけで詳細画面の完了です。
resources/views/recipe/recipe_detail.blade.php
<x-app-layout>
<x-slot name="header">
<h2 class="font-semibold text-xl text-gray-800 leading-tight">
レシピ詳細
</h2>
</x-slot>
<div class="py-12">
<div class="max-w-7xl mx-auto sm:px-6 lg:px-8">
<div class="bg-white overflow-hidden shadow-xl sm:rounded-lg">
@if (session('status'))
<div class="success mt-5 px-4 text-green-900">
{{ session('status') }}
</div>
@endif
@if (session('error'))
<div class="error mt-5 px-4 text-red-900">
{{ session('error') }}
</div>
@endif
<!-- ページ固有要素 -->
<div class="mt-5 px-4 py-5">
<table class="w-full border shadow my-6">
<tbody>
<tr>
  <th class="px-3 py-3 text-center border">ID</th>
  <td class="px-3 py-3 border">{{ $recipe->id }}</td>
</tr>
<tr>
<th class="px-3 py-3 text-center border">レシピ名</th>
<td class="px-3 py-3 border">{{ $recipe->name }}</td>
</tr>
<tr>
<th class="px-3 py-3 text-center border">作成日</th>
<td class="px-3 py-3 border">{{ $recipe->created_at->format("Y-m-d H:i:s") }}</td>
</tr>
<tr>
<th class="px-3 py-3 text-center border">更新日</th>
<td class="px-3 py-3 border">{{ $recipe->updated_at->format("Y-m-d H:i:s") }}</td>
</tr>
<tr>
<th class="px-3 py-3 text-center border"> </th>
<td class="px-3 py-3 border">
<a href="{{ route('recipe_edit', ['id' => $recipe->id]) }}"
class="bg-blue-500 text-white font-bold py-2 px-4 rounded">編集</a>
</td>
</tr>
</tbody>
</table>
</div>
<!-- /ページ固有要素 ここまで -->
</div>
</div>
</div>
</x-app-layout>一覧画面の見出しと値を<tr>〜</tr>で囲んで左右に並べるだけで簡単に詳細画面が作れます。インデントが深いので若干見づらいかもしれませんが、このように各行毎に値を表示しています。
<tr>
<th class="px-3 py-3 text-center border">ID</th>
<td class="px-3 py-3 border">{{ $recipe->id }}</td>
</tr>編集へのリンクは次のように書きます。
{{ route('recipe_edit', ['id' => $recipe->id]) }}まだルーティングは設定していませんが、編集画面へのルーティングを「recipe_edit」で指定する予定です。
同じように詳細画面を「recipe_detail」で指定します。レシピ一覧画面から詳細画面に誘導を行うため、詳細ボタンを次のようにテンプレートを修正しましょう。
<a href="{{ route('recipe_detail', ['id' => $recipe->id]) }}"
	class="bg-blue-500 text-white font-bold py-2 px-4 rounded">詳細</a>
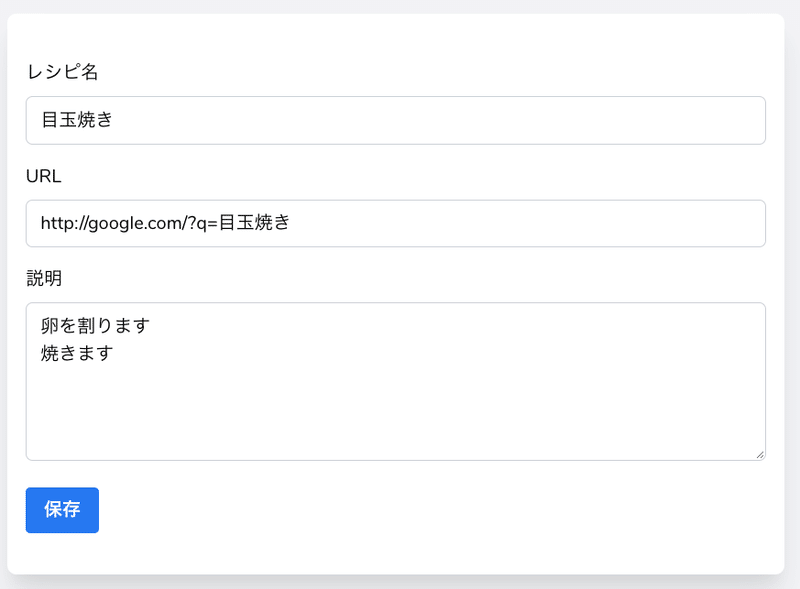
# 編集画面: Viewの作成
編集画面のViewは作成画面からコピーするのが良いでしょう。項目が変わらないのであれば作成画面との違いはわずかです。
・old()の第2引数にモデルの値を入れる
・フォームの遷移先(action)の指定を変更する
・ボタン名を「作成」から「更新」に変更する
Viewの全体は下記のような形となります。
resources/views/recipe/recipe_edit_form.blade.php
<x-app-layout>
   <x-slot name="header">
       <h2 class="font-semibold text-xl text-gray-800 leading-tight">
           レシピ変更
       </h2>
   </x-slot>
	<div class="py-12">
		<div class="max-w-7xl mx-auto sm:px-6 lg:px-8">
			<div class="bg-white overflow-hidden shadow-xl sm:rounded-lg">
				@if (session('status'))
				<div class="success mt-5 px-4 text-green-900">
					{{ session('status') }}
				</div>
				@endif
				<!-- ページ固有要素 -->
				<div class="mt-5 px-4 py-5">
					<!-- エラー表示 -->
					<form method="post" action="{{ route('update_recipe',['id' => $recipe->id]) }}">
						@csrf
						<div class="mb-4">
							<label for="recipe_name" class="block mb-2">レシピ名</label>
							<input type="text"
								id="recipe_name"
								class="form-input w-full"
								name="name"
								value="{{ old('name', $recipe->name) }}"
								placeholder="レシピ名" />
							@if ($errors->has('name'))
							<span class="error mb-4 text-red-900">{{ $errors->first('name') }}</span>
							@endif
						</div>
						<div class="mb-4">
							<label for="recipe_url" class="block mb-2">URL</label>
							<input type="text"
								id="recipe_url"
								class="form-input w-full"
								name="url"
								value="{{ old('url', $recipe->url) }}"
								placeholder="https://xxxxx" />
							@if ($errors->has('url'))
							<span class="error mb-4 text-red-900">{{ $errors->first('url') }}</span>
							@endif
						</div>
						<div class="mb-4">
							<label for="recipe_description" class="block mb-2">説明</label>
							<textarea type="text"
								id="recipe_description"
								class="form-input w-full"
								name="description"
								rows="5"
								>{{ old('description', $recipe->description) }}</textarea>
							@if ($errors->has('description'))
							<span class="error mb-4 text-red-900">{{ $errors->first('description') }}</span>
							@endif
						</div>

						<div class="mb-4 flex items-center">
							<input type="submit" value="保存" class="bg-blue-500 text-white font-bold py-2 px-4 rounded" />
						</div>
					</form>
				</div>
				<!-- /ページ固有要素 ここまで -->
			</div>
		</div>
	</div>
</x-app-layout>
作成画面のテンプレートから変更した箇所は下記です。
{{ old('name') }}
 ↓
{{ old('name', $recipe->name) }}
{{ old('url') }}
↓
{{ old('url', $recipe->url) }}{{ old('description') }}
↓
{{ old('description', $recipe->description) }}作成画面では指定していなかった第2引数に初期値としてControllerから渡している$recipeの値を入れています。たったこれだけで編集フォームを作ることができます。
フォームの遷移先も次のように更新処理に変更します。
{{ route('store_recipe') }}
↓
{{ route('update_recipe',['id' => $recipe->id]) }}
テンプレートの作成ができたら、ルーティングを設定して動作確認を行います。
# 詳細・編集機能:ルーティング
routes/web.php
/* 詳細・編集 */
Route::get('/recipe/{id}',
    [App\Http\Controllers\RecipeController::class, "show"])
	->name("recipe_detail");
Route::get('/recipe/edit/{id}',
    [App\Http\Controllers\RecipeController::class, "form"])
	->name("recipe_edit");
Route::post('/recipe/edit/{id}',
    [App\Http\Controllers\RecipeController::class, "update"])
	->name("update_recipe");
RecipeControllerのshow, form, updateそれぞれにルーティングと名前の指定を行っています。
ルーティングのポイントはURLにIDを指定する形の書き方です。
{id}で指定している部分と、詳細ページへのリンクで指定しているrouteの書き方を対応させます。
Route::get('/recipe/{id}', [...])->name("recipe_detail");
{{ route('recipe_detail', ['id' => $recipe->id]) }}
例えば{id}ではなく「{recipe_id}」を利用するとroute()の書き方を次のように変更する必要があります。
Route::get('/recipe/{recipe_id}', [...])->name("recipe_detail");
{{ route('recipe_detail', ['recipe_id' => $recipe->id]) }}
一般的に詳細画面などは{id}を使う形で良いでしょう。
# 動作確認
ブラウザで「http://localhost:8000/recipe」を開いてレシピ一覧から詳細・編集画面へと進みましょう。
作業していない場合は、レシピ一覧画面に詳細リンクを設定しておきます。
<a href="{{ route('recipe_detail', ['id' => $recipe->id]) }}"
	class="bg-blue-500 text-white font-bold py-2 px-4 rounded">詳細</a>
# まとめ
詳細・編集パターンのポイントについてまとめます。
・Controllerは1個、関数は3個(詳細・フォーム・更新処理)
・IDを指定したルーティングの書き方
・モデル名::find($id)の使い方
・詳細画面は一覧からコピーすると早い
・編集画面は作成からコピーすると早い
・old()関数の第2引数の使い方
パターンがわかっていればほとんどの機能をコピペで作ることが出来るのは他と同じです。
利用するモデル、Viewのファイル名、バリデーション、フォームの項目などコピーして書き換えることで他の編集画面も容易に作ることができます。
おつかれさまでした!
完成まで突っ走る意気込みです。サポートしていただけると非常に嬉しいです。応援よろしくお願いします。