
Androidアプリ『おりこうちょきん』開発日記 【その1】スタンプカードのマス目を作る

今回のヘッダーはサイケなトリケラトプス©長男です。
(見切れてしまうのなんとかしたい)

プロローグにて、ポイントをためるスタンプカード様のアプリを作ることに決めました。スタンプカードなのでイメージは以下のようなマス目です。
┌──┬──┬──┬──┬──┐
├──┼──┼──┼──┼──┤
├──┼──┼──┼──┼──┤
├──┼──┼──┼──┼──┤
└──┴──┴──┴──┴──┘
今回はこれを実現するまでの経緯を記録します。
ViewとViewGroupとは?
デザインを始める前に、VB出身の私がつまづいた用語について書きます。
VBでは、画面に配置するUI部品(テキストボックスやボタン等)のことを「Control」と呼びました。これがAndroidStudioでは「View」になります。これを知らないで始めたので、自動生成されるコードを読めなかったり、解説記事が理解できなかったりしました…。
また、VBではあまり意識しなかった概念として「ViewGroup」があります。Viewを配置するの土台のようなものです。とても分かりやすい解説が以下でなされています。
ViewGroup にはいくつかの種類があり、これがアプリ上のレイアウトを決定する要素となります。
●LinearLayout:縦または横に内部のビューを配置する
●TableLayout:表形式で内部のビューを配置する
●AbsoluteLayout:表示位置を絶対座標で指定して配置する
●RelativeLayout:他のビューとの位置関係を元に位置を決めて配置する
●GridLayout:内部のビューを行数と列数の格子状に分割して配置する
●FrameLayout:内部のビューを重ねて配置する(表示位置の指定はできない)
"https://androidroid.info/android/view/482/"から引用
こちらの記事が公開されたのが2014年なのでその当時は無かったのだと思いますが、2020年現在AndroidStudioのデフォルトはConstraintLayoutです。これはViewの垂直位置と水平位置を周囲のViewなどと結び付けて配置場所を決定する方式のようで、AndroidStudio初心者にはとっつきにくく、また今のところ私はそのメリットを理解できていません。今はスルー。
プロジェクトを新規作成する
まずAndroidStudioを起動して、新規プロジェクトを作成します。
最初からいろいろ部品があると何が何やら分からなくなるので「空のアクティビティー」を選択します。
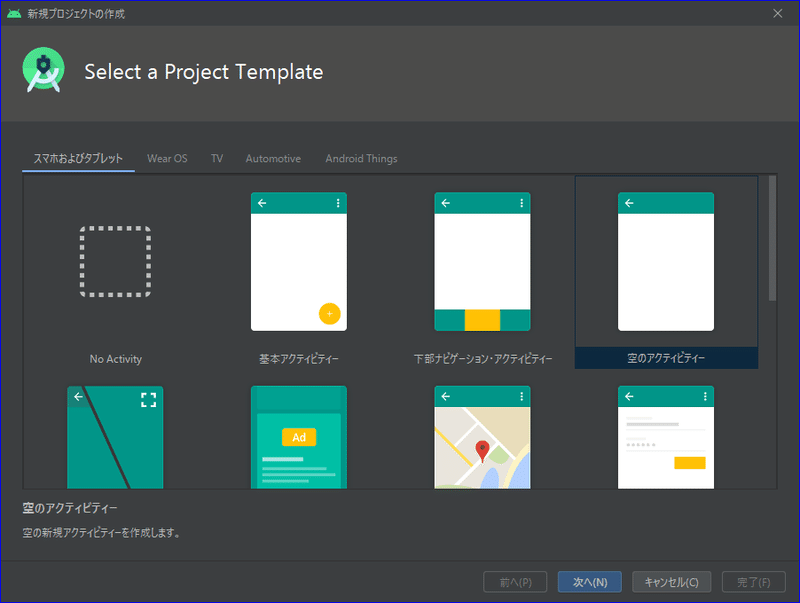
名前やパッケージ名はプレイストアに出すことを考えると重要ですが、まず自分の端末で使えればいい=APKファイルを生成できればいいので適当につけます。(APKはAndroidアプリの拡張子です。知らなかった。)
以下のサンプルイメージでは練習用環境であることを表すSandbox、メタ構文変数のhoge、fugaを使っています。

完了ボタンを押すとこうなります。▼
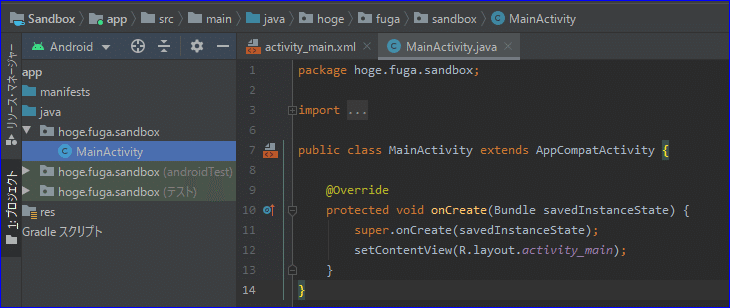
activity_main.xmlは画面デザイン、
MainActivity.javaは処理を記述するところです。
その他、AndroidStudioに関する前提知識が簡潔にまとめられた記事がこちらです。
activity_main.xmlで画面デザインをする
activity_main.xmlをデザインモードで展開するとお馴染みの「Hello World!」が中央に配置されています。
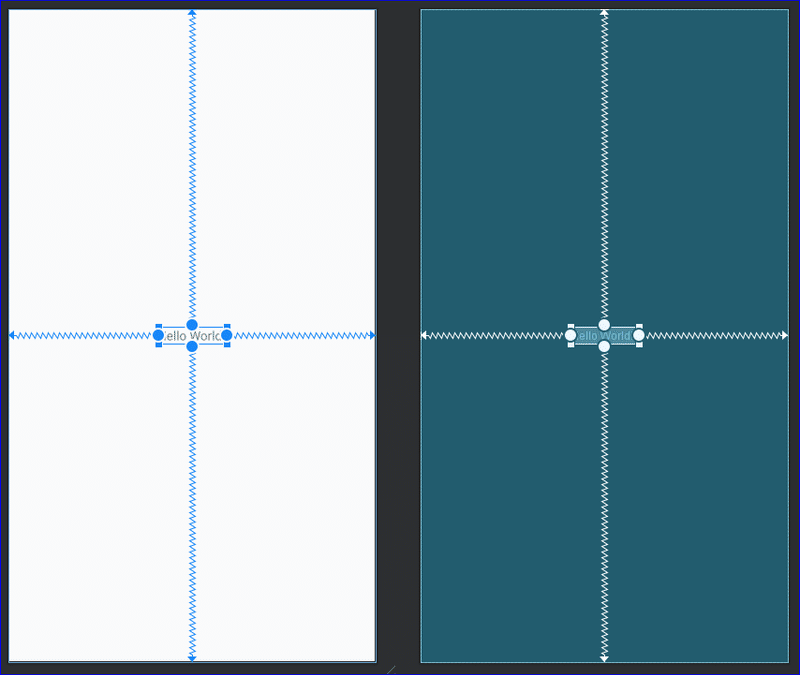
「Hello World!」からビヨビヨのびているこの線と右側の青緑はなんだ…とまず思いましたが、
●ビヨビヨは例のConstraintLayoutの座標を決定するためのもの
●画面デザインのプレビューが白(左側)なのに対し、デザインの構造を表すものが青緑(右側)
という風に暫定で理解しました。すべてをちゃんと理解しようとしたら遅々として進まない…。
ConstraintLayoutの中にTableLayoutを配置する
マス目を実現するなら適任はTableLayoutと思われるので、これを使います。
「Hello World!」は私にビヨビヨを教える役目を終えたので削除して、
パレット > Layouts > TableLayout を選択して、デフォルトのConstraintLayoutの中に配置します。

▲Gifアニメーションを再度見る場合は、
画像を右クリックして新しいタブ画像を開くなどしてください。
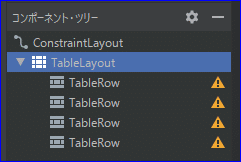
TableLayoutを配置すると画面いっぱいになりますが、スタンプを押す場所はこんなに大きくなくていいのでサイズ調整します。コンポーネント・ツリーを見ると、ConstraintLayoutの配下にTableLayoutが配置されたと分かります。ViewGroupのネストです。
ConstraintLayoutでは垂直と水平の座標位置が必要なので、四辺の中心にある◎から画面の四辺に向けてドラッグして例のビヨビヨを張ります。
TableLayoutの配下にはデフォルトでTableRowが4つ設定されています。
警告が出ているのはいろいろ設定が不足しているからで、これから設定して解消していくので気にしません。
ここまでGUIで行ったことが、コードでは以下のように記述されます。
▼activity_main.xml
<?xml version="1.0" encoding="utf-8"?>
<androidx.constraintlayout.widget.ConstraintLayout xmlns:android="http://schemas.android.com/apk/res/android"
   xmlns:app="http://schemas.android.com/apk/res-auto"
   xmlns:tools="http://schemas.android.com/tools"
   android:layout_width="match_parent"
   android:layout_height="match_parent"
   tools:context=".MainActivity">

   <TableLayout
       android:layout_width="295dp"
       android:layout_height="616dp"
       app:layout_constraintBottom_toBottomOf="parent"
       app:layout_constraintEnd_toEndOf="parent"
       app:layout_constraintStart_toStartOf="parent"
       app:layout_constraintTop_toTopOf="parent">

       <TableRow
           android:layout_width="match_parent"
           android:layout_height="match_parent" />

       <TableRow
           android:layout_width="match_parent"
           android:layout_height="match_parent" />

       <TableRow
           android:layout_width="match_parent"
           android:layout_height="match_parent" />

       <TableRow
           android:layout_width="match_parent"
           android:layout_height="match_parent" />
   </TableLayout>
</androidx.constraintlayout.widget.ConstraintLayout>
TableLayoutの配下にTableRowが4つあるというのは、テーブルが行を4つ保持しているということです。(書いてみるとそのまんまだ。)
つまり、ここ ↓ まできました。
┌──────────────┐
├──────────────┤
├──────────────┤
├──────────────┤
└──────────────┘
TableRowの中に要素(ImageButton)を配置する
次は列を追加したいところですが、TableColmunなどというものは存在しないので、この行の中にImageButtonを並べてマス目にしていきます。
なぜImageButtonを採用したかというと、ボタンをクリックしたらボタンのイメージが変わるように実装したら、スタンプを押しているように見えるのではと考えたからです。
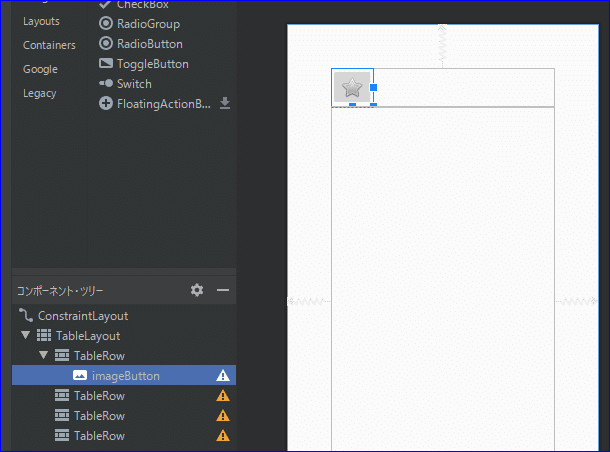
パレット > Buttons > ImageButton を1行目のTableRow配下にドラッグします。
すると「リソースの選択」ダイアログが起動します。この中から、ボタンのイメージを選択します。
スタンプを押す前は灰色の☆、押したら黄色の☆になるようにしたいので「btn_star_big_off」を選択します。

これで☆ボタンが配置されました。
この☆ボタンを行ごとに並べていけば、マス目を実現できそうです。
毎回ドラッグしてリソースを選択して…というのは手間なので、今度はコードで記述していきます。
▼activity_main.xmlから抜粋
    <TableLayout
       android:layout_width="295dp"
       android:layout_height="616dp"
       app:layout_constraintBottom_toBottomOf="parent"
       app:layout_constraintEnd_toEndOf="parent"
       app:layout_constraintStart_toStartOf="parent"
       app:layout_constraintTop_toTopOf="parent">

       <TableRow
           android:layout_width="match_parent"
           android:layout_height="match_parent" >

           <ImageButton
               android:id="@+id/imageButton"
               android:layout_width="wrap_content"
               android:layout_height="wrap_content"
               app:srcCompat="@android:drawable/btn_star_big_off" />
       </TableRow>

       <TableRow
           android:layout_width="match_parent"
           android:layout_height="match_parent" />

       <TableRow
           android:layout_width="match_parent"
           android:layout_height="match_parent" />

       <TableRow
           android:layout_width="match_parent"
           android:layout_height="match_parent" />
   </TableLayout>
1行目のTableRow配下に、先ほどGUIでドラッグして作ったImageButtonが記述されています。これをコピーして貼り付けていきます。
▼activity_main.xmlから1行目のTableRowのみ抜粋
        <TableRow
           android:layout_width="match_parent"
           android:layout_height="match_parent" >

           <ImageButton
               android:id="@+id/imageButton"
               android:layout_width="wrap_content"
               android:layout_height="wrap_content"
               app:srcCompat="@android:drawable/btn_star_big_off" />

           <ImageButton
               android:id="@+id/imageButton2"
               android:layout_width="wrap_content"
               android:layout_height="wrap_content"
               app:srcCompat="@android:drawable/btn_star_big_off" />

           <ImageButton
               android:id="@+id/imageButton3"
               android:layout_width="wrap_content"
               android:layout_height="wrap_content"
               app:srcCompat="@android:drawable/btn_star_big_off" />

           <ImageButton
               android:id="@+id/imageButton4"
               android:layout_width="wrap_content"
               android:layout_height="wrap_content"
               app:srcCompat="@android:drawable/btn_star_big_off" />

           <ImageButton
               android:id="@+id/imageButton5"
               android:layout_width="wrap_content"
               android:layout_height="wrap_content"
               app:srcCompat="@android:drawable/btn_star_big_off" />
       </TableRow>
View(ここではImageButton)のIDが同一だとエラーになってしまうので、「android:id」の部分は番号を振ってひとつずつ変えていきます。
これをデザイン画面で確認すると…

おお!いいかんじ!
右端がちょっと余っているのが気になりますが、ボタンを均等割り付けする方法はまた今度考えます。
同じように、全てのTableRowにボタンを配置していきます。
▼activity_main.xml (長いです)
<?xml version="1.0" encoding="utf-8"?>
<androidx.constraintlayout.widget.ConstraintLayout xmlns:android="http://schemas.android.com/apk/res/android"
   xmlns:app="http://schemas.android.com/apk/res-auto"
   xmlns:tools="http://schemas.android.com/tools"
   android:layout_width="match_parent"
   android:layout_height="match_parent"
   tools:context=".MainActivity">

   <TableLayout
       android:layout_width="295dp"
       android:layout_height="616dp"
       app:layout_constraintBottom_toBottomOf="parent"
       app:layout_constraintEnd_toEndOf="parent"
       app:layout_constraintStart_toStartOf="parent"
       app:layout_constraintTop_toTopOf="parent">

       <TableRow
           android:layout_width="match_parent"
           android:layout_height="match_parent" >

           <ImageButton
               android:id="@+id/imageButton"
               android:layout_width="wrap_content"
               android:layout_height="wrap_content"
               app:srcCompat="@android:drawable/btn_star_big_off" />

           <ImageButton
               android:id="@+id/imageButton2"
               android:layout_width="wrap_content"
               android:layout_height="wrap_content"
               app:srcCompat="@android:drawable/btn_star_big_off" />

           <ImageButton
               android:id="@+id/imageButton3"
               android:layout_width="wrap_content"
               android:layout_height="wrap_content"
               app:srcCompat="@android:drawable/btn_star_big_off" />

           <ImageButton
               android:id="@+id/imageButton4"
               android:layout_width="wrap_content"
               android:layout_height="wrap_content"
               app:srcCompat="@android:drawable/btn_star_big_off" />

           <ImageButton
               android:id="@+id/imageButton5"
               android:layout_width="wrap_content"
               android:layout_height="wrap_content"
               app:srcCompat="@android:drawable/btn_star_big_off" />
       </TableRow>

       <TableRow
           android:layout_width="match_parent"
           android:layout_height="match_parent" >

           <ImageButton
               android:id="@+id/imageButton6"
               android:layout_width="wrap_content"
               android:layout_height="wrap_content"
               app:srcCompat="@android:drawable/btn_star_big_off" />

           <ImageButton
               android:id="@+id/imageButton7"
               android:layout_width="wrap_content"
               android:layout_height="wrap_content"
               app:srcCompat="@android:drawable/btn_star_big_off" />

           <ImageButton
               android:id="@+id/imageButton8"
               android:layout_width="wrap_content"
               android:layout_height="wrap_content"
               app:srcCompat="@android:drawable/btn_star_big_off" />

           <ImageButton
               android:id="@+id/imageButton9"
               android:layout_width="wrap_content"
               android:layout_height="wrap_content"
               app:srcCompat="@android:drawable/btn_star_big_off" />

           <ImageButton
               android:id="@+id/imageButton10"
               android:layout_width="wrap_content"
               android:layout_height="wrap_content"
               app:srcCompat="@android:drawable/btn_star_big_off" />
       </TableRow>

       <TableRow
           android:layout_width="match_parent"
           android:layout_height="match_parent" >

           <ImageButton
               android:id="@+id/imageButton11"
               android:layout_width="wrap_content"
               android:layout_height="wrap_content"
               app:srcCompat="@android:drawable/btn_star_big_off" />

           <ImageButton
               android:id="@+id/imageButton12"
               android:layout_width="wrap_content"
               android:layout_height="wrap_content"
               app:srcCompat="@android:drawable/btn_star_big_off" />

           <ImageButton
               android:id="@+id/imageButton13"
               android:layout_width="wrap_content"
               android:layout_height="wrap_content"
               app:srcCompat="@android:drawable/btn_star_big_off" />

           <ImageButton
               android:id="@+id/imageButton14"
               android:layout_width="wrap_content"
               android:layout_height="wrap_content"
               app:srcCompat="@android:drawable/btn_star_big_off" />

           <ImageButton
               android:id="@+id/imageButton15"
               android:layout_width="wrap_content"
               android:layout_height="wrap_content"
               app:srcCompat="@android:drawable/btn_star_big_off" />
       </TableRow>

       <TableRow
           android:layout_width="match_parent"
           android:layout_height="match_parent" >

           <ImageButton
               android:id="@+id/imageButton16"
               android:layout_width="wrap_content"
               android:layout_height="wrap_content"
               app:srcCompat="@android:drawable/btn_star_big_off" />

           <ImageButton
               android:id="@+id/imageButton17"
               android:layout_width="wrap_content"
               android:layout_height="wrap_content"
               app:srcCompat="@android:drawable/btn_star_big_off" />

           <ImageButton
               android:id="@+id/imageButton18"
               android:layout_width="wrap_content"
               android:layout_height="wrap_content"
               app:srcCompat="@android:drawable/btn_star_big_off" />

           <ImageButton
               android:id="@+id/imageButton19"
               android:layout_width="wrap_content"
               android:layout_height="wrap_content"
               app:srcCompat="@android:drawable/btn_star_big_off" />

           <ImageButton
               android:id="@+id/imageButton20"
               android:layout_width="wrap_content"
               android:layout_height="wrap_content"
               app:srcCompat="@android:drawable/btn_star_big_off" />
       </TableRow>
   </TableLayout>
</androidx.constraintlayout.widget.ConstraintLayout>
▼これで5列x4行のマス目ができました。
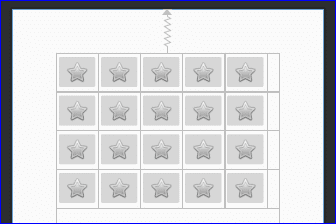
こういった、同じボタンをたくさん配置するような場合、「動的に生成したい」と思うのがプログラマの常です(?)が、動的にやるなら静的なやり方をまずは知らなければならない、ということで地道にやっていきます。
次回はこれらのボタンにクリックイベントを実装していきます。
👈To Be Continued…
この記事が気に入ったらサポートをしてみませんか?